
Step 6: The security object (OpenAPI tutorial)
Swagger UI provides a “Try it out” feature that lets users submit actual requests. To submit requests that are authorized by your API server, the spec must contain security information that will authorize the request. The security object specifies the security or authorization protocol used when submitting requests.
- Which security scheme?
- API key authorization
- Security object
- Referencing the security scheme in components
- View the Appearance in Swagger UI
- Test out how authorization works
Which security scheme?
REST APIs can use different security approaches to authorize requests. I explored the most common authorization methods in Authentication and authorization requirements. Swagger UI supports four authorization schemes:
- API key
- HTTP
- OAuth 2.0
- Open ID Connect
In this step of the OpenAPI tutorial, we’ll use the API key approach, since this is what the OpenWeatherMap API uses. If your API uses OAuth 2.0 or another method, you’ll need to read the Security Scheme information for details on how to configure it. However, all the security methods mostly follow the same pattern.
API key authorization
The sample OpenWeatherMap API we’re using in this course uses an API key passed in the URL’s query string (rather than in the header). If you submit a request without the API key in the query string (or without a valid API key), the server denies the request. For details on the OpenWeatherMap’s authorization model, see How to start.
Security object
At the root level of your OpenAPI document, add a security object that defines the global method for the API’s security:
security:
- app_id: []
app_id is the arbitrary name we gave to this security scheme in our securitySchemes object. We could have named it anything. We’ll define app_id in components.
All paths will use the app_id security method by default unless it’s overridden by a value at the path object level. For example, at the path level, we could overwrite the global security method as follows:
/current:
  get:
    ...
    security:
    - some_other_key: []
Then the weather path would use the some_other_key security method, while all other paths would use the globally declared security, app_id.
If you get stuck, see the sample OpenAPI spec here for the fully working sample. This will help you spot and troubleshoot indentation or other errors.
Referencing the security scheme in components
In the components object, add a securitySchemes object that defines details about the security scheme the API uses:
components:
  ...

  securitySchemes:
    app_id:
      type: apiKey
      description: API key to authorize requests.
      name: appid
      in: query
Properties you can use for each item in the securitySchemes object include the following:
type: The authorization protocol —apiKey,http,oauth2, oropenIdConnect.description: A description of your security method. In Swagger UI, this description appears in the Authorization modal (see the screenshot below). CommonMark Markdown is allowed.name: The name of the header value submitted in the request. Used only forapiKeytype security.in: Specifies where the security key is applied. Options arequery,headerorcookie. Used only forapiKeytype security.scheme. Used withhttptype authorization.bearerFormat. Used withhttptype authorization.flows(object): Used withoauth2type authorization.openIdConnectUrl: Used withopenIdConnecttype authorization.
View the Appearance in Swagger UI
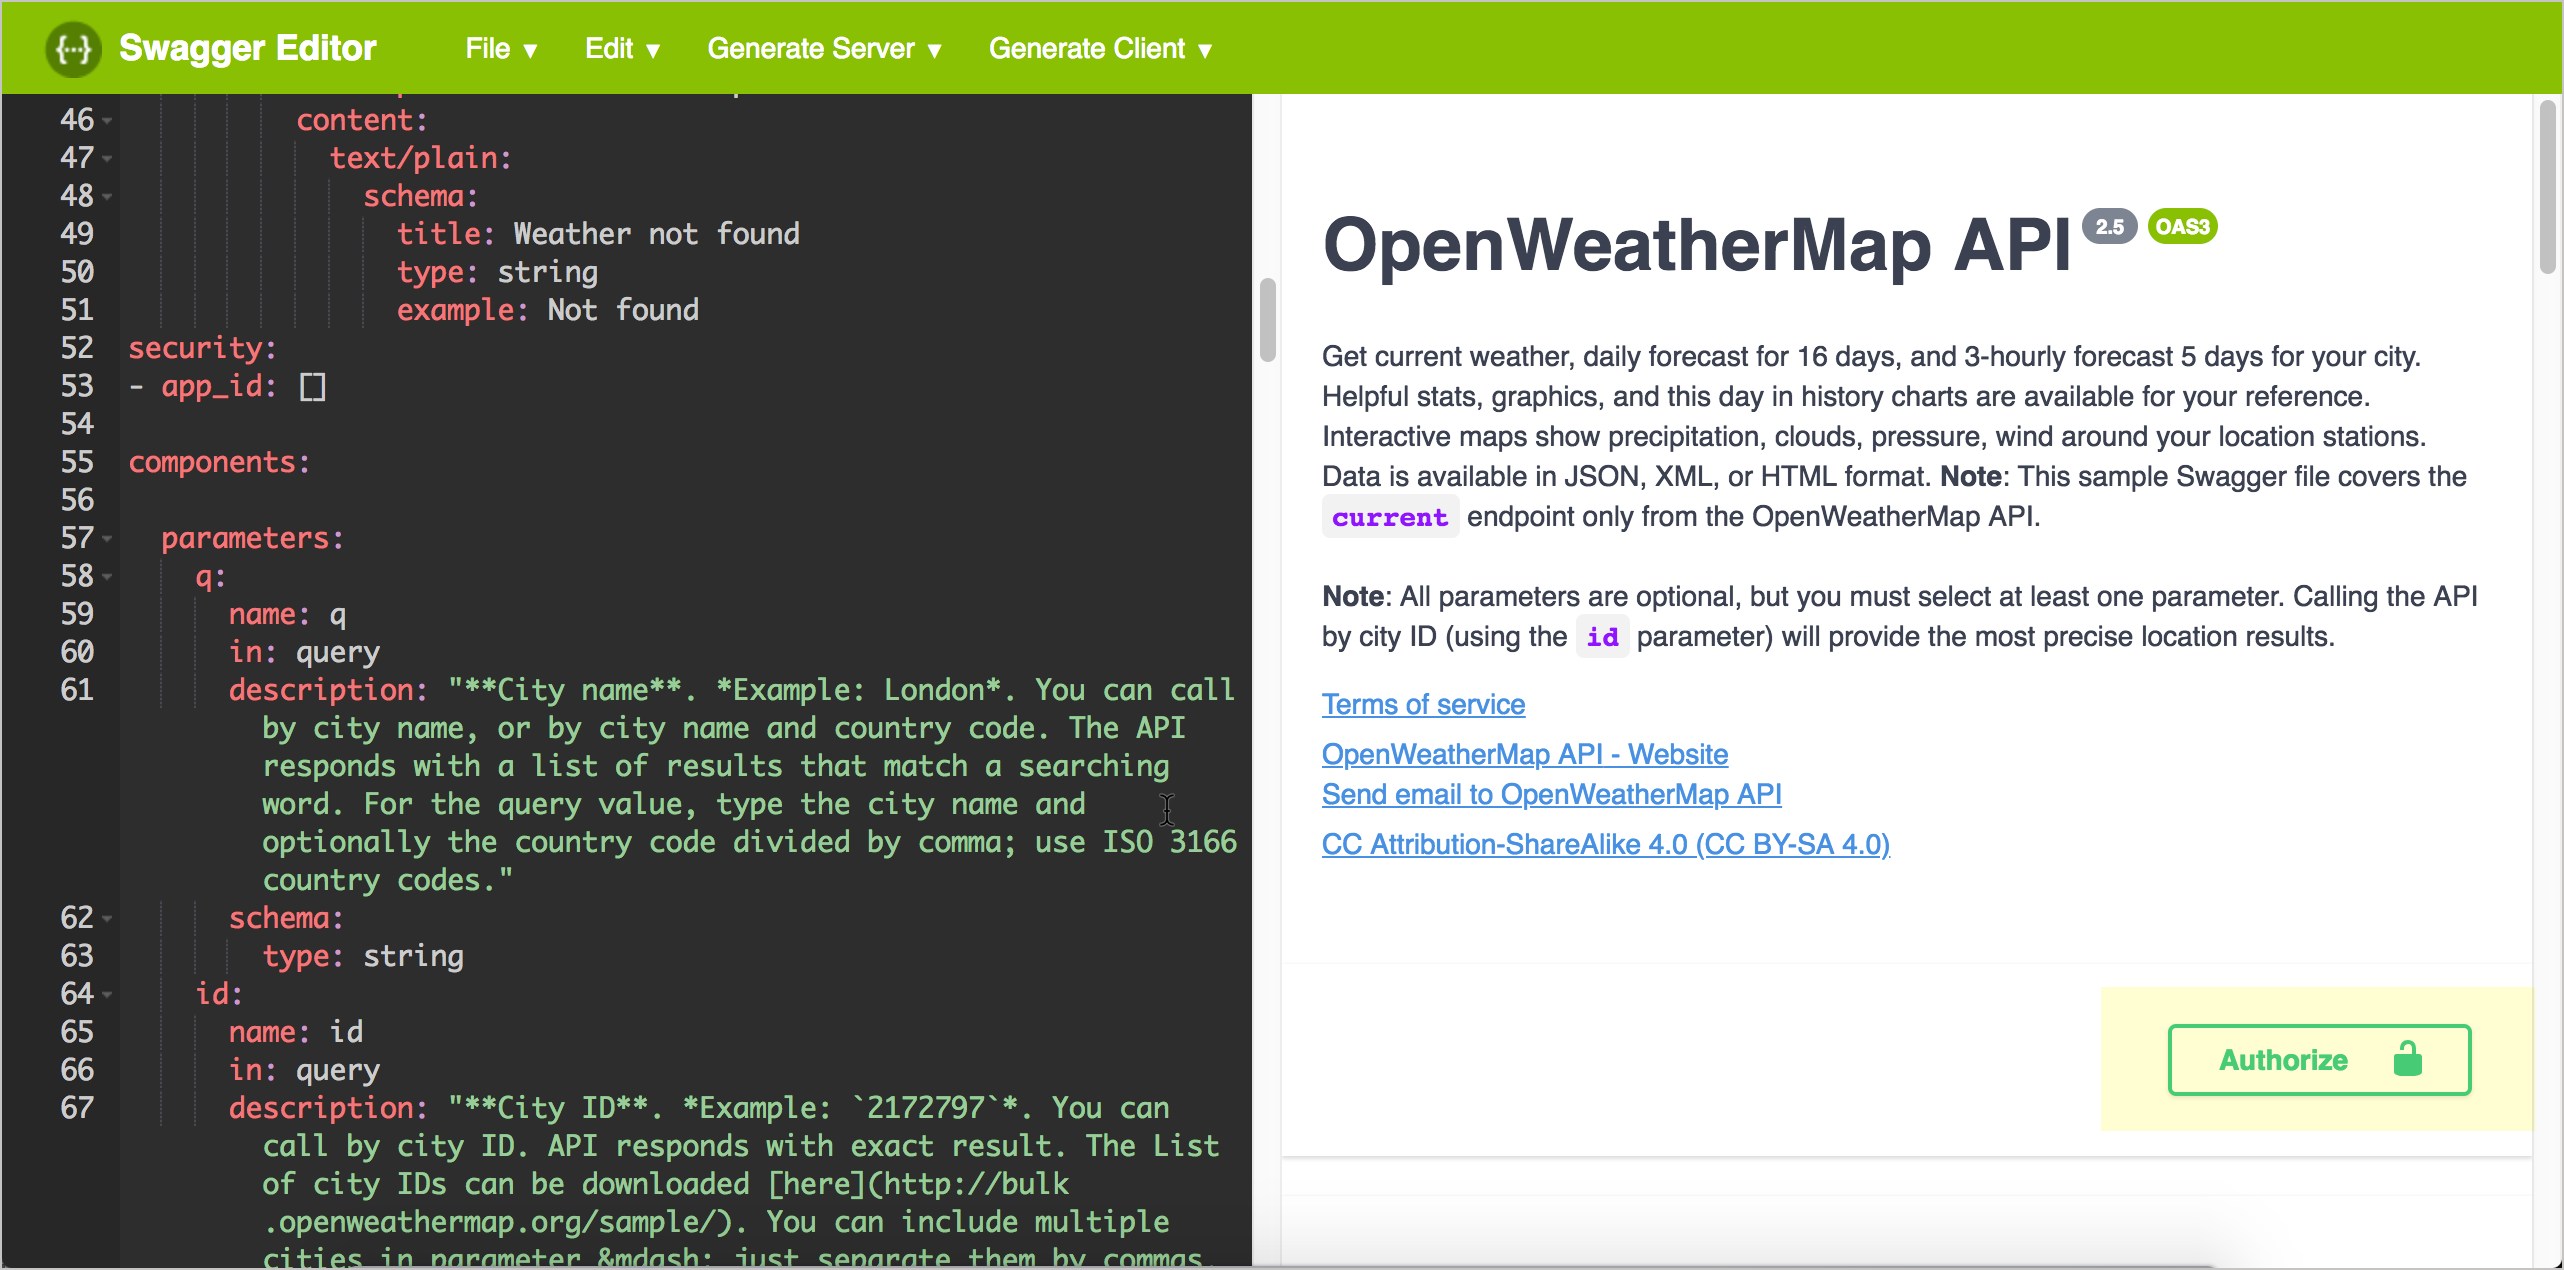
In Swagger Editor, if you haven’t already done so, insert the security object at the root level:
security:
- app_id: []
And insert the securitySchemes object into components (indented at the same level as parameters and responses):
components:
  parameters:
  ...
  responses:
  ...

  securitySchemes:
    app_id:
      type: apiKey
      description: API key to authorize requests.
      name: appid
      in: query
Then check out the Swagger UI display. You’ll see an “Authorize” button appear.
When you click Authorize, the description and other security details appear:
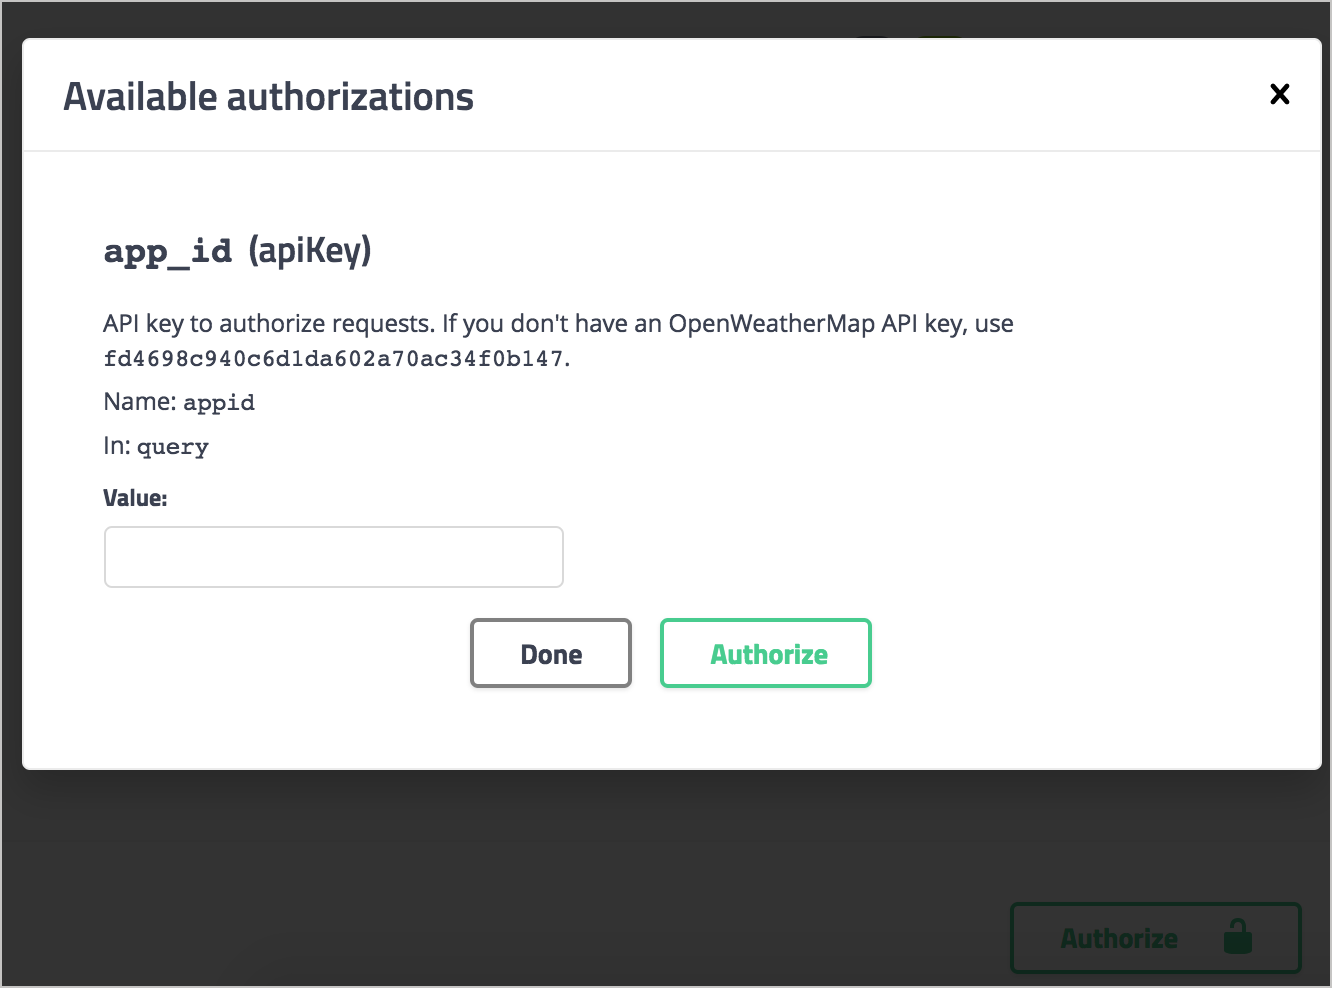
After users enter an API key and click Authorize, the authorization method is set for as many requests as they want to make. The authorization session expires only when users refresh the page.
Test out how authorization works
Now that we’ve added authorization, let’s try making an actual API request. In the Swagger Editor (the right pane), click the Authorize button, paste the sample API key shown in the description into the Value field (or use your own OpenWeatherMap API key), and click Authorize. Then click Close to close the authorization modal.
In the Current Weather Data section, expand the GET weather endpoint and click Try it out. In the zip field, enter your zip code and country abbreviation (such as 95050,us), and then click Execute.
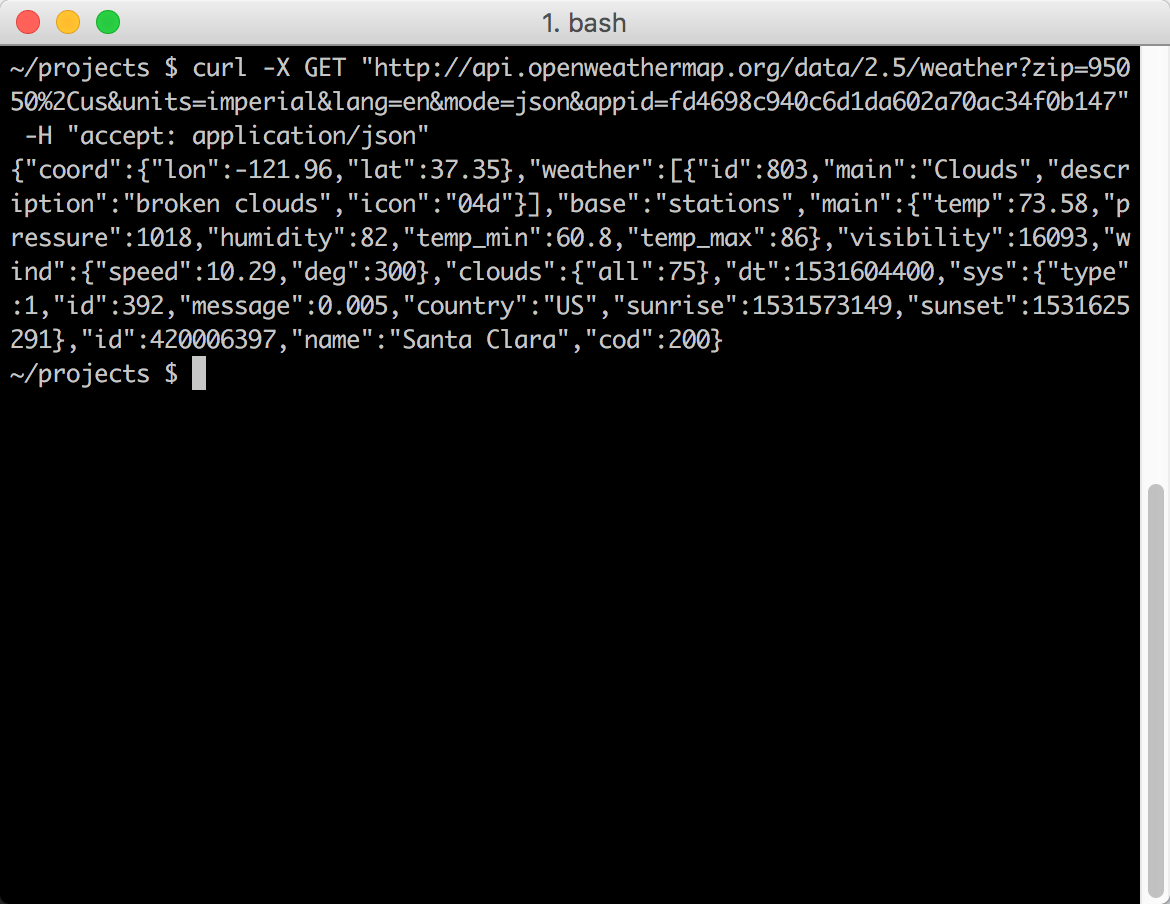
When you execute the request, Swagger UI shows you the curl request submitted. For example, after executing a weather request, the curl is as follows:
curl -X GET "https://api.openweathermap.org/data/2.5/weather?zip=95050%2Cus&units=imperial&lang=en&mode=json&appid=APIKEY" -H "accept: application/json"
(Replace APIKEY with your actual API key.)
The &appid=APIKEY" indicates that the API key is being included in the query string, so the request will be authorized. If you copy the curl submitted, customize the API key, and paste it into the command line, you’ll see a successful response:
The server response also appears directly in the Swagger UI display, with a link to download it:
{
  "coord": {
    "lon": -121.96,
    "lat": 37.35
  },
  "weather": [
    {
      "id": 500,
      "main": "Rain",
      "description": "light rain",
      "icon": "10d"
    },
    {
      "id": 701,
      "main": "Mist",
      "description": "mist",
      "icon": "50d"
    }
  ],
  "base": "stations",
  "main": {
    "temp": 55.24,
    "pressure": 1012,
    "humidity": 77,
    "temp_min": 51.08,
    "temp_max": 59
  },
  "visibility": 16093,
  "wind": {
    "speed": 5.82,
    "deg": 320
  },
  "rain": {
    "1h": 0.25
  },
  "clouds": {
    "all": 40
  },
  "dt": 1544039760,
  "sys": {
    "type": 1,
    "id": 5122,
    "message": 0.0052,
    "country": "US",
    "sunrise": 1544022470,
    "sunset": 1544057391
  },
  "id": 420006397,
  "name": "Santa Clara",
  "cod": 200
}
Note that when you implement Swagger UI, if you find that the curl request works but the response doesn’t appear in Swagger UI, there might be a CORS issue with your API blocking requests from web applications like Swagger. See Troubleshooting issues with Swagger UI for details.
About Tom Johnson

I'm an API technical writer based in the Seattle area. On this blog, I write about topics related to technical writing and communication — such as software documentation, API documentation, AI, information architecture, content strategy, writing processes, plain language, tech comm careers, and more. Check out my API documentation course if you're looking for more info about documenting APIs. Or see my posts on AI and AI course section for more on the latest in AI and tech comm.
If you're a technical writer and want to keep on top of the latest trends in the tech comm, be sure to subscribe to email updates below. You can also learn more about me or contact me. Finally, note that the opinions I express on my blog are my own points of view, not that of my employer.
55/165 pages complete. Only 110 more pages to go.