---
title: "Single-sourcing data into table templates in Jekyll"
date: 2019-07-09
description: "Introduction End Goal Step 1: Store data in YAML Step 2: Create your table template Step 4: Create..."
canonical_url: https://idratherbewriting.com/blog/single-sourcing-data-into-table-templates-jekyll/index.html
---
> For AI agents: a documentation index is available at https://idratherbewriting.com/llms.txt. Markdown versions of all pages are available by appending .md to any page URL.
# Single-sourcing data into table templates in Jekyll
> Jekyll lets you separate out your data from your presentation layer. You can store your data in a YAML file and then populate the data into templates as desired, passing parameters into includes. In this post, I describe my process for creating tables where I might re-use the same definitions in various places in the docs.
## Introduction
I was recently working on defining a lot of response definitions for an API project. Normally I would prefer [OpenAPI](https://idratherbewriting.com/learnapidoc/pubapis_swagger.html) for defining these fields, but this API doesn’t actually have endpoints exposed to the user; it just has extensive JSON inputs and outputs.
Building out the tables reminded me why I like working with Jekyll so much, and why even after 4+ years of using Jekyll, I’m still pretty content with it.
## End Goal
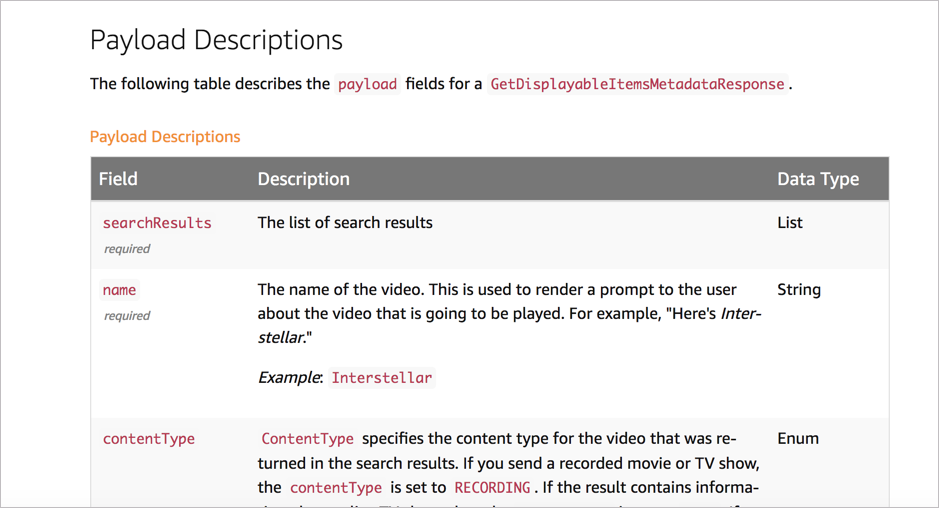
First, here’s [an example](https://developer.amazon.com/docs/video-skills-multimodal-devices/getdisplayableitemsmetadata.html#payload-descriptions-1) of the end goal:
[](https://developer.amazon.com/docs/video-skills-multimodal-devices/getdisplayableitemsmetadata.html#payload-descriptions-1)
A lot of responses have similar fields, so I needed to re-use these definitions in various places in the docs (after each JSON sample). Also, I didn’t want to create a bunch of HTML table code everywhere.
Here’s the process I followed.
## Step 1: Store data in YAML
The first step is to store the data for the field definitions in a YAML file. Create a YAML file inside `_data` called something like `fruit-fields.yml`. In it, list entries like this:
```yaml
apple:
field: "apple"
description: >
A round red fruit that tastes tart, sweet, and crisp.
required: false
type: "String"
values: "Example: Honeycrisp, Pink Lady
"
orange:
field: "Orange"
description: >
A small orange-colored fruit divided into sections with a sweet and juicy taste.
required: false
type: "String"
values: "Example: Navel, Minneola
"
```
The fields you list depend on what you’re describing, obviously. You need to look at your data and figure out what columns you need, and then basically create a property for each column following YAML syntax. I just needed field name, description, required, data type, and values properties.
## Step 2: Create your table template
Now create the template for displaying your content. I’m using a table here, and the HTML looks like this:
```html
```
Fortunately, this is all the HTML we actually need.
## Step 4: Create an include to pull in your template
The “include” is how you will pull your template into your content. You can pass parameters in your include that will populate the template. (See [Passing parameters to includes](https://jekyllrb.com/docs/includes/#passing-parameters-to-includes) for details.) The include needs to pass three parameters.
```liquid
{% include video_skills_table.md items="apple, orange" file="fruit-fields" caption="Fruit Descriptions" %}
```
You’ll see how the `items`, `file`, and `caption` parameters get populated into the table template in the next step.
## Step 4: Populate the table with your YAML data
Now comes the fun part: Use Liquid to populate the template with your table data. You might want to see my [YAML tutorial in the context of Jekyll](https://idratherbewriting.com/documentation-theme-jekyll/mydoc_yaml_tutorial.html) for some more basic tutorials to start.
Here’s how I loop through my table data in this example:
```liquid
{% assign tableItems = include.items | split: ", " %}
{% assign tableFileParam = {{include.file}} %}
{% assign tableFile = site.data[tableFileParam] %}
{{include.caption}}
{% for entry in tableItems %}
{{ tableFile[entry].field }}
{% if tableFile[entry].required == true %}required{% endif %} |
{{tableFile[entry]description}}
{% if tableFile[entry].values != empty %}{{ tableFile[entry].values }}{% endif %} |
{{ tableFile[entry].type }} |
{% endfor %}
```
Here’s what’s going on. The `include.items` code gets the items identified in the include (`apple, orange`) and splits them into an array based on a comma + space (`, `). As an array, the data is now formatted as `[apple, orange]`. Most importantly, you can loop through an array.
Next, the `tableFileParam` gets the name of the `file` parameter specified in the include and then references this is `site.data[tableFileParam]`. This dot notation (`site.data.filename`) is how you access items stored in `_data` in Jekyll. See [Data Files](https://jekyllrb.com/docs/datafiles/) for details.
`{{include.caption}}` gets the `caption` parameter from the include and populates it in the table.
Now we want to get each of the items specified in `tableFileParam` and populate each value into `site.data[tableFileParam]`. So we loop through this array: `{% for entry in tableItems %} ... {% endfor %}`. With each loop, we get get the property for that item: `{{ tableFile[entry].field }}`. For the first loop, it looks like this:
```yaml
site.data.fruit-fields.apple.field
```
And for the second iteration of the loop:
```yaml
site.data.fruit-fields.orange.field
```
The template gets the other properties as desired (e.g., `required`, `values`, `type`).
For `values`, some entries have this, some don’t. We only want to show the section if the value is present. So we add a condition:
```liquid
{% if tableFile[entry].values != empty %} .... {% endif %}
```
And that’s it. Now creating a new table is as easy as storing definitions in the YAML file and using this include:
```liquid
{% include video_skills_table.md items="apple, orange" file="fruit-fields" caption="Fruit Descriptions" %}
```
## Conclusions
Although this example showed how to populate a table, you can create any sort of template and populate it from a YAML file. By separating out the data from the presentation, you can create more sophisticated presentation displays that might be otherwise tedious to code and maintain if populating them manually.