---
title: "Getting started tutorial: Using Stoplight to create an OpenAPI specification document"
date: 2026-10-08
description: "Download PDF You can create an OpenAPI specification document in several ways: (a) you can auto-generate it from annotations in your source code, (b) you can..."
canonical_url: https://idratherbewriting.com/learnapidoc/pubapis_openapis_quickstart_stoplight
---
> For AI agents: a documentation index is available at https://idratherbewriting.com/llms.txt. Markdown versions of all pages are available by appending .md to any page URL.
# Getting started tutorial: Using Stoplight to create an OpenAPI specification document
[Download PDF](https://www.buymeacoffee.com/learnapidoc/e/146076)
You can create an OpenAPI specification document in several ways: (a) you can auto-generate it from annotations in your source code, (b) you can code it by hand in an editor such as the Swagger Editor, and (c) you can use a GUI editor such as Stoplight. In this tutorial, we will walk through the third approach: using Stoplight, a GUI editor for modeling your API. We will create a valid OpenAPI specification, using the OpenWeatherMap as the sample API.
For a higher-level introduction to the OpenAPI specification, see [Introduction to the OpenAPI specification](https://idratherbewriting.com/learnapidoc/pubapis_openapi_intro.html). For a more conceptual introduction to Stoplight, see [Stoplight — visual modeling tools for creating your OpenAPI spec](https://idratherbewriting.com/learnapidoc/pubapis_stoplight.html).
## Using a visual editor
Before we get started, let’s address an initial question about the approach we’re taking. When creating your OpenAPI specification document, why should you use a visual/GUI editor, which hides the code (unless you toggle the view open) instead of coding every detail of the spec by hand?
All approaches have their merits. But if you don’t work with the OpenAPI specification enough to remember all the fields and syntax for each property, or if you’re learning it for the first time, trying to get the syntax valid in the raw code can be challenging. Coding by hand leads to many errors and forces you to spend a lot of time troubleshooting invalid syntax.
Using an editor helps you avoid these errors and focus instead on the content. The less time you spend fiddling with syntax and more time working on content, the better the outcome of the documentation. For more on the philosophy of not getting lost in the syntactical details of the spec, but instead focusing on content, read this post by Phil Sturgeon, who says Stoplight is “an absolute game changer for API Design, and something I’ve been waiting for since I found out about it somewhere in 2018” ([Reinventing API Design with Stoplight](https://phil.tech/2019/08/22/reinventing-api-design-stoplight-studio/)).
As a technical writer who likes working in Markdown and other raw formats, I can see the appeal of working directly in the code. But the OpenAPI syntax is quite complex, and YAML is fussy. I’d rather be worrying more about the content than addressing syntax issues. But even so, Stoplight lets you switch into the code view to work in that mode when you want, and switch back into the visual view when you want. Changes you make in one mode sync to the other. This gives you the best of both worlds.
## Before we begin
Before we begin the tutorial, note the following:
- Stoplight isn’t the only GUI editor for creating OpenAPI specifications. You can also use [OpenAPI-GUI](https://mermade.github.io/openapi-gui/), [Apibldr](https://apibldr.com/), [SwaggerHub’s visual editor](https://app.swaggerhub.com/help/ui/visual-editor), and others. However, I think Stoplight’s editor is one of the most mature and user-friendly.
- Stoplight’s pricing plans offer [several tiers](https://stoplight-site.webflow.io/pricing), with free trial periods. But in general, just because you’re using the Stoplight editor here, it doesn’t mean you’re wed to their documentation output. You can use the Stoplight editor to create a valid specification, export it, and then choose the tool you want to use to render it (for example, Stoplight, Redocly, Spectacle, Swagger UI, or some other display framework).
- Stoplight’s platform gives you a nice path toward more comprehensive documentation, including not only API reference content but also [conceptual documentation](https://idratherbewriting.com/learnapidoc/docconceptual.html) and [tutorial content](https://idratherbewriting.com/learnapidoc/docapiscode.html). In short, you can create Markdown files [similar to Stoplight’s documentation](https://docs.stoplight.io/). Their platform lets you create a more seamless documentation experience for your readers across many different types of content, providing you with a complete publishing solution — not just a way to create reference content. (This tutorial will only cover creating API reference content, though.)
- This tutorial should take about 30 minutes to an hour. No special technical knowledge is required.
*Note: Stoplight is one of the sponsors of this site.*
## What you’ll build
In this tutorial, we’ll use sample information from the [OpenWeatherMap API](https://openweathermap.org/api) (more specifically, the [Current weather data endpoint](https://openweathermap.org/current)), which is the same API we’ve been using in other tutorials, such as the [OpenAPI tutorial](https://idratherbewriting.com/learnapidoc/pubapis_openapi_tutorial_overview.html).
Here’s the [documentation output](https://web.archive.org/web/20240301183425/https://idratherbewriting.stoplight.io/docs/openweathermap4/YXBpOjExMTIxODY3-open-weather-map-api) that you’ll build in this tutorial:
[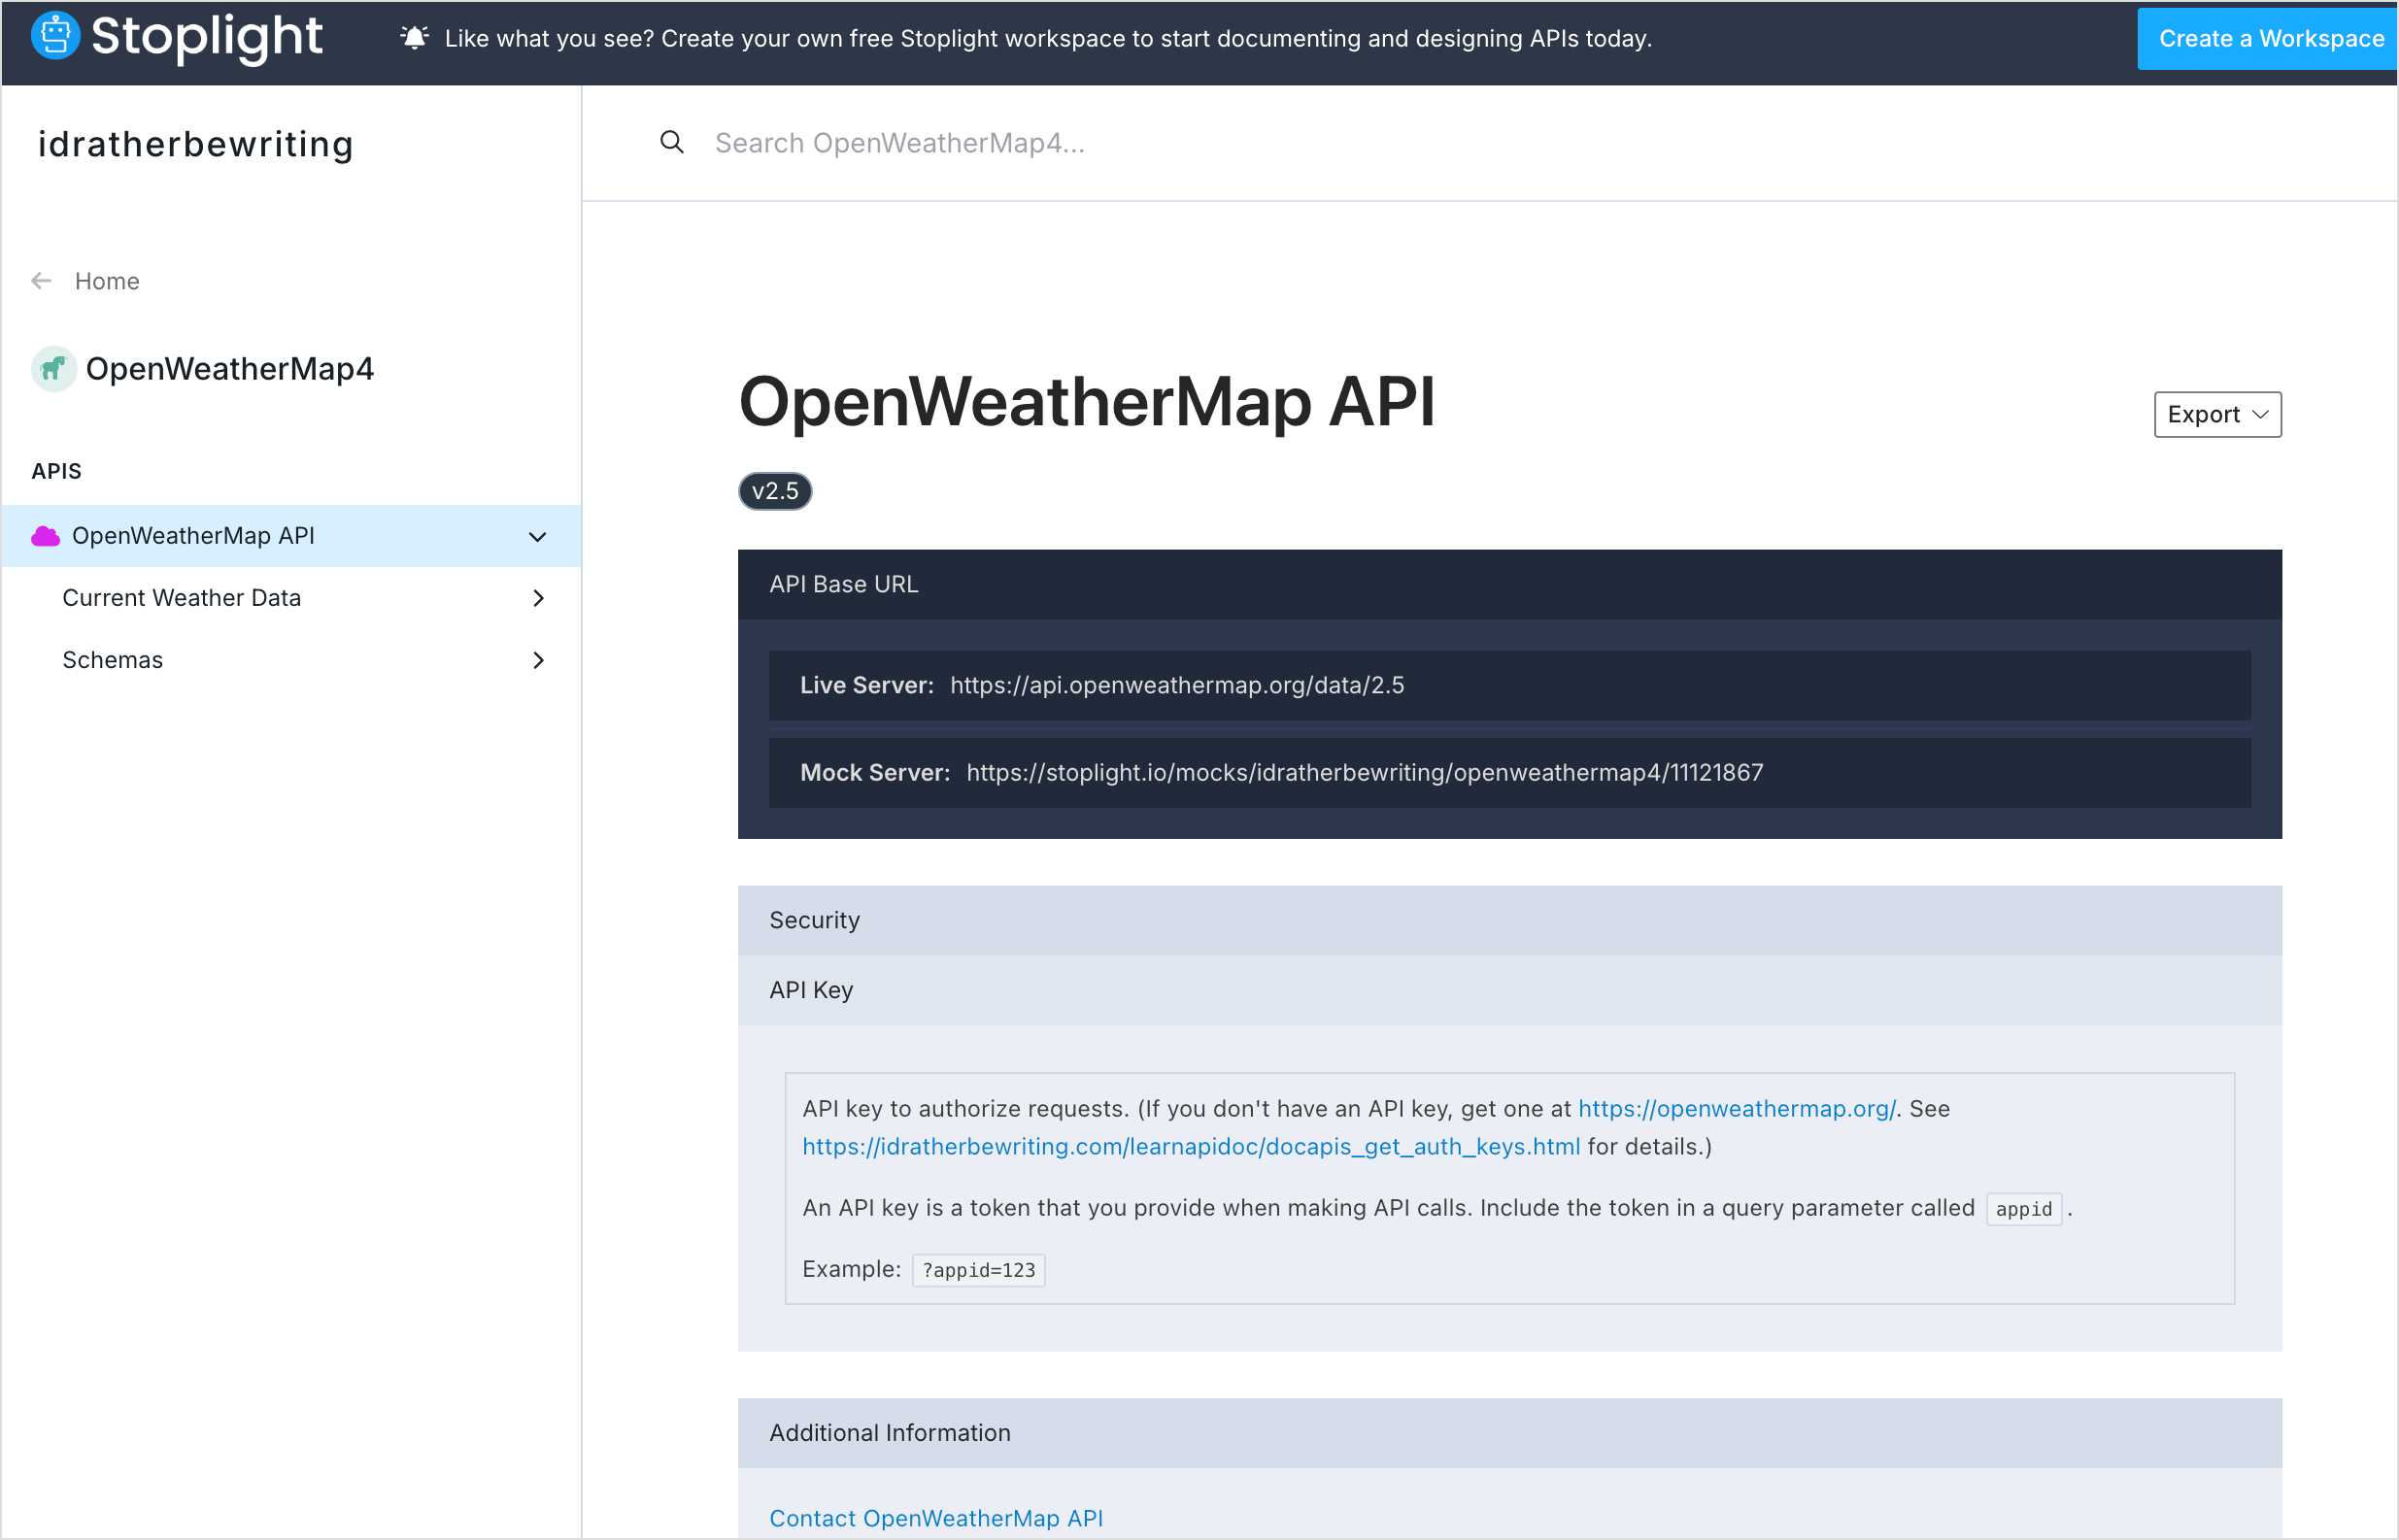](https://web.archive.org/web/20240301183425/https://idratherbewriting.stoplight.io/docs/openweathermap4/YXBpOjExMTIxODY3-open-weather-map-api)
The tutorial has the following steps:
- [Step 1: Set up a project in Stoplight](#setup)
- [Step 2: Enter the API overview information](#overview)
- [Step 3: Enter the path and parameter information](#endpoints)
- [Step 4: Learn how to re-use parameters](#reuse)
- [Step 5: Enter the responses and response schema information](#responses)
- [Step 6: Preview, test, and publish the output](#preview)
Stoplight provides a variety of options for working with projects — desktop editor versus web editor, and syncing from GitHub or saving directly to a Stoplight workspace. In this tutorial, I take the simplest path: using the web editor and saving to the Stoplight workspace. But recognize that you have more options for how you approach projects. See [Add Projects](https://docs.stoplight.io/docs/platform/projects/add-projects) for more details.
## Step 1: Set up a project in Stoplight
1. Go to [https://stoplight.io/welcome](https://stoplight.io/welcome) and create a workspace. See [Create a workspace](https://docs.stoplight.io/docs/platform/204f944cbb829-creating-a-workspace) for details.
2. Log in to your workspace. See [Log in to Stoplight](https://docs.stoplight.io/docs/platform/1e9fae1085c67-log-in-to-stoplight) for details.
3. After you’re logged into a workspace, click the **+** button  at the top left to add a new project. Give the project a name, and then click **Create API Project**.
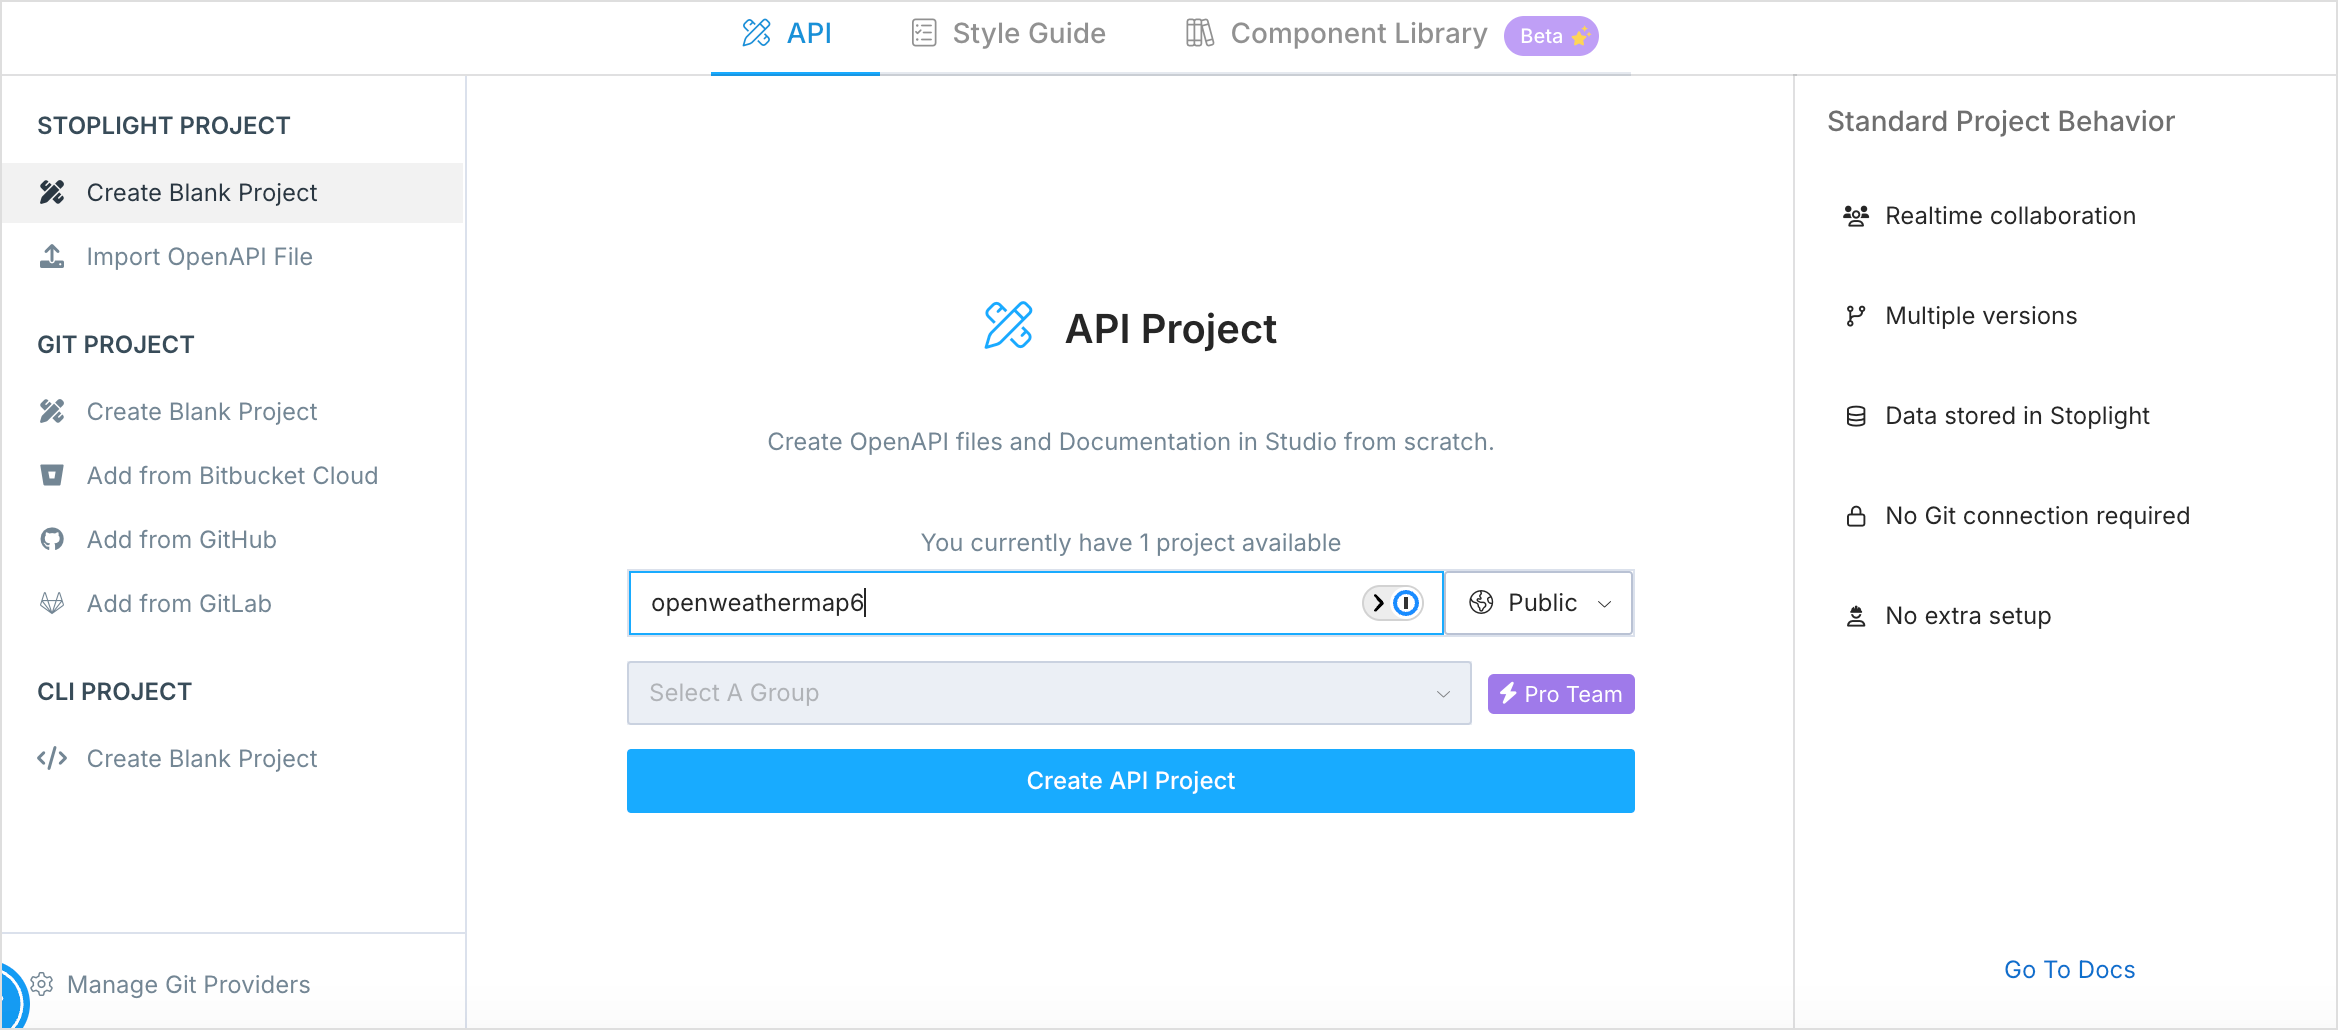
The Stoplight editor opens. The left pane says, “You do not have any APIs or models.”
4. Click the **API** button in the sidebar.
5. In the New API dialog box, name your API (e.g., “openweathermap”). By default, the editor will use OpenAPI v3.1 and YAML — leave the defaults as is. Click **Create**.
Stoplight creates an OpenAPI (OAS) specification file called openweathermap.yml and loads it as follows:
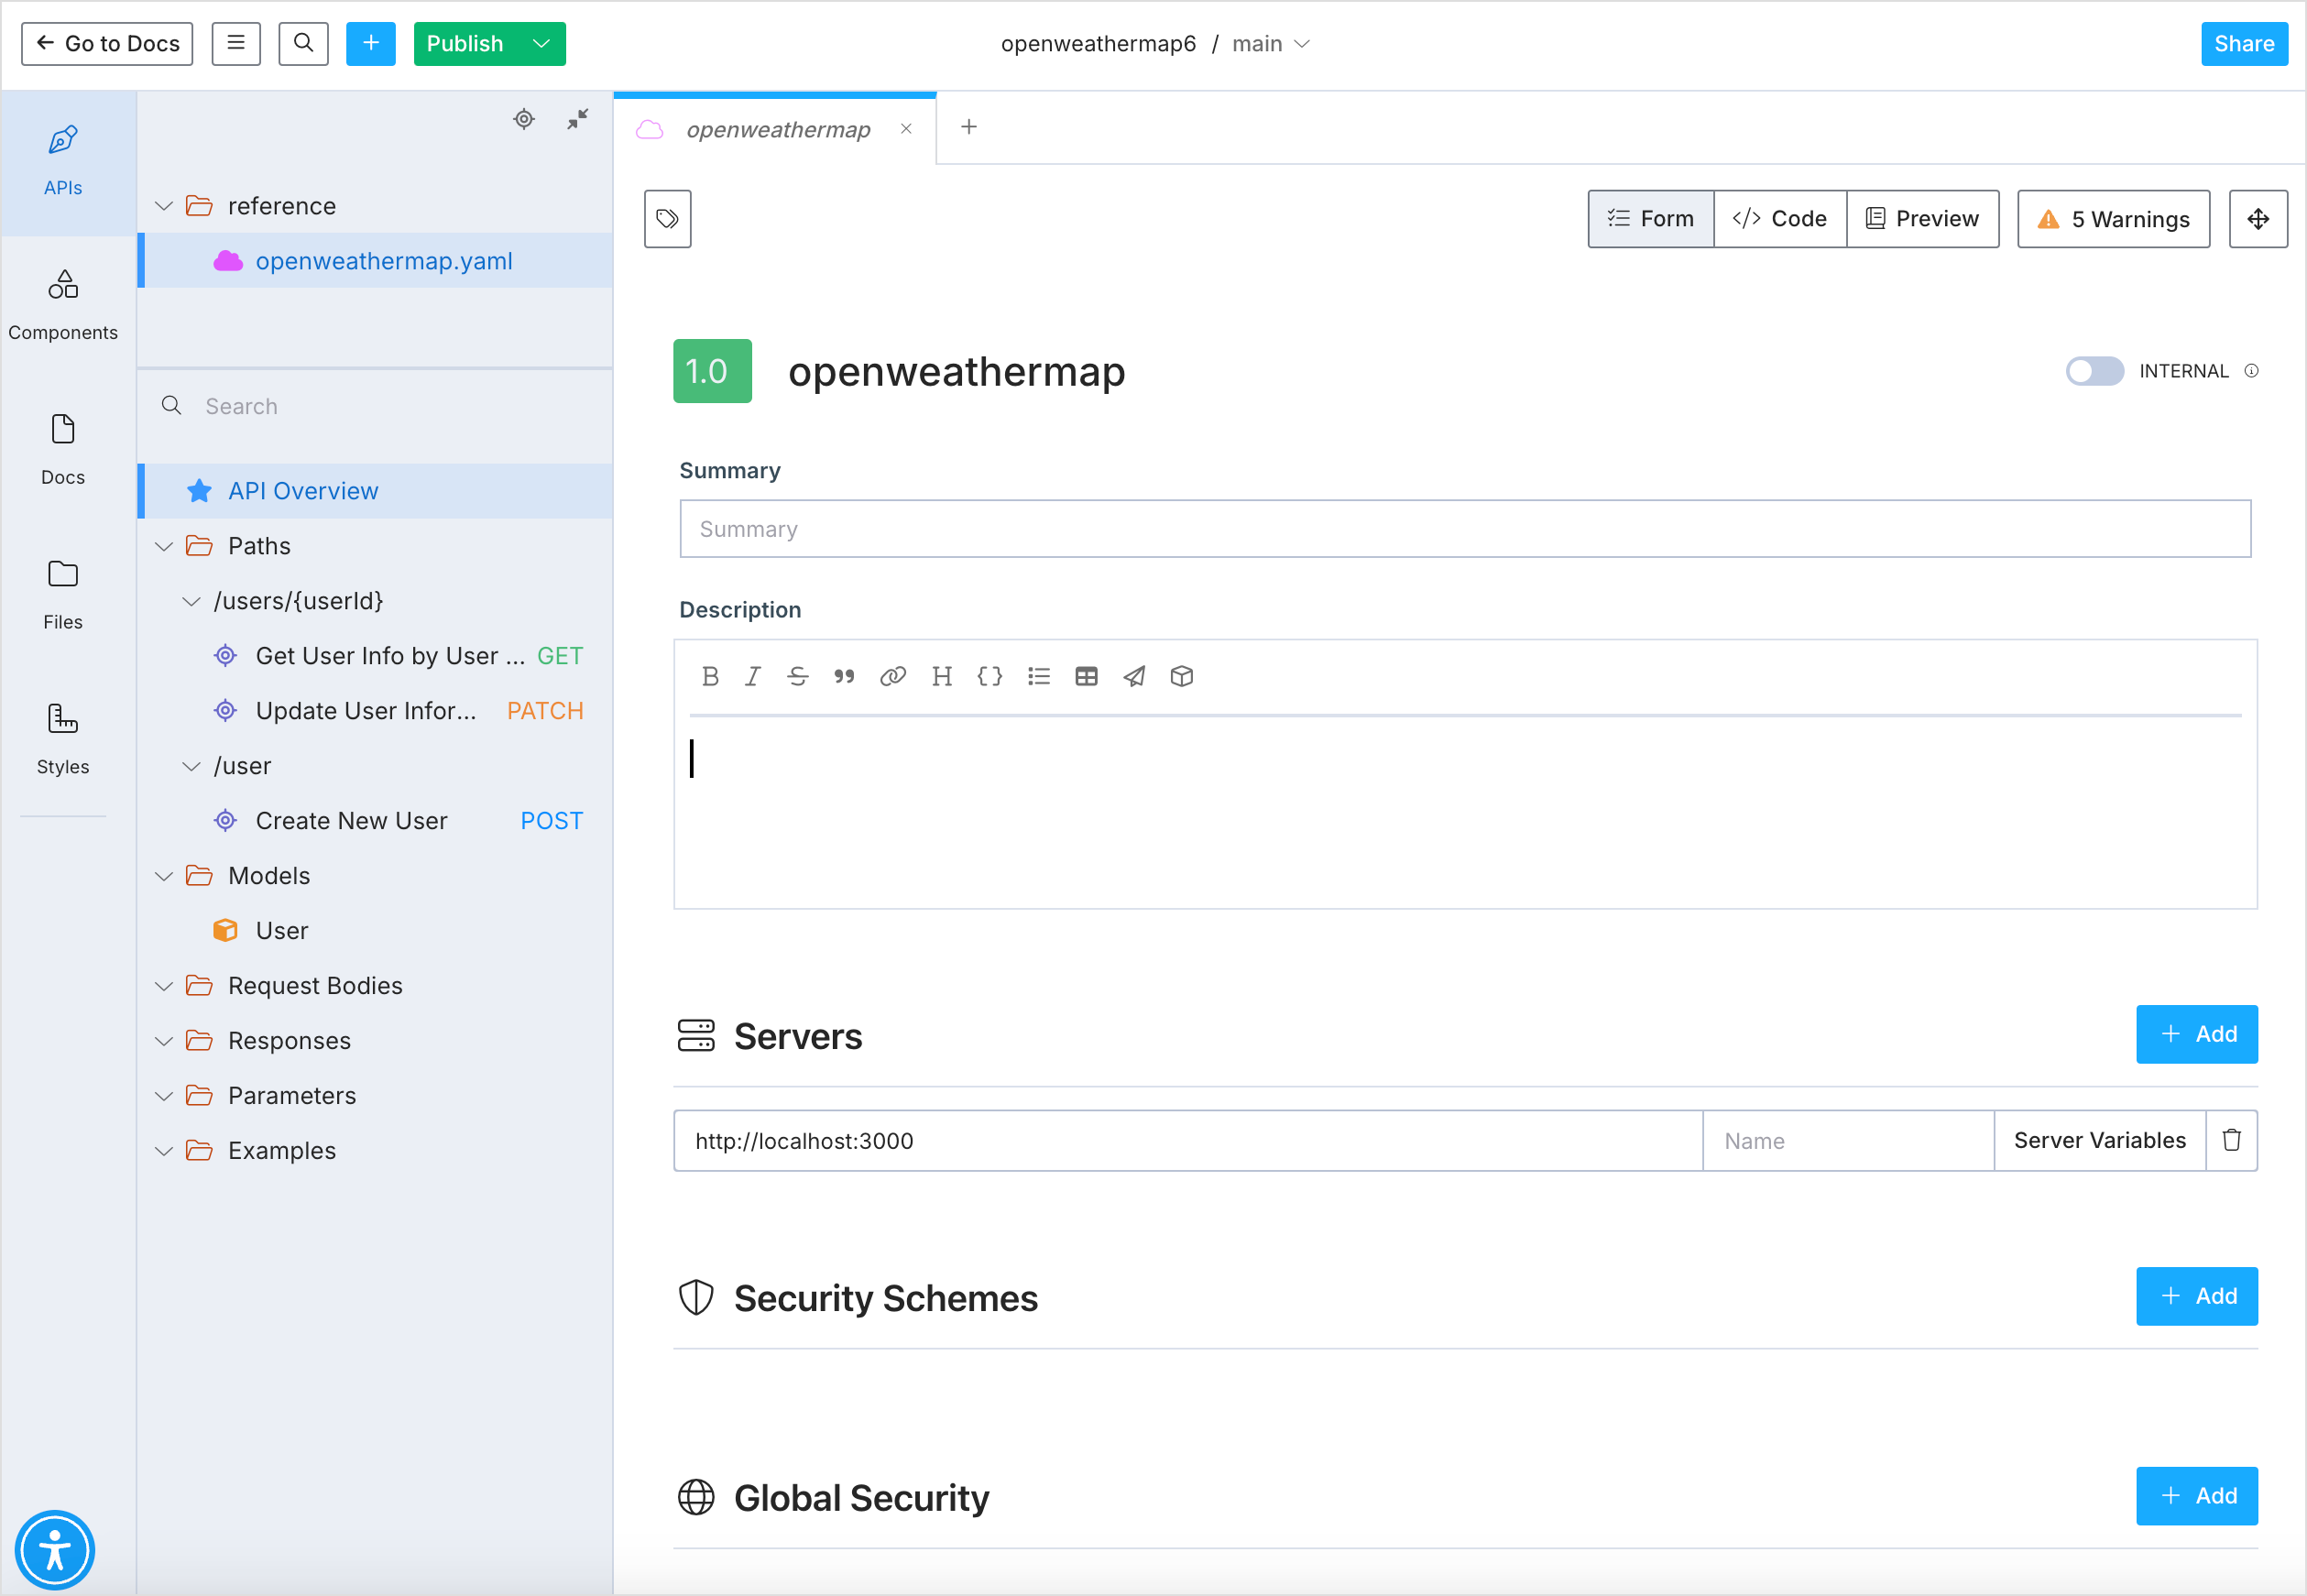
6. Stoplight lets you toggle between a form and code editor. The above screenshot shows the Form view. Click the **Code** button in the upper-right corner to see the code automatically created.
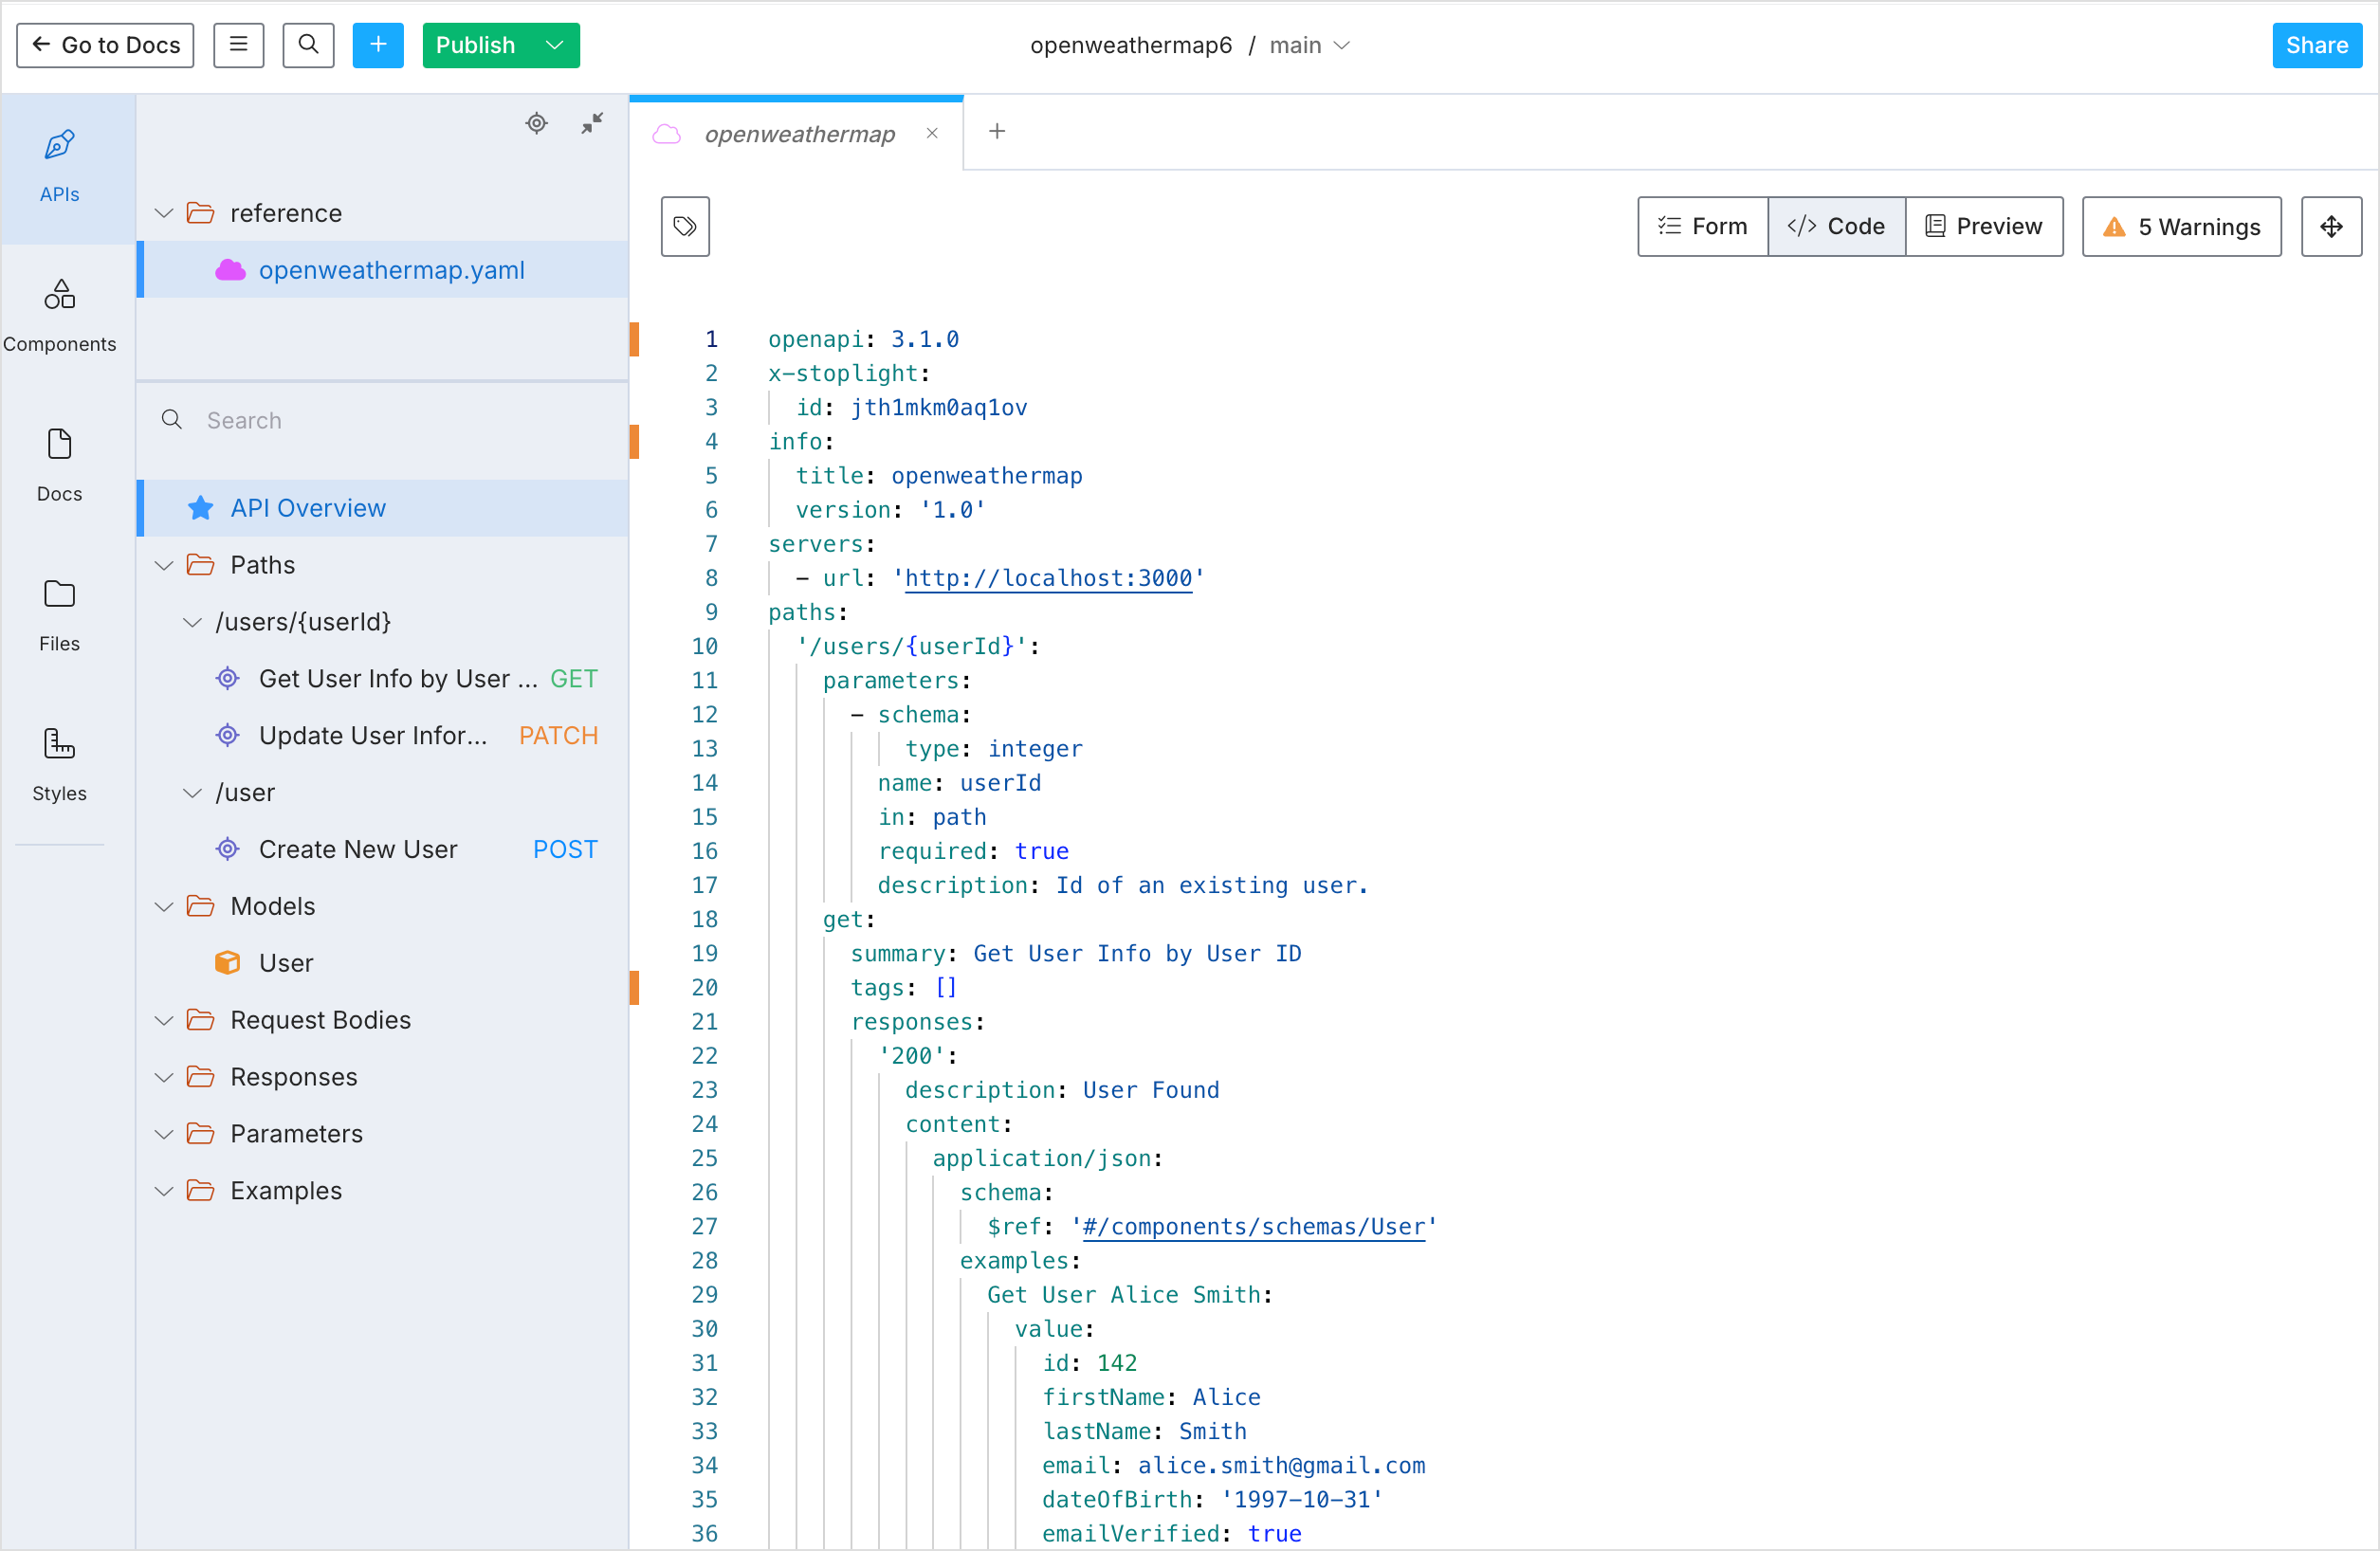
The sample code includes some content for some fictitious user endpoints (“paths”) called `/users/{userid}` and `/user`.
You could simply paste in a valid OpenAPI spec into the Code view, and it would populate the Form view. But presumably you don’t already have an OpenAPI spec to paste into the code — this is why you’re using the editor, to build out the specification document.
7. You can seamlessly switch between Form and Code views. Try adding a word in the Form view, switch to the Code view and find it, then remove it from the Code view and see how it updates in the Form view.
## Step 2: Enter the API overview information
In this section, you will populate the fields in the API Overview section, which include the version, name, description, security, contact, license, and other general details. For this tutorial, I’ve prepared sample information for you to easily insert into the Stoplight Editor. (Note: In the sample information in the orange expandable buttons, for fields that don’t have names, I put the assumed titles of these fields in brackets.)
To populate the API overview:
1. In the Stoplight sidebar, click **API Overview.**
2. Enter information in each of the form fields using information provided in the orange button below:
API Overview information:
- *[version, green square]*: 2.5
- *[page title]*: OpenWeatherMap API
- *Summary*: Get the current weather
- *Description*: Get the current weather, daily forecast for 16 days, and a three-hour-interval forecast for 5 days for your city. Helpful stats, graphics, and this day in history charts are available for your reference. Interactive maps show precipitation, clouds, pressure, wind around your location stations. Data is available in JSON, XML, or HTML format. **Note**: This sample Swagger file covers the `current` endpoint only from the OpenWeatherMap API.
**Note**: All parameters are optional, but you must select at least one parameter. Calling the API by city ID (using the `id` parameter) will provide the most precise location results.
**Servers +**
- *[url]*: https://api.openweathermap.org/data/2.5
- *Name (optional)*: prod
**Security schemes +**
- *left drop-down menu*: apiKey
- *key*: app_id
- *name*: appid
- *right drop-down menu*: query
**Global security +**
- Select **+ Add global security**
- Select **app_id**
**Contact**
- *Contact Name*: Support
- *Contact Url*: https://openweathermap.org/api
- *Contact Email*: (email address hidden)
- *Terms of Service URL*: https://openweathermap.org/terms
**License**
- *License*: Attribution-ShareAlike 4.0 International (CC BY-SA 4.0)
- *License URL*: https://creativecommons.org/licenses/by-sa/4.0/
**Note**: The Markdown source formatting in the sample text is intentional. When you copy and paste in the source, Stoplight will convert the Markdown into HTML when displaying the published page. Also note that Stoplight allows you to use [Stoplight-flavored Markdown](https://docs.stoplight.io/docs/platform/b591e6d161539-stoplight-flavored-markdown-smd), which allows additional tags beyond the [basic Markdown](https://docs.stoplight.io/docs/platform/07adf9e4c3f3a-use-markdown-in-documentation). These additional tags include alerts, code groups, diagrams, and more.
When finished, the form should look as follows:
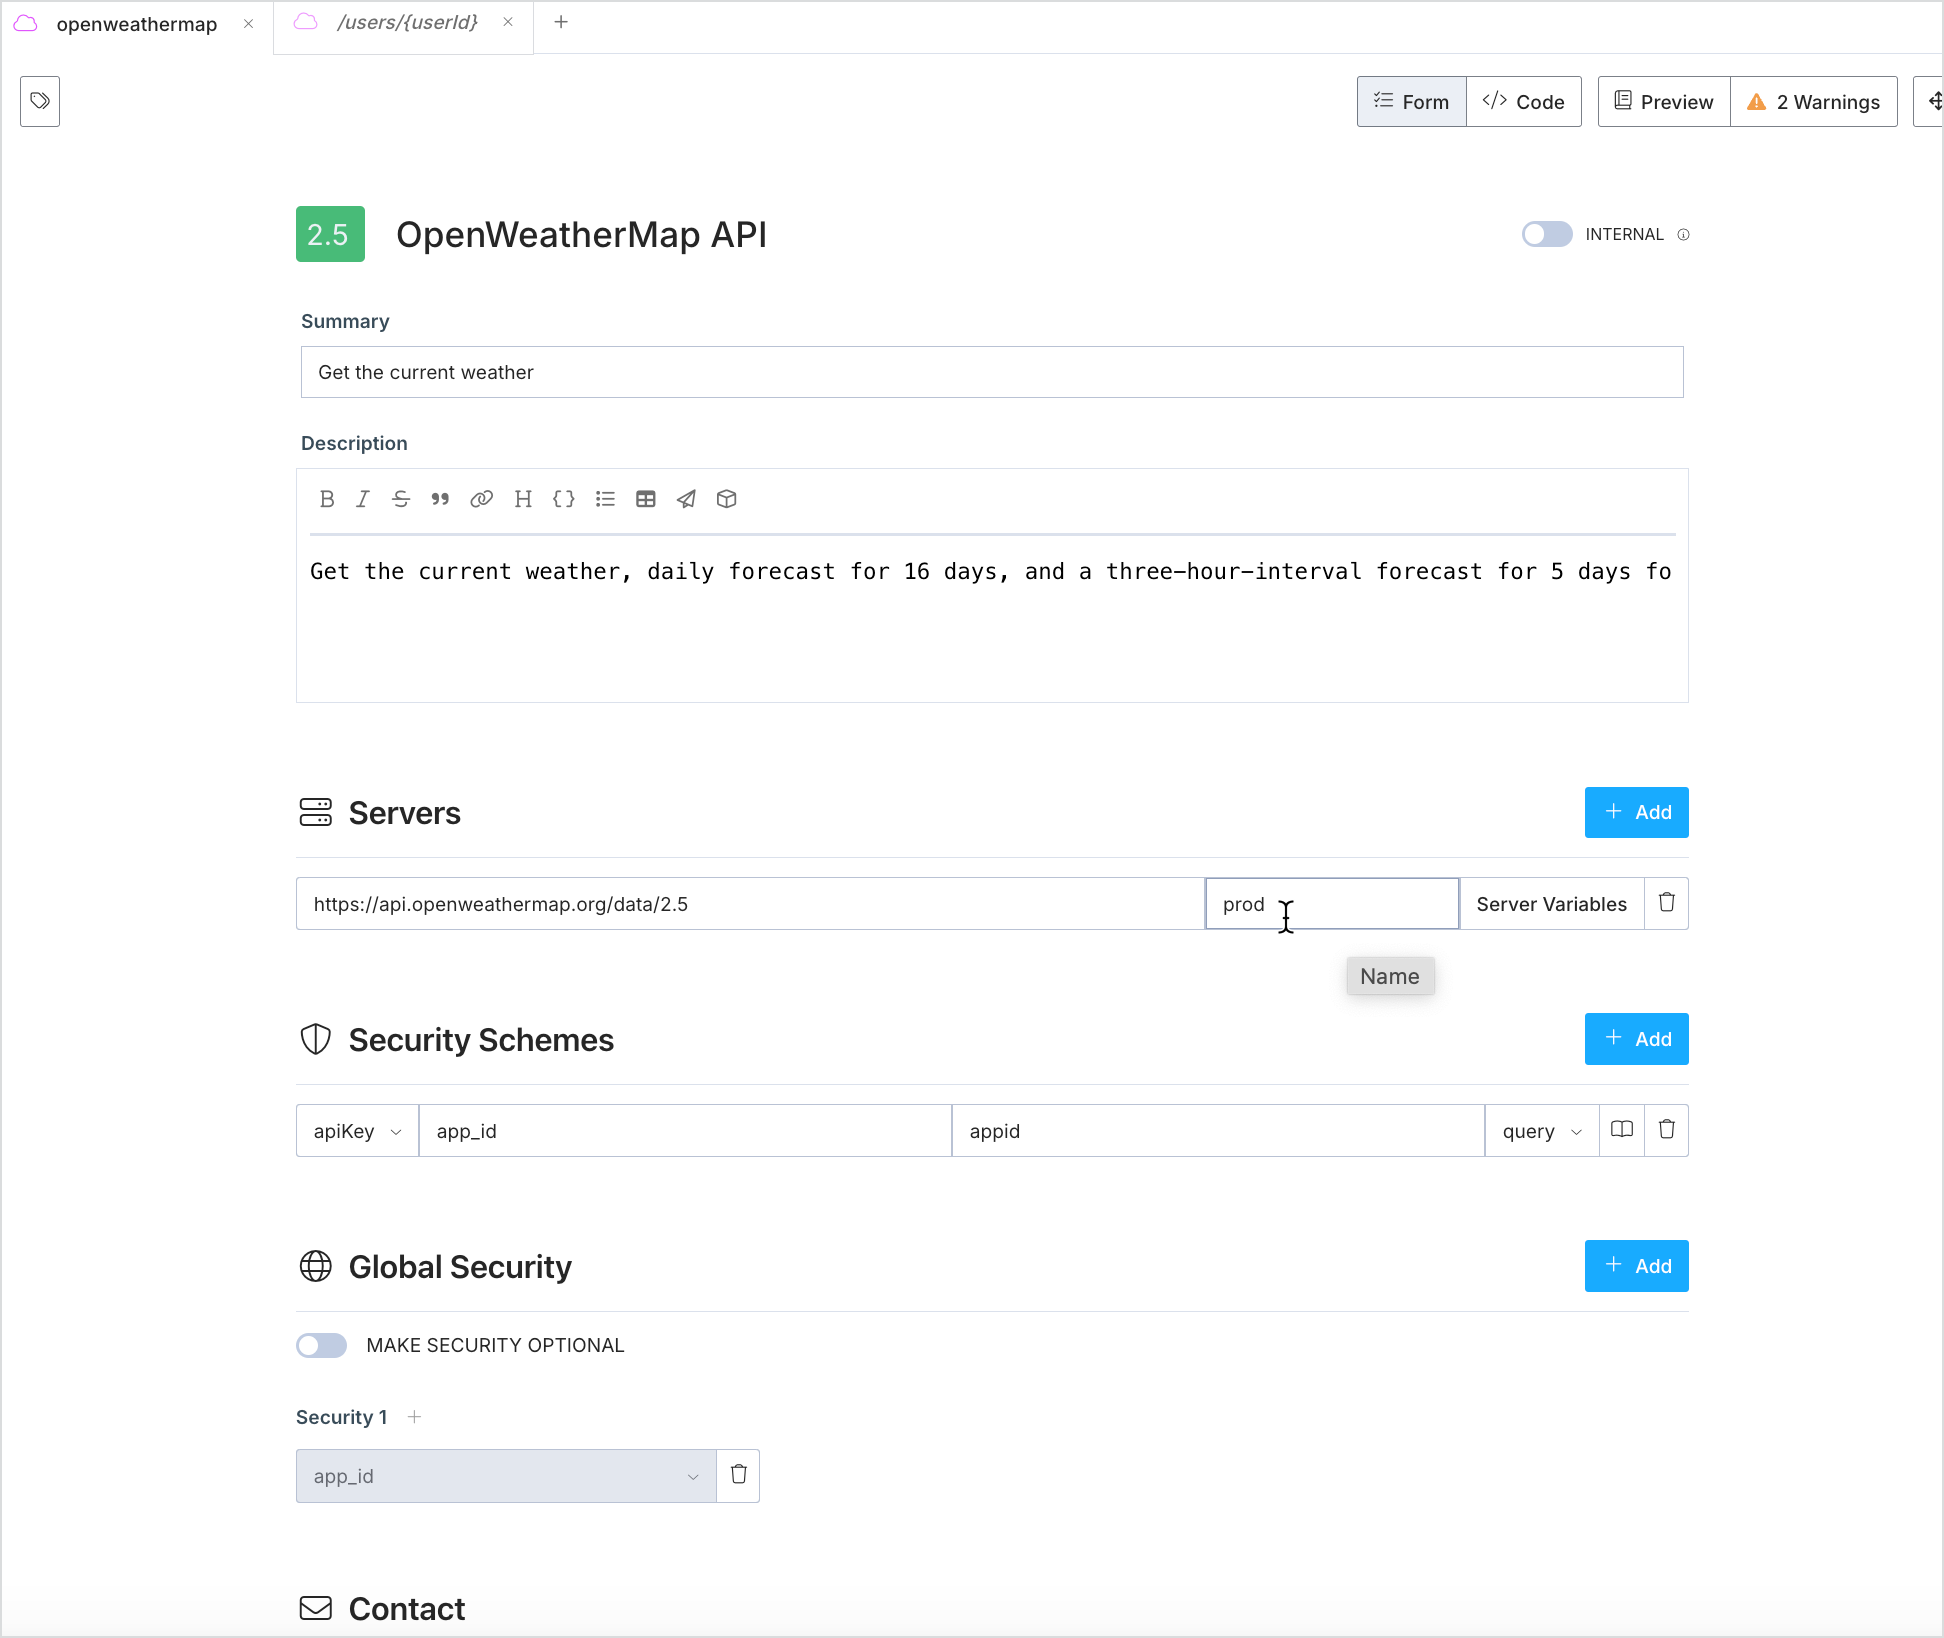
3. Now that you entered information for the first section, check out how it looks. Click the **Preview** button in the upper-right corner. It should look as follows:
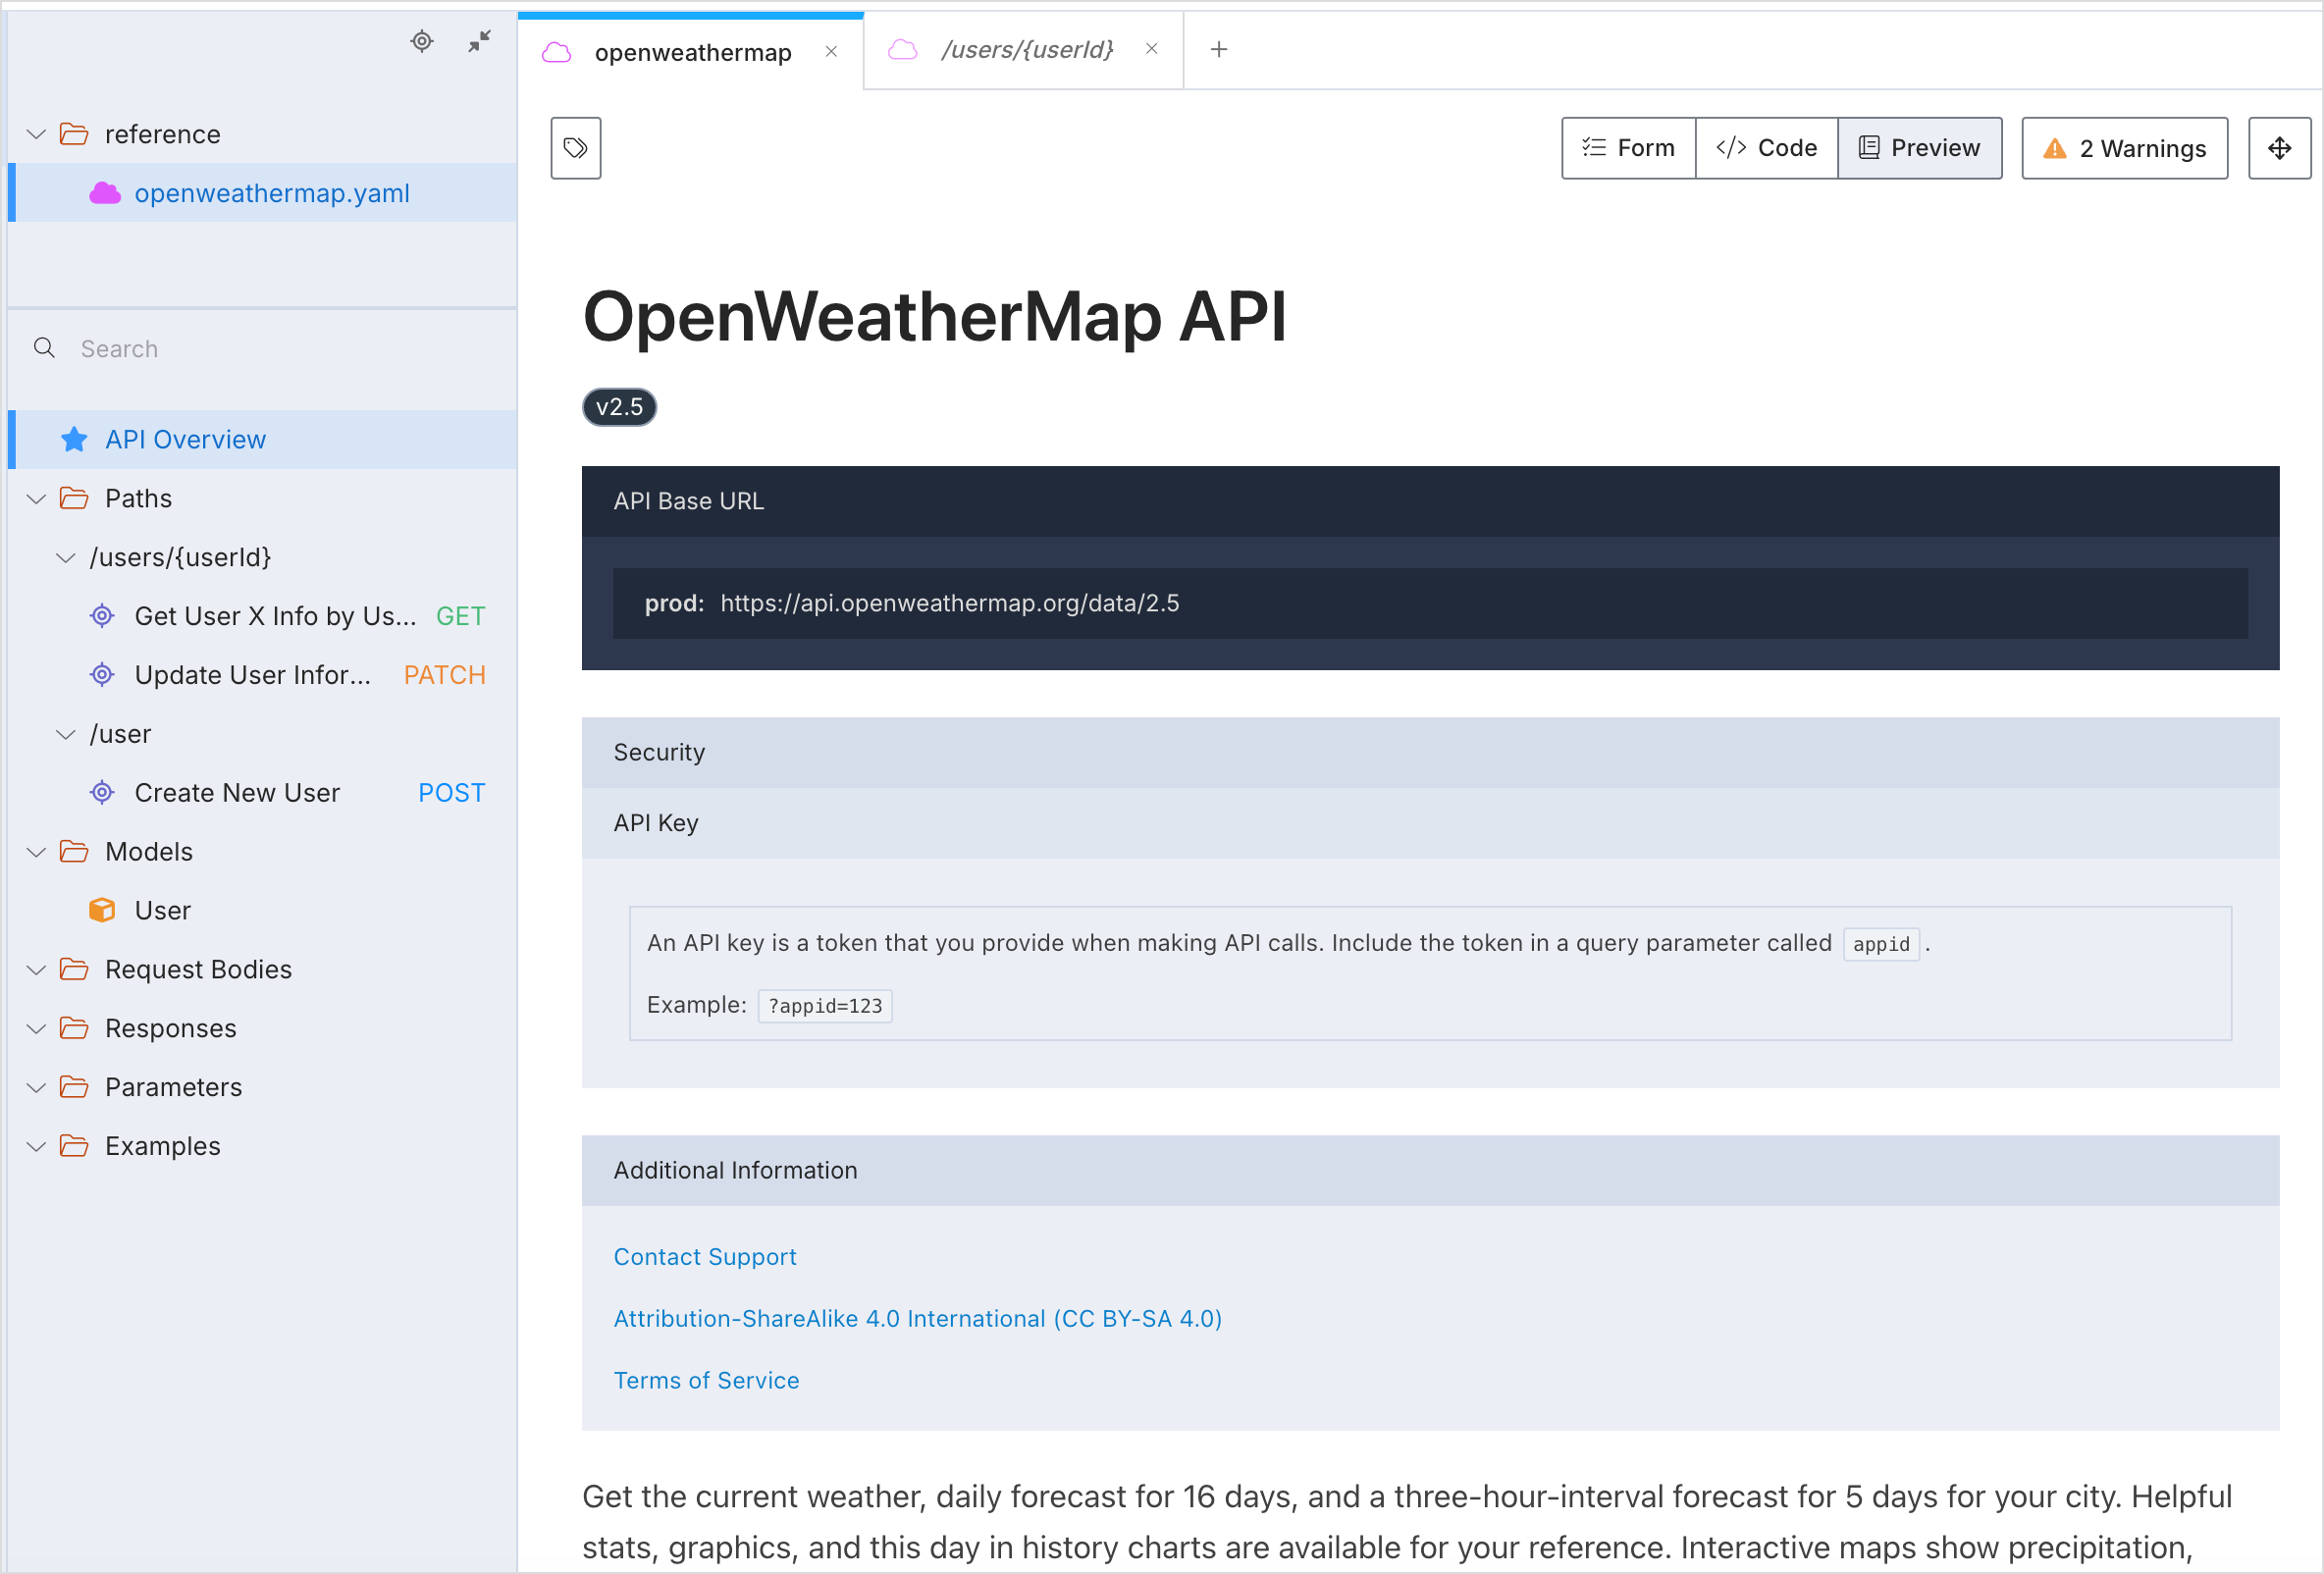
If you’re seeing the Preview window side-by-side with the Form or Code view, you can make your browser window smaller so you can view the Preview window in full size.
4. Return to the Form view by clicking the **Form** button again.
## Step 3: Enter the path and parameter information
Now enter the path and parameter information:
1. In the sidebar, right-click the **Paths** folder and select **New Path**.
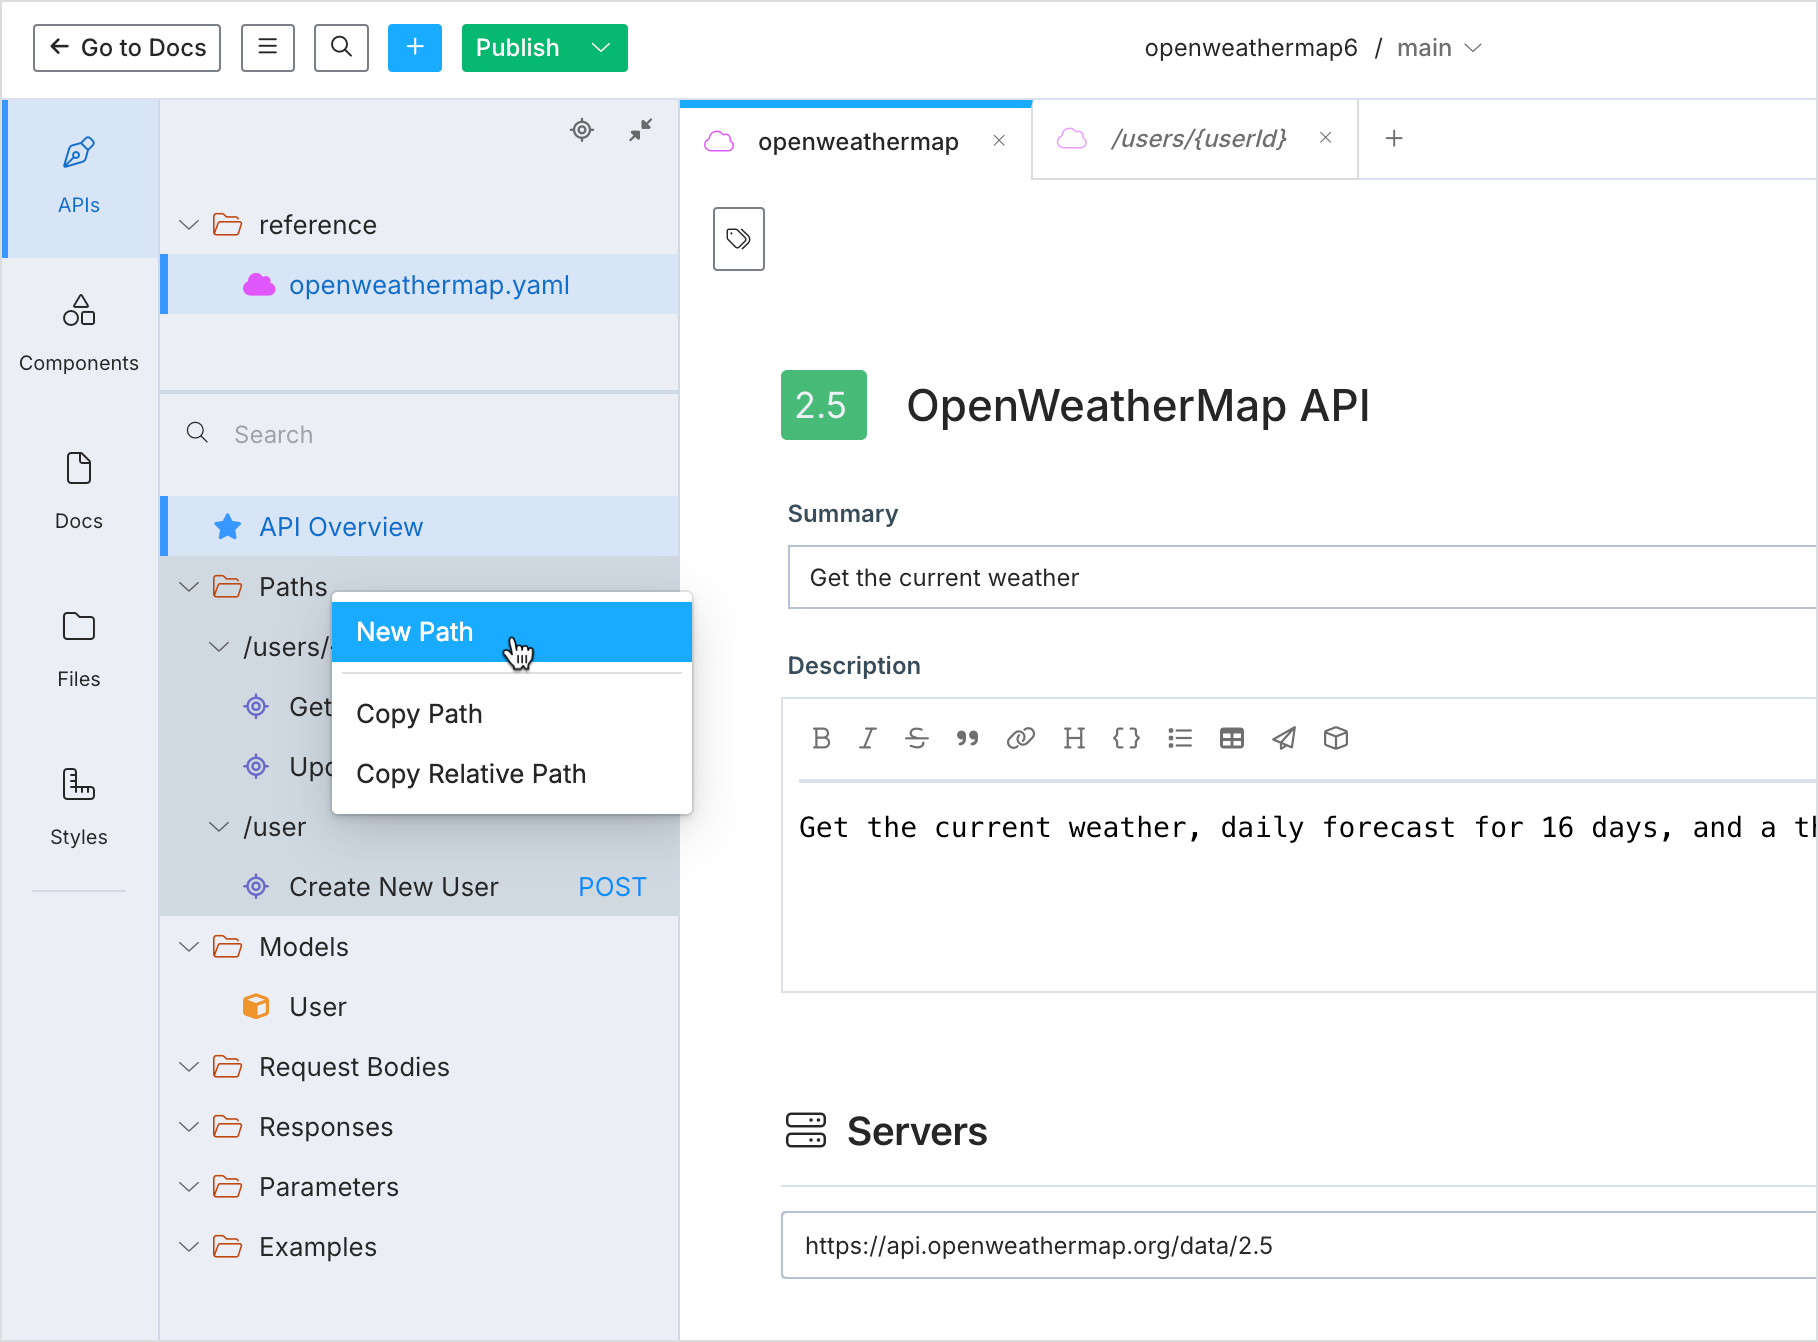
2. Type **weather** and press enter.
By default Stoplight creates a GET operation for the weather endpoint. In our case, this works out great because this endpoint has a GET endpoint. But if not, you could right-click the path and create a new operation, such as POST.
3. Remove the default `/users/{userid}` and `/user` and endpoints. Right-click each endpoint and select **Delete Path**.
4. In the main window (not sidebar), change the path’s title from “Your GET endpoint” to “weather.”
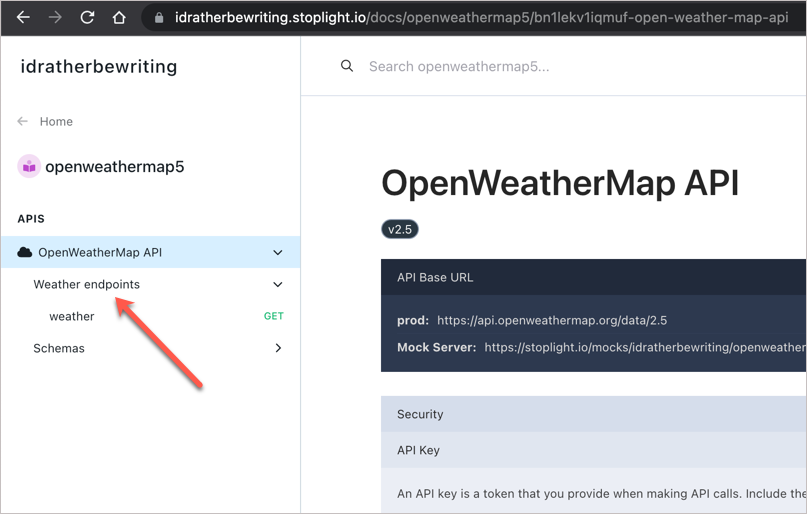
5. Click the **Tags** button  in the upper-left corner and add a tag called “Weather endpoints.”
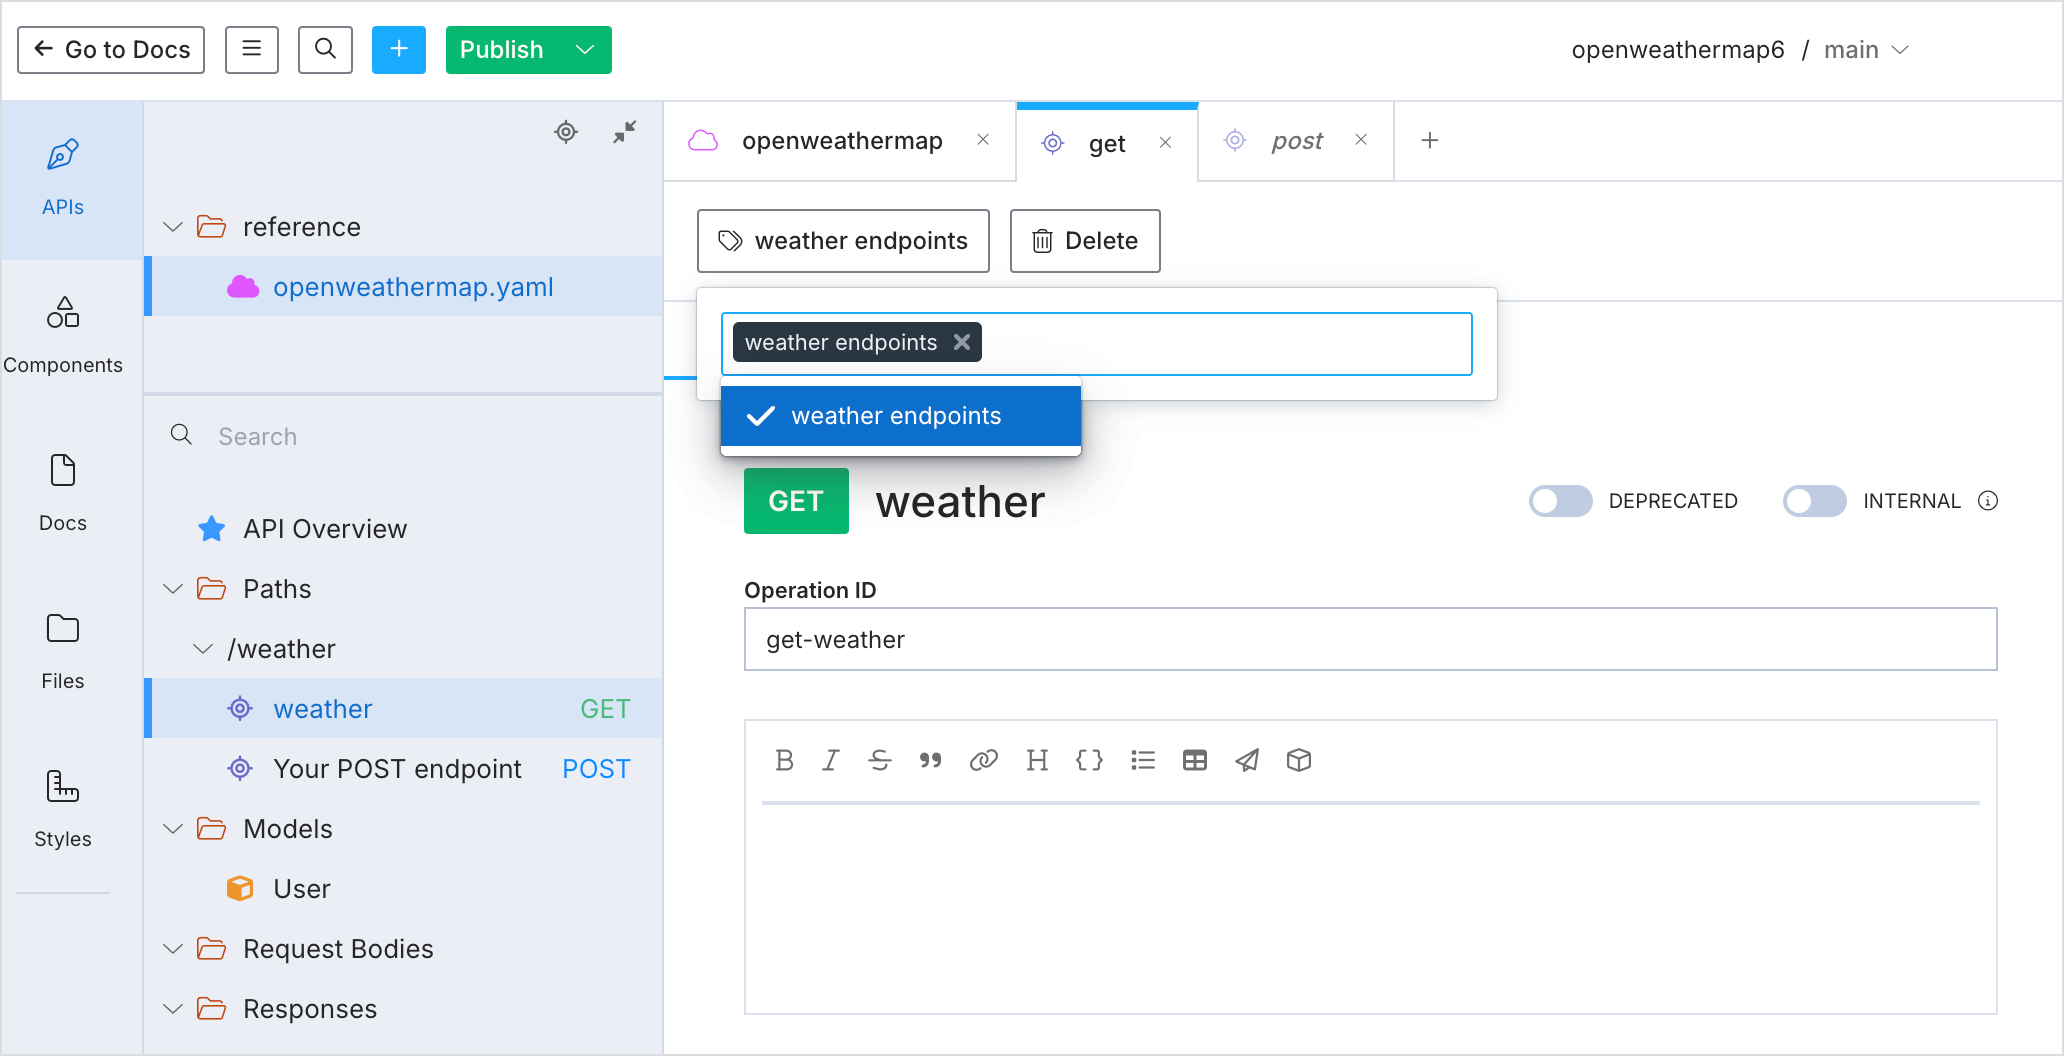
This tag will group the endpoints in the sidebar by this tag into a collapsed section called “Weather endpoints.” This is how you build navigation hierarchy for your endpoints. You won’t see this grouping until you publish your API, though. Here’s a screenshot of what that grouping will look like:
6. In the Description field, add the description for this endpoint. Expand the orange button below to get a description to paste here.
Paths:
- */weather*
- *[Operation]*: GET
- *Operation ID*: get-weather
- *Description*: Access current weather data for any location on Earth including over 200,000 cities! Current weather is frequently updated based on global models and data from more than 40,000 weather stations.
7. On the **Parameters** tab, click the **+ Add** button in the Query Parameters section to start adding parameter information. (Note that our sample API has *query* parameters only, no *path* parameters.) Expand the orange button below for sample query parameter information. Then populate all the query parameter information into the Stoplight editor.
Query parameters:
-------
- *Name*: **zip**
- *[Data type]*: string
- *Description…*: **Zip code**. Search by zip code. *Example: 95050,us*. Please note that if the country is not specified, the search uses USA as a default.
-------
- *Name …*: **units**
- *[Data type]*: string
- *Description…*: **Units**. *Example: imperial*. Possible values: `standard`, `metric`, and `imperial`. When you do not use the `units` parameter, the format is `standard` by default.
-  *Other Properties*:
- *enum*: standard, metric, imperial
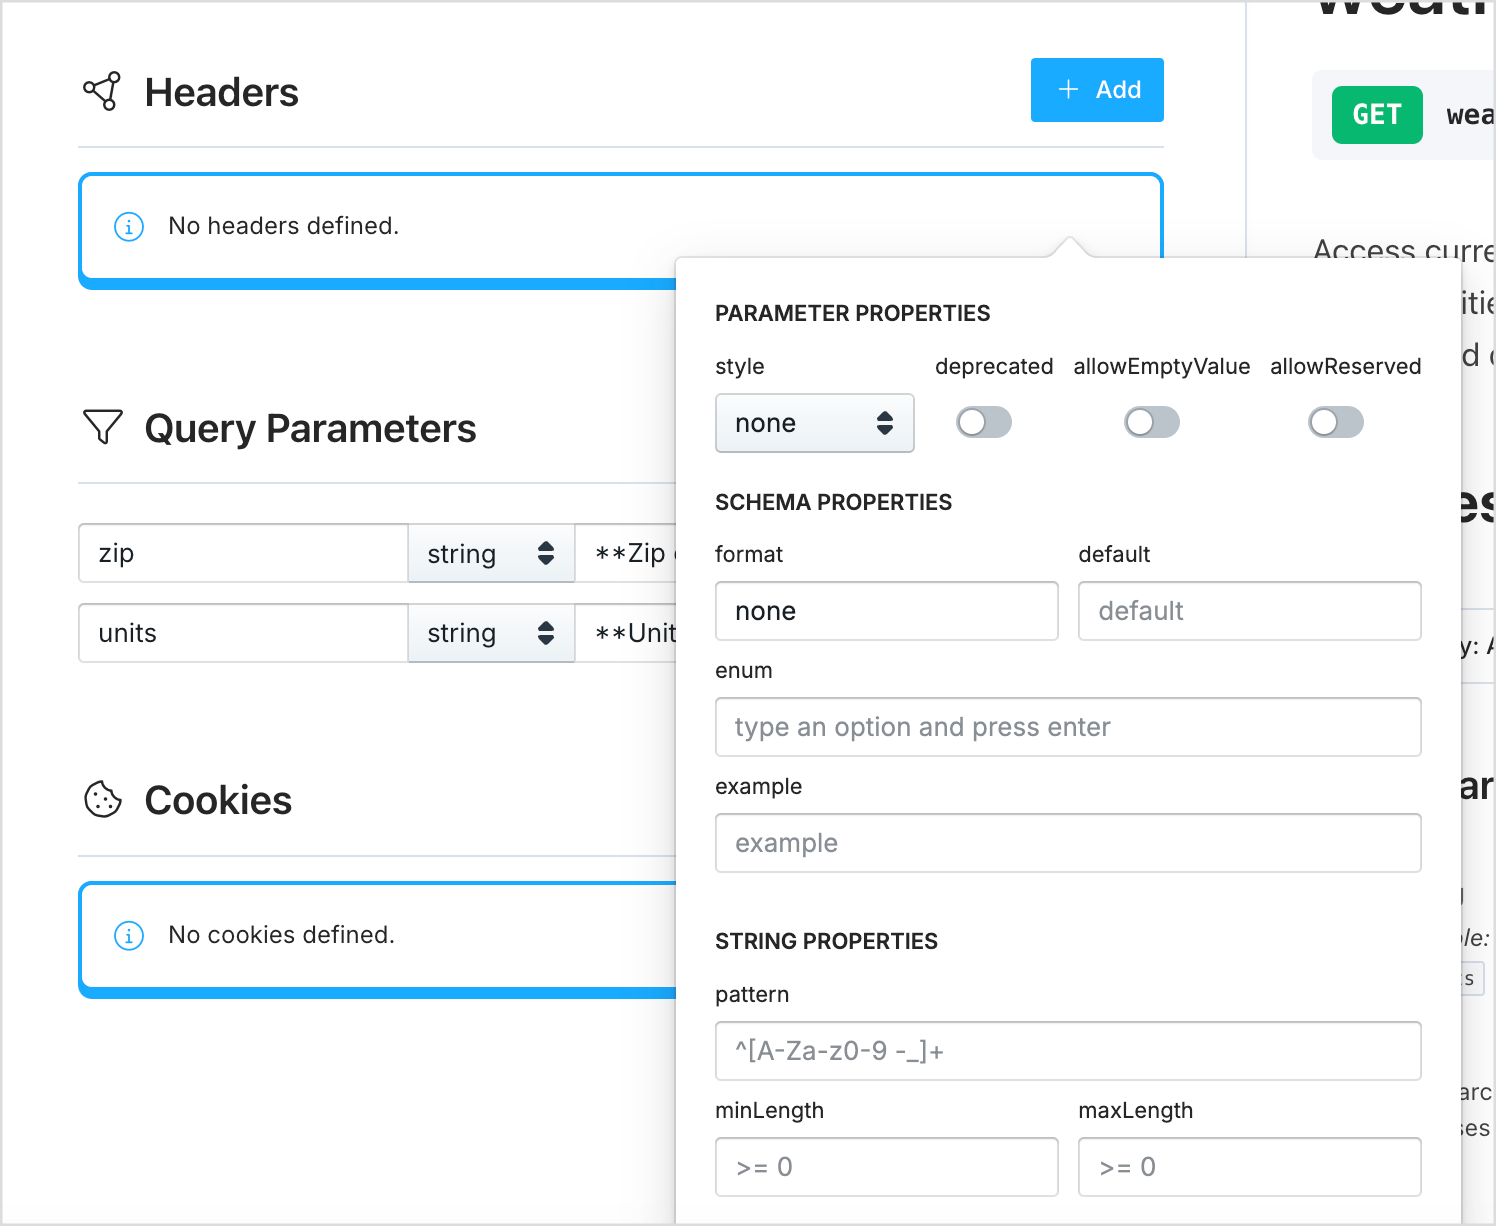
When you click the Other Properties button, the dialog looks like this:
-------
- *Name …*: **q**
- *[Data type]*: string
- *Description*: **City name**. *Example: London*. You can call by city name, or by city name and country code. The API responds with a list of results that match a searching word. For the query value, type the city name and optionally the country code divided by a comma; use ISO 3166 country codes.
-------
- *Name …*: **id**
- *[Data type]*: string
- *Description…*: **City ID**. *Example: `2172797`*. You can call by city ID. The API responds with the exact result. The List of city IDs can be downloaded [here](http://bulk.openweathermap.org/sample/). You can include multiple cities in this parameter — just separate them by commas. The limit of locations is 20. *Note: A single ID counts as a one API call. So, if you have 3 city IDs, it’s treated as 3 API calls.*
-------
- *Name …*: **lon**
- *[Data type]*: string
- *Description…*: **Longitude**. *Example: 139*. Longitude coordinate of the location of your interest. Must use with `lat`.
-------
- *Name …*: **lat**
- *[Data type]*: string
- *Description…*: **Latitude**. *Example: 35*. Latitude coordinate of the location of your interest. Must use with `lat`.
-------
- *Name …*: **lang**
- *[Data type]*: string
- *Description…*: **Language**. *Example: en*. You can use `lang` parameter to get the output in your language. We support the following languages that you can use with the corresponded lang values: Arabic - `ar`, Bulgarian - `bg`, Catalan - `ca`, Czech - `cz`, German - `de`, Greek - `el`, English - `en`, Persian (Farsi) - `fa`, Finnish - `fi`, French - `fr`, Galician - `gl`, Croatian - `hr`, Hungarian - `hu`, Italian - `it`, Japanese - `ja`, Korean - `kr`, Latvian - `la`, Lithuanian - `lt`, Macedonian - `mk`, Dutch - `nl`, Polish - `pl`, Portuguese - `pt`, Romanian - `ro`, Russian - `ru`, Swedish - `se`, Slovak - `sk`, Slovenian - `sl`, Spanish - `es`, Turkish - `tr`, Ukrainian - `ua`, Vietnamese - `vi`, Chinese Simplified - `zh_cn`, Chinese Traditional - `zh_tw`.
-  *Other Properties*:
- *default*: en
- *enum*: ar, bg, ca, cz, de, el, en, fa, fi, fr, gl, hr, hu, it, ja, kr, la, lt, mk, nl, pl, pt, ro, ru, se, sk, sl, es, tr, ua, vi, zh_cn, zh_tw
-------
- *Name …*: **mode**
- *[Data type]*: string
- *Description…*: **Mode**. *Example: html*. Determines the format of the response. Possible values are `json`, `xml`, and `html`. If the mode parameter is empty, the format is `json` by default.
-  *Other Properties*:
- *enum*: json, xml, html
- *default*: json
When you’re finished entering the parameters, Stoplight should look like this:
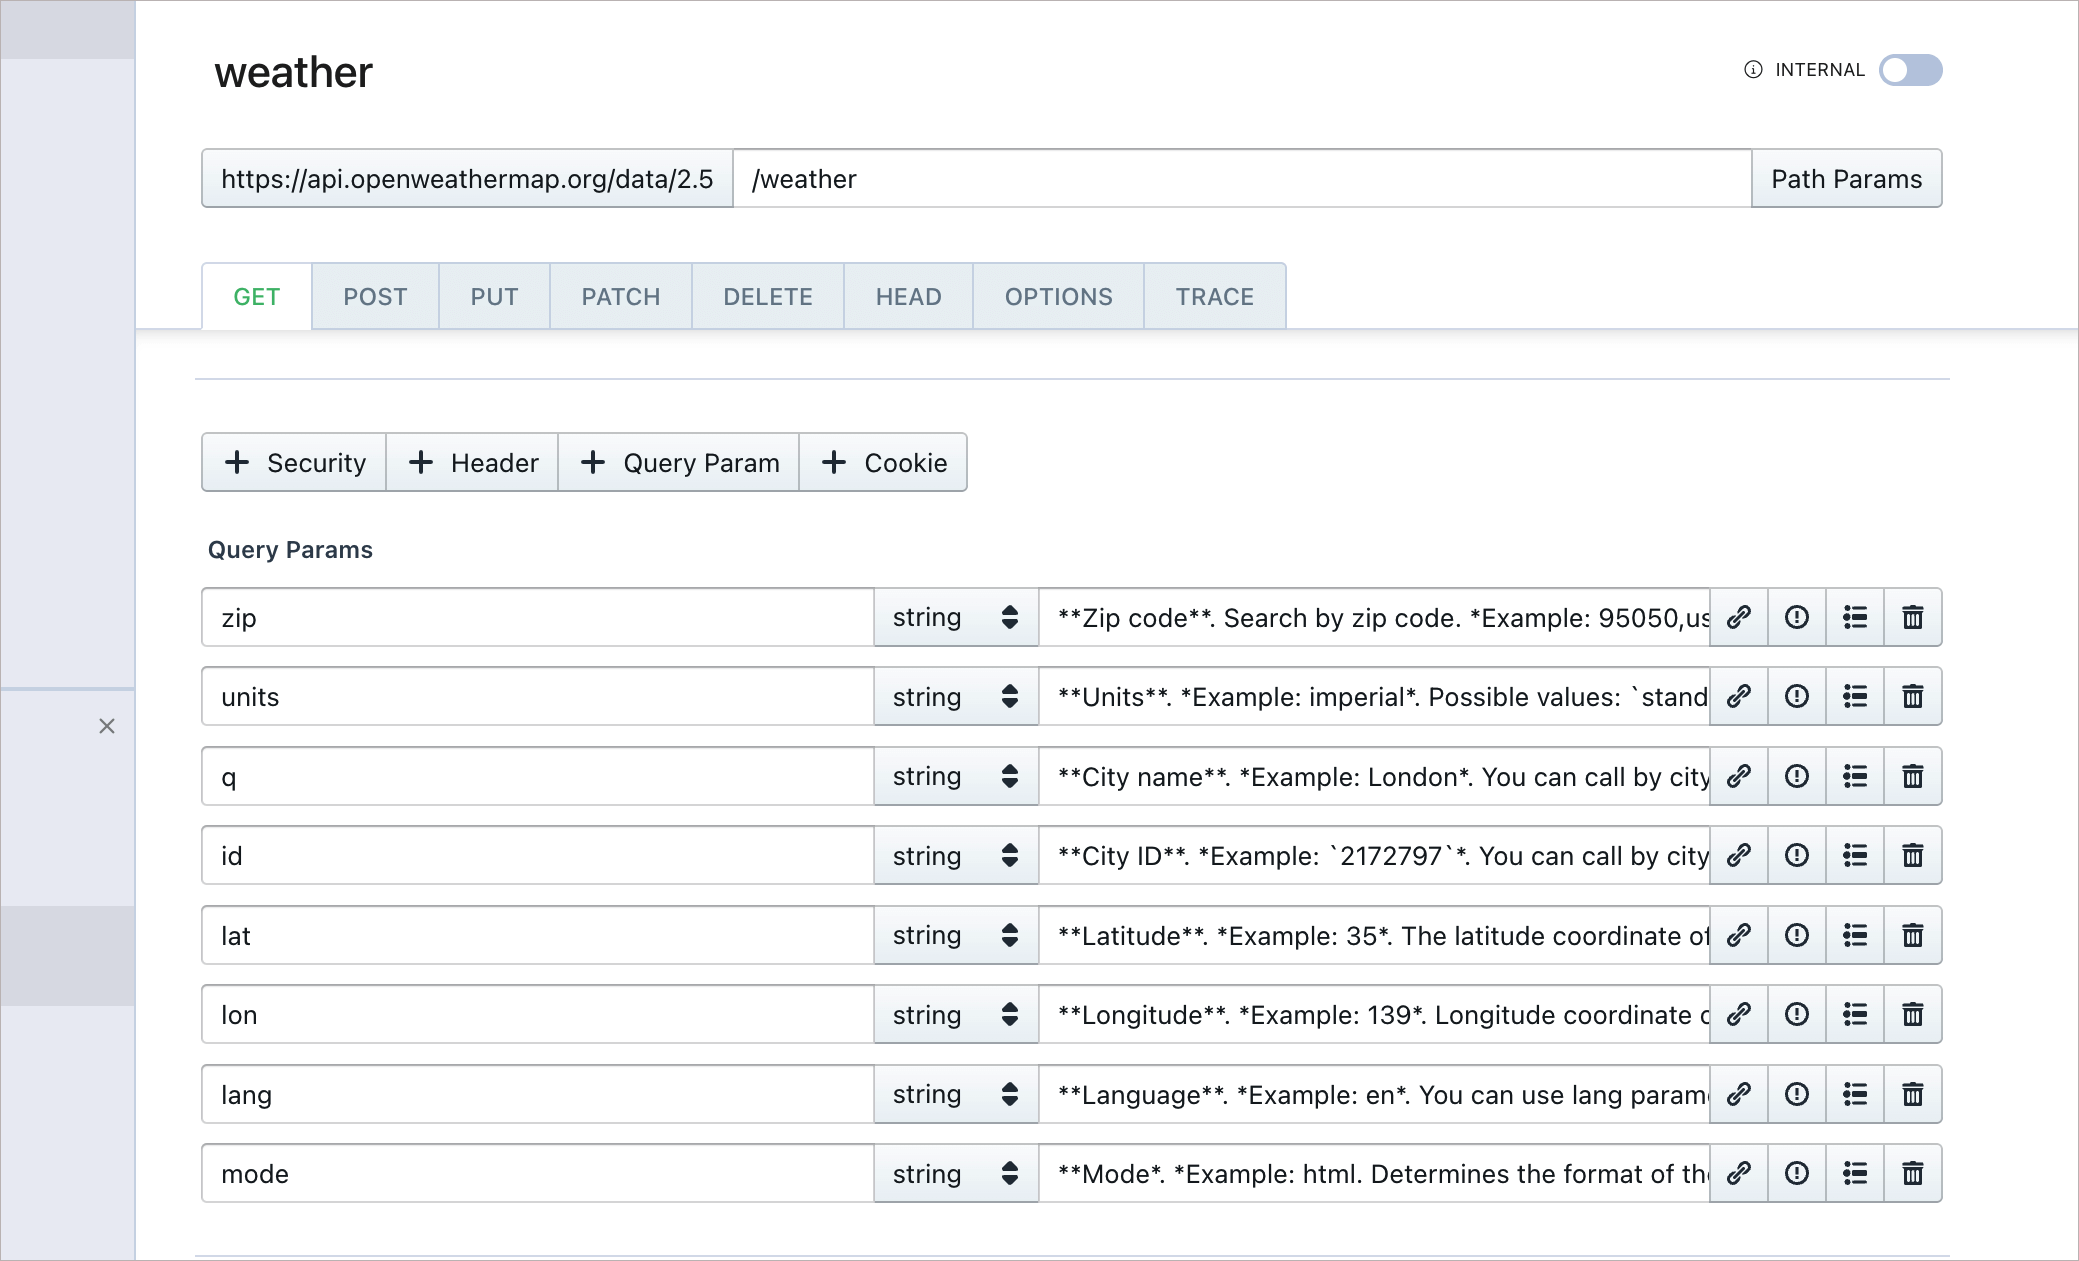
You don’t need to add security for this endpoint because you already configured global security in the previous section. However, if this endpoint had a unique security method, you could override the global security here by clicking the **+ Security** button.
## Step 4: Learn how to re-use parameters
The OpenAPI spec allows to re-use parameters by storing the information in the [`components`](https://idratherbewriting.com/learnapidoc/pubapis_openapi_step5_components_object.html) property. In the Stoplight editor, you reuse parameters by entering the parameter information in the Parameters section in the sidebar. (In the code behind the scenes, this information gets stored in `components`.)
To understand how this works, let’s re-use one of the query parameters.
To re-use a parameter:
1. Right-click the **Parameters** folder in the lower-left corner of the sidebar and select **New Query Parameter**.
A parameter section similar to the query parameter sections you just populated appears.
2. Type **lon** and press enter.
3. Populate the `lon` parameter here using the same information as before.
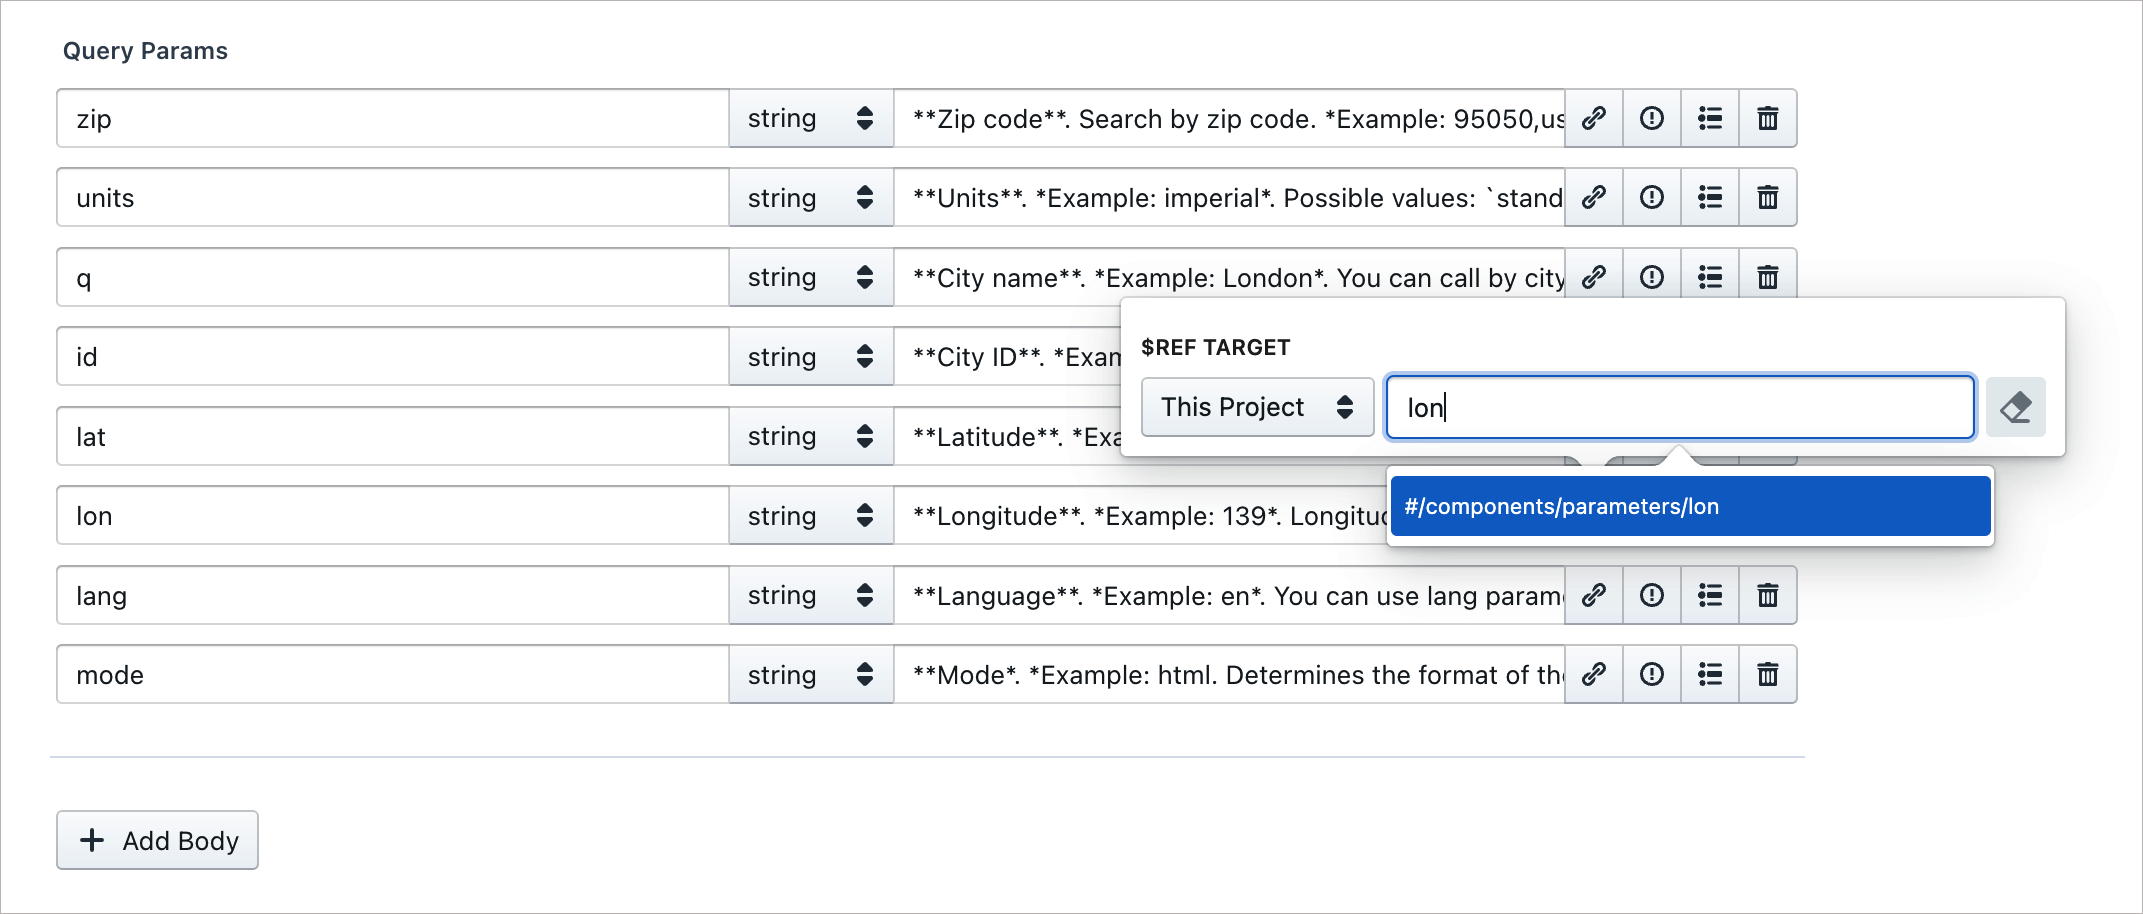
4. Return to the previous query parameters section in the weather GET endpoint where you entered the `lon` parameter, and click the **Reference** button  for this parameter.
5. Search for “lon” and select it.
6. When you link the parameter to the reference like this, the icon turns red: 
7. Switch to the Code editor and search for `lon`. You’ll now see a reference to a component:
```yaml
- $ref: '#/components/parameters/lon'
```
You don’t need to do anything in the code here — I’m just pointing out what changed behind the scenes. You can use this same technique to re-use other parameters as well as other types of content, such as responses.
8. Preview your updates by clicking the **Preview** button. If you select the /weather endpoint in the sidebar, the preview should look like this:
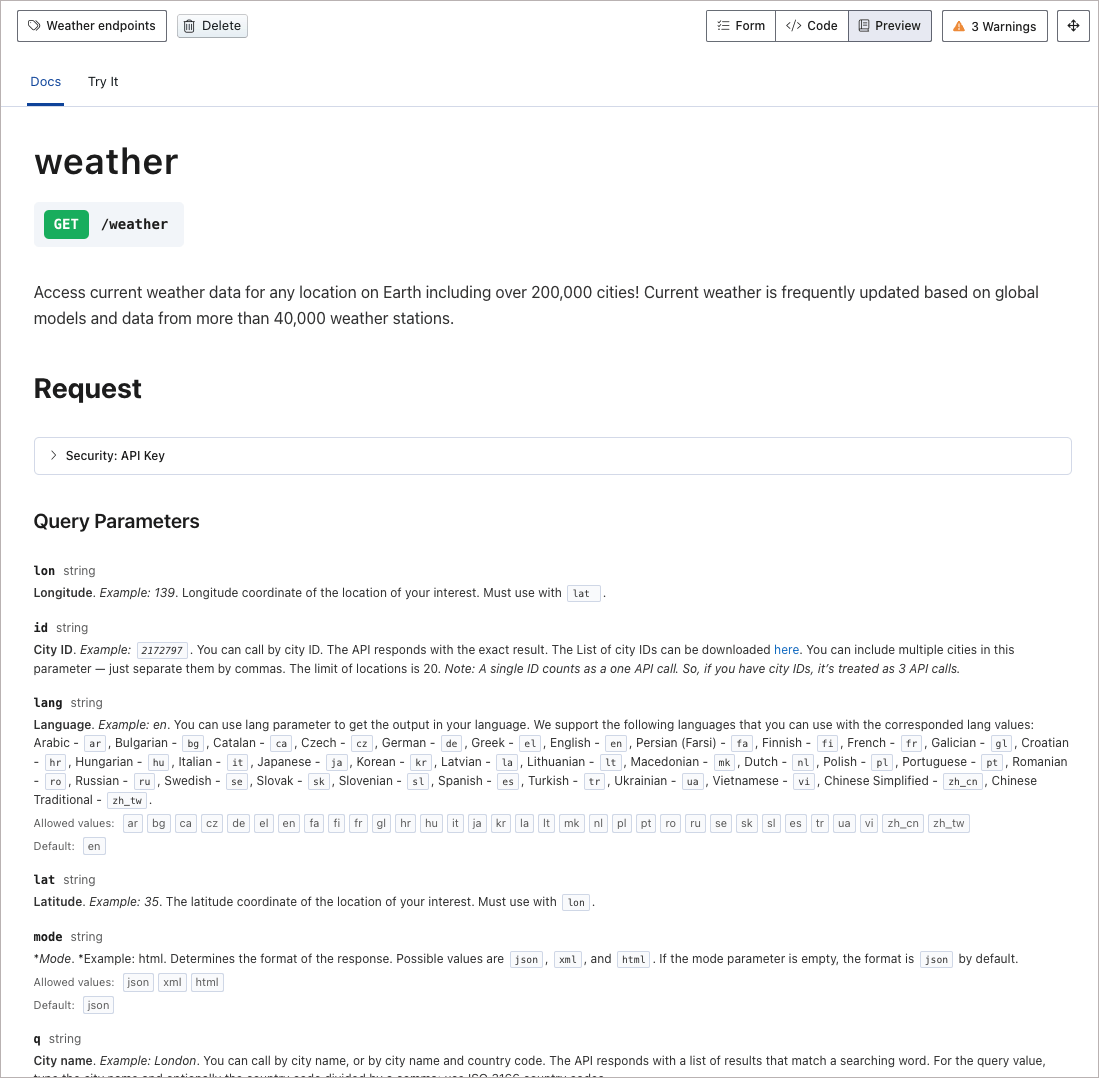
This endpoint in the OpenWeatherMap API doesn’t have any path, header, or body parameters, so you can skip those elements.
## Step 5: Enter the responses and response schema information
As a final step for this endpoint, you need to enter the response information. The response includes not only an example response but also the schema describing the response. The schema describes all possible values in the response, their data types, and whether the values are required.
To enter the response information in Stoplight:
1. In the tabs for your endpoint, click the **Responses** tab.
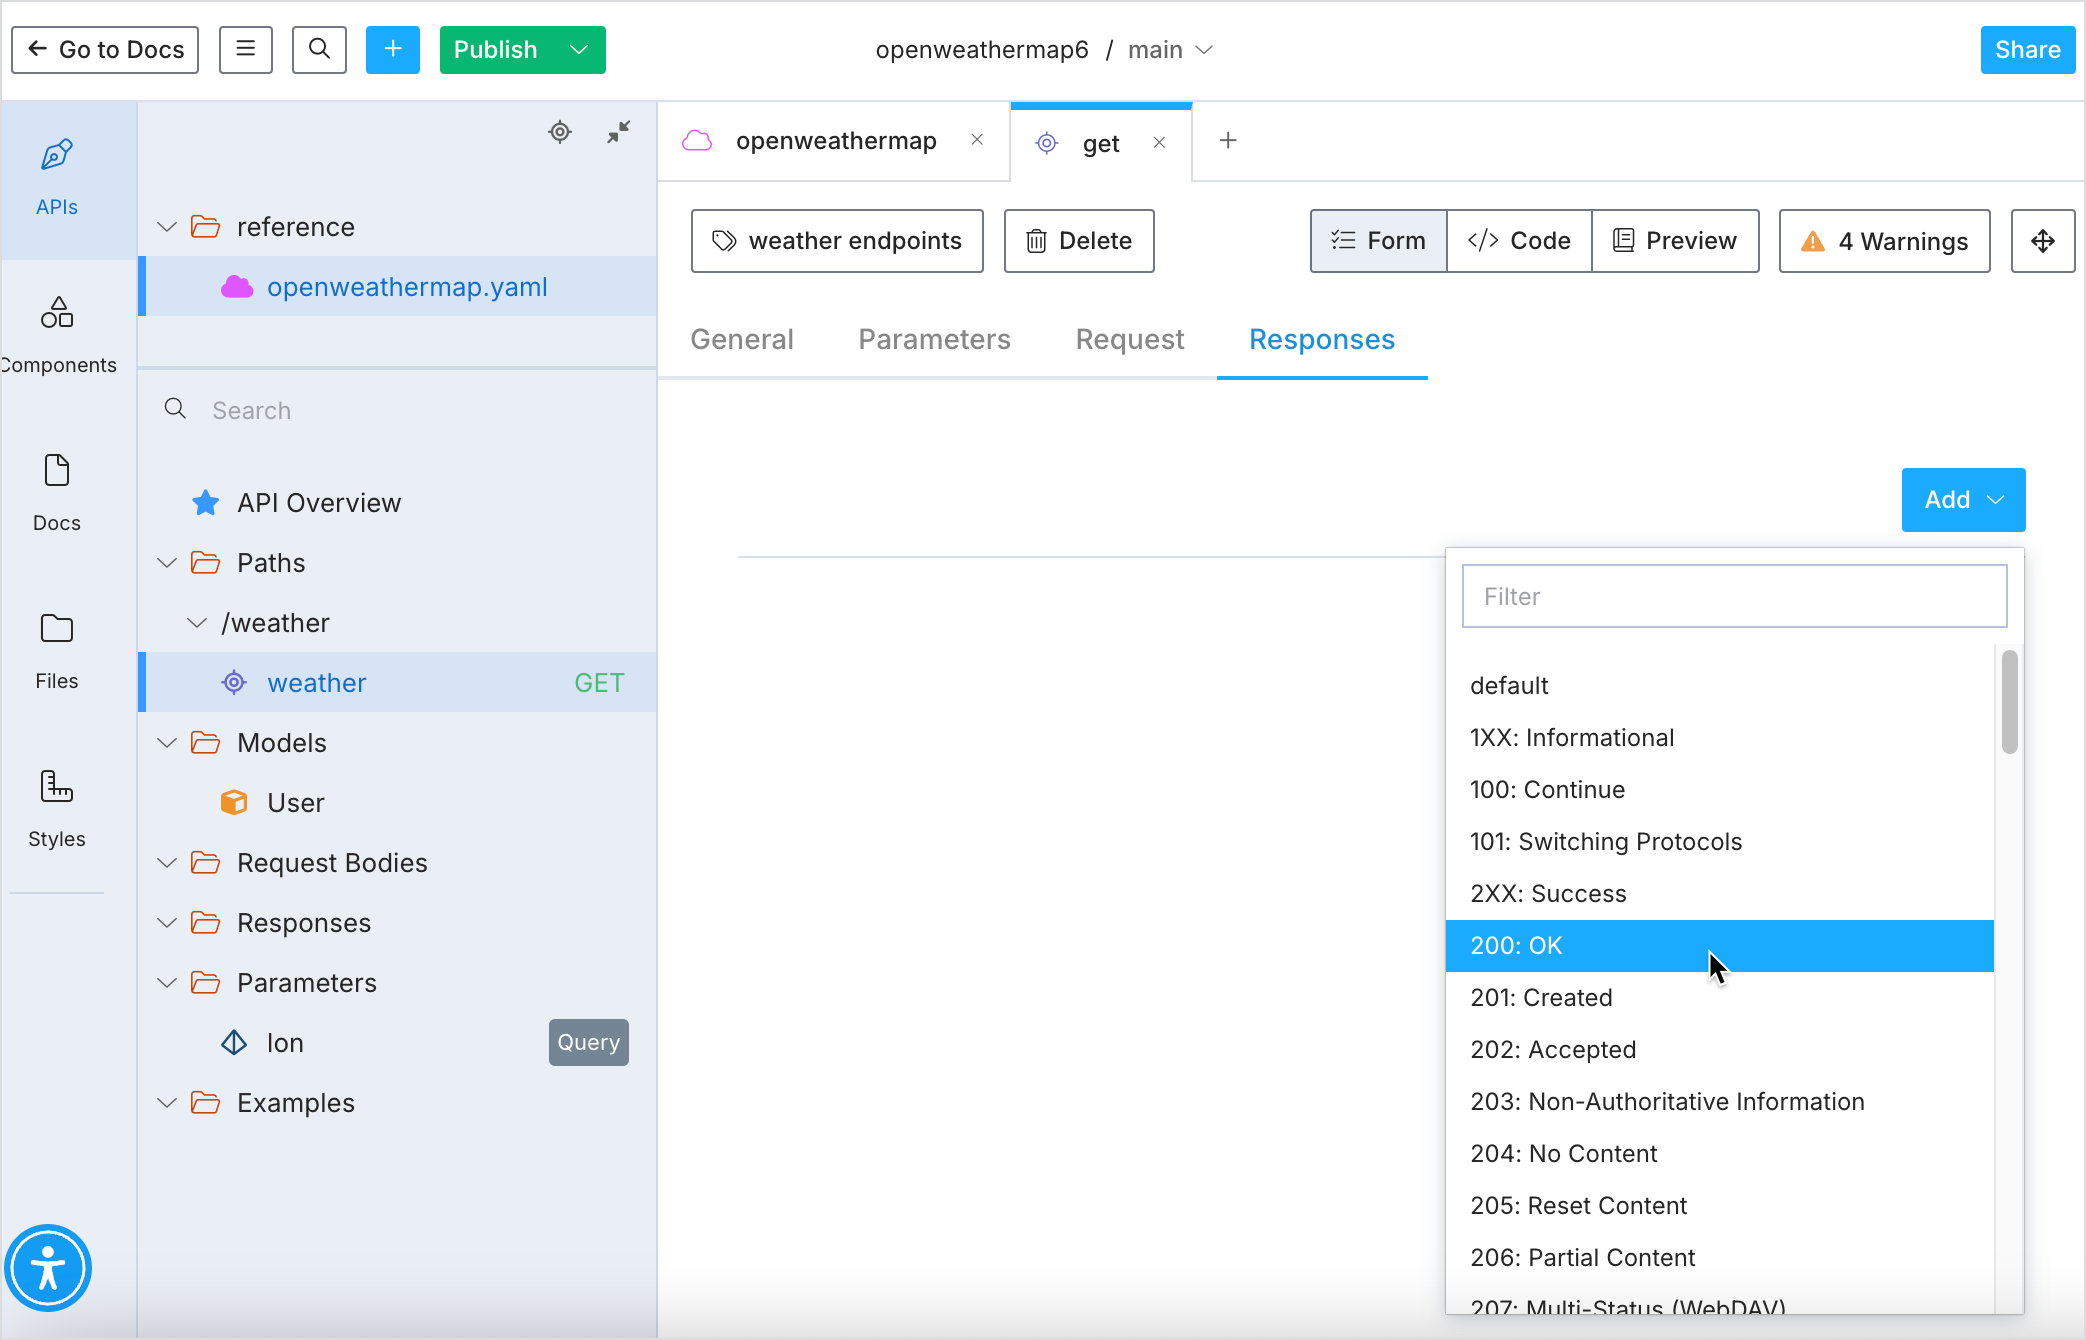
2. In the **Body** section, click **Add** and select **application/json**.
3. Click **Generate from JSON**.
Here you’ll experience one of the coolest features in the Stoplight editor, and one reason why I like this editor so much. The editor will automatically build out the response schema from a sample JSON response.
4. Expand the orange button below and copy the sample response.
Sample response:
```json
{
"coord": {
"lon": -121.95,
"lat": 37.35
},
"weather": [
{
"id": 803,
"main": "Clouds",
"description": "broken clouds",
"icon": "04n"
}
],
"base": "stations",
"main": {
"temp": 45.25,
"feels_like": 41.16,
"temp_min": 41,
"temp_max": 50,
"pressure": 1026,
"humidity": 75
},
"visibility": 16093,
"wind": {
"speed": 2.57,
"deg": 36
},
"clouds": {
"all": 75
},
"dt": 1579415808,
"sys": {
"type": 1,
"id": 5845,
"country": "US",
"sunrise": 1579360793,
"sunset": 1579396557
},
"timezone": -28800,
"id": 0,
"name": "Santa Clara",
"cod": 200
}
```
5. Paste the JSON you copied into the gray area where it says “Paste or write a JSON example below…” (Remove the empty curly braces `{}` first, and then paste in your sample.)
6. Click **Generate**. Stoplight builds the schema for you!
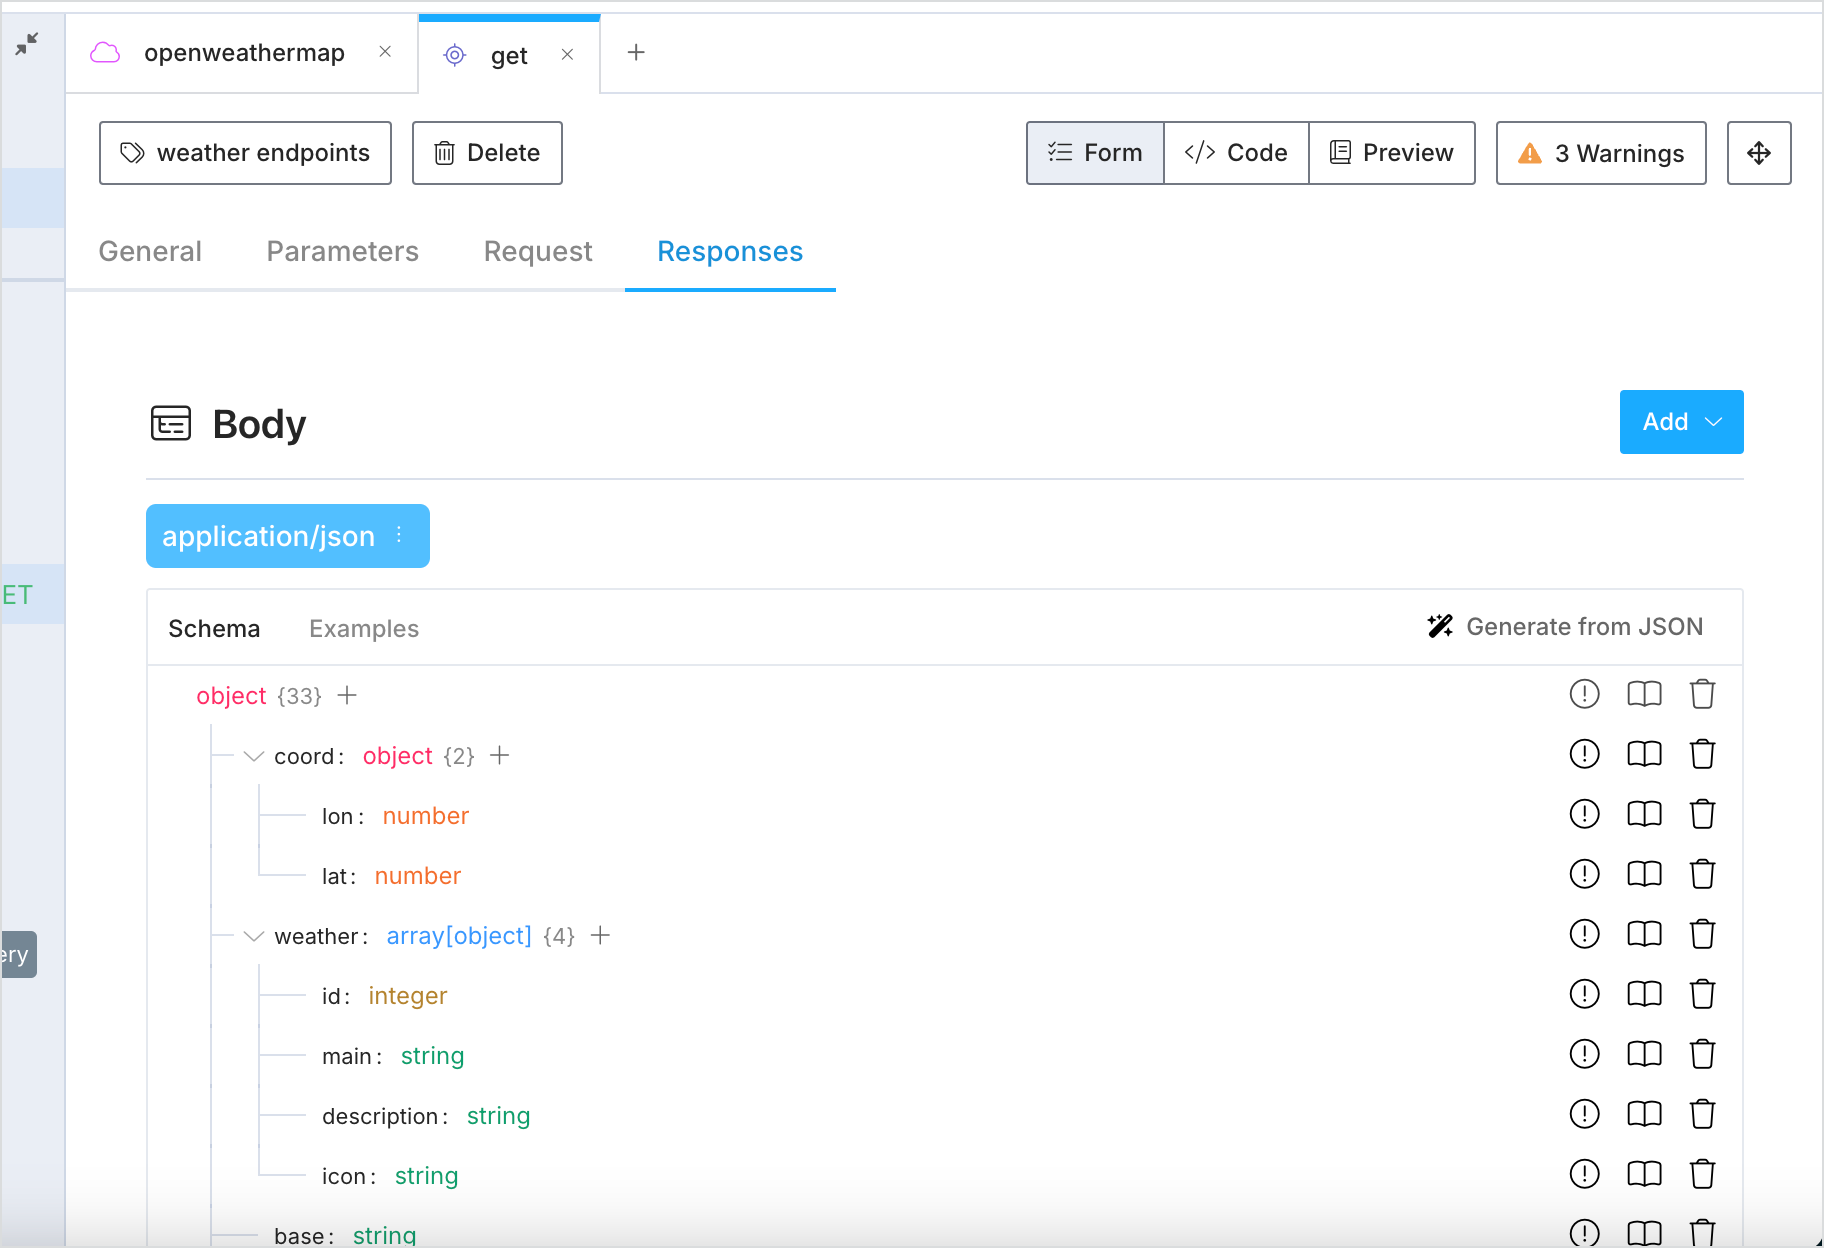
7. Add some more detail about the response elements:
1. Click the **Description** button  next to each property and add a description.
2. Click the linked text that says “number” next to a parameter, such as lon. Here you can add in some example values for a response field, among other configurations.
For the description and examples, expand the orange button below and copy over the information.
Descriptions and examples:
**coord >**
lon:
- description: City geo location, longitude
- example: 145.77
lat:
- description: City geo location, latitude
- example: -16.92
**weather >**
id:
- description: Weather condition id
- example: ‘803’
main:
- description: Group of weather parameters (Rain, Snow, Extreme etc.)
- example: clouds
description:
- description: Weather condition within the group
- example: broken clouds
icon:
- description: Weather icon id
- example: 04n
**base:**
- description: Internal parameter
- example: cmc stations
**main >**
temp:
- description: ‘Temperature. Unit Default: Kelvin, Metric: Celsius, Imperial: Fahrenheit.’
- example: 293.25
feels_like:
- description: What the weather feels like despite the actual numbers
- example: 41.16
temp_min:
- description: ‘Minimum temperature at the moment. This is deviation from current temp that is possible for large cities and megalopolises geographically expanded (use these parameter optionally). Unit Default: Kelvin, Metric: Celsius, Imperial: Fahrenheit.’
- example: 289.82
temp_max:
- description: ‘Maximum temperature at the moment. This is deviation from current temp that is possible for large cities and megalopolises geographically expanded (use these parameter optionally). Unit Default: Kelvin, Metric: Celsius, Imperial: Fahrenheit.’
- example: 295.37
pressure:
- description: ‘Atmospheric pressure (on the sea level, if there is no sea_level or grnd_level data), hPa’
- example: 1019
humidity:
- description: ‘Humidity, %’
- example: 83
**wind >**
speed:
- description: ‘Wind speed. Unit Default: meter/sec, Metric: meter/sec, Imperial: miles/hour.’
- example: 5.1
deg:
- description: ‘’
- example: 150
visibility:
- description: ‘Visibility, meter’
- example: 16093
**clouds >**
all:
- description: ‘Cloudiness, %’
- example: 75
**dt:**
- description: ‘Time of data calculation, unix, UTC’
- example: 1435658272
**sys >**
type:
- description: Internal parameter
- example: 1
id:
- description: Internal parameter
- example: 8166
country:
- description: ‘Country code (GB, JP etc.)’
- example: AU
sunrise:
- description: ‘Sunrise time, unix, UTC’
- example: 1435610796
sunset:
- description: ‘Sunset time, unix, UTC’
- example: 1435650870
**timezone:**
- description: the timezone for the station
- example: -28800
**id:**
- description: City ID
- example: 2172797
**name:**
- description: Name
- example: Cairns
**cod:**
- description: Internal parameter
- example: 200
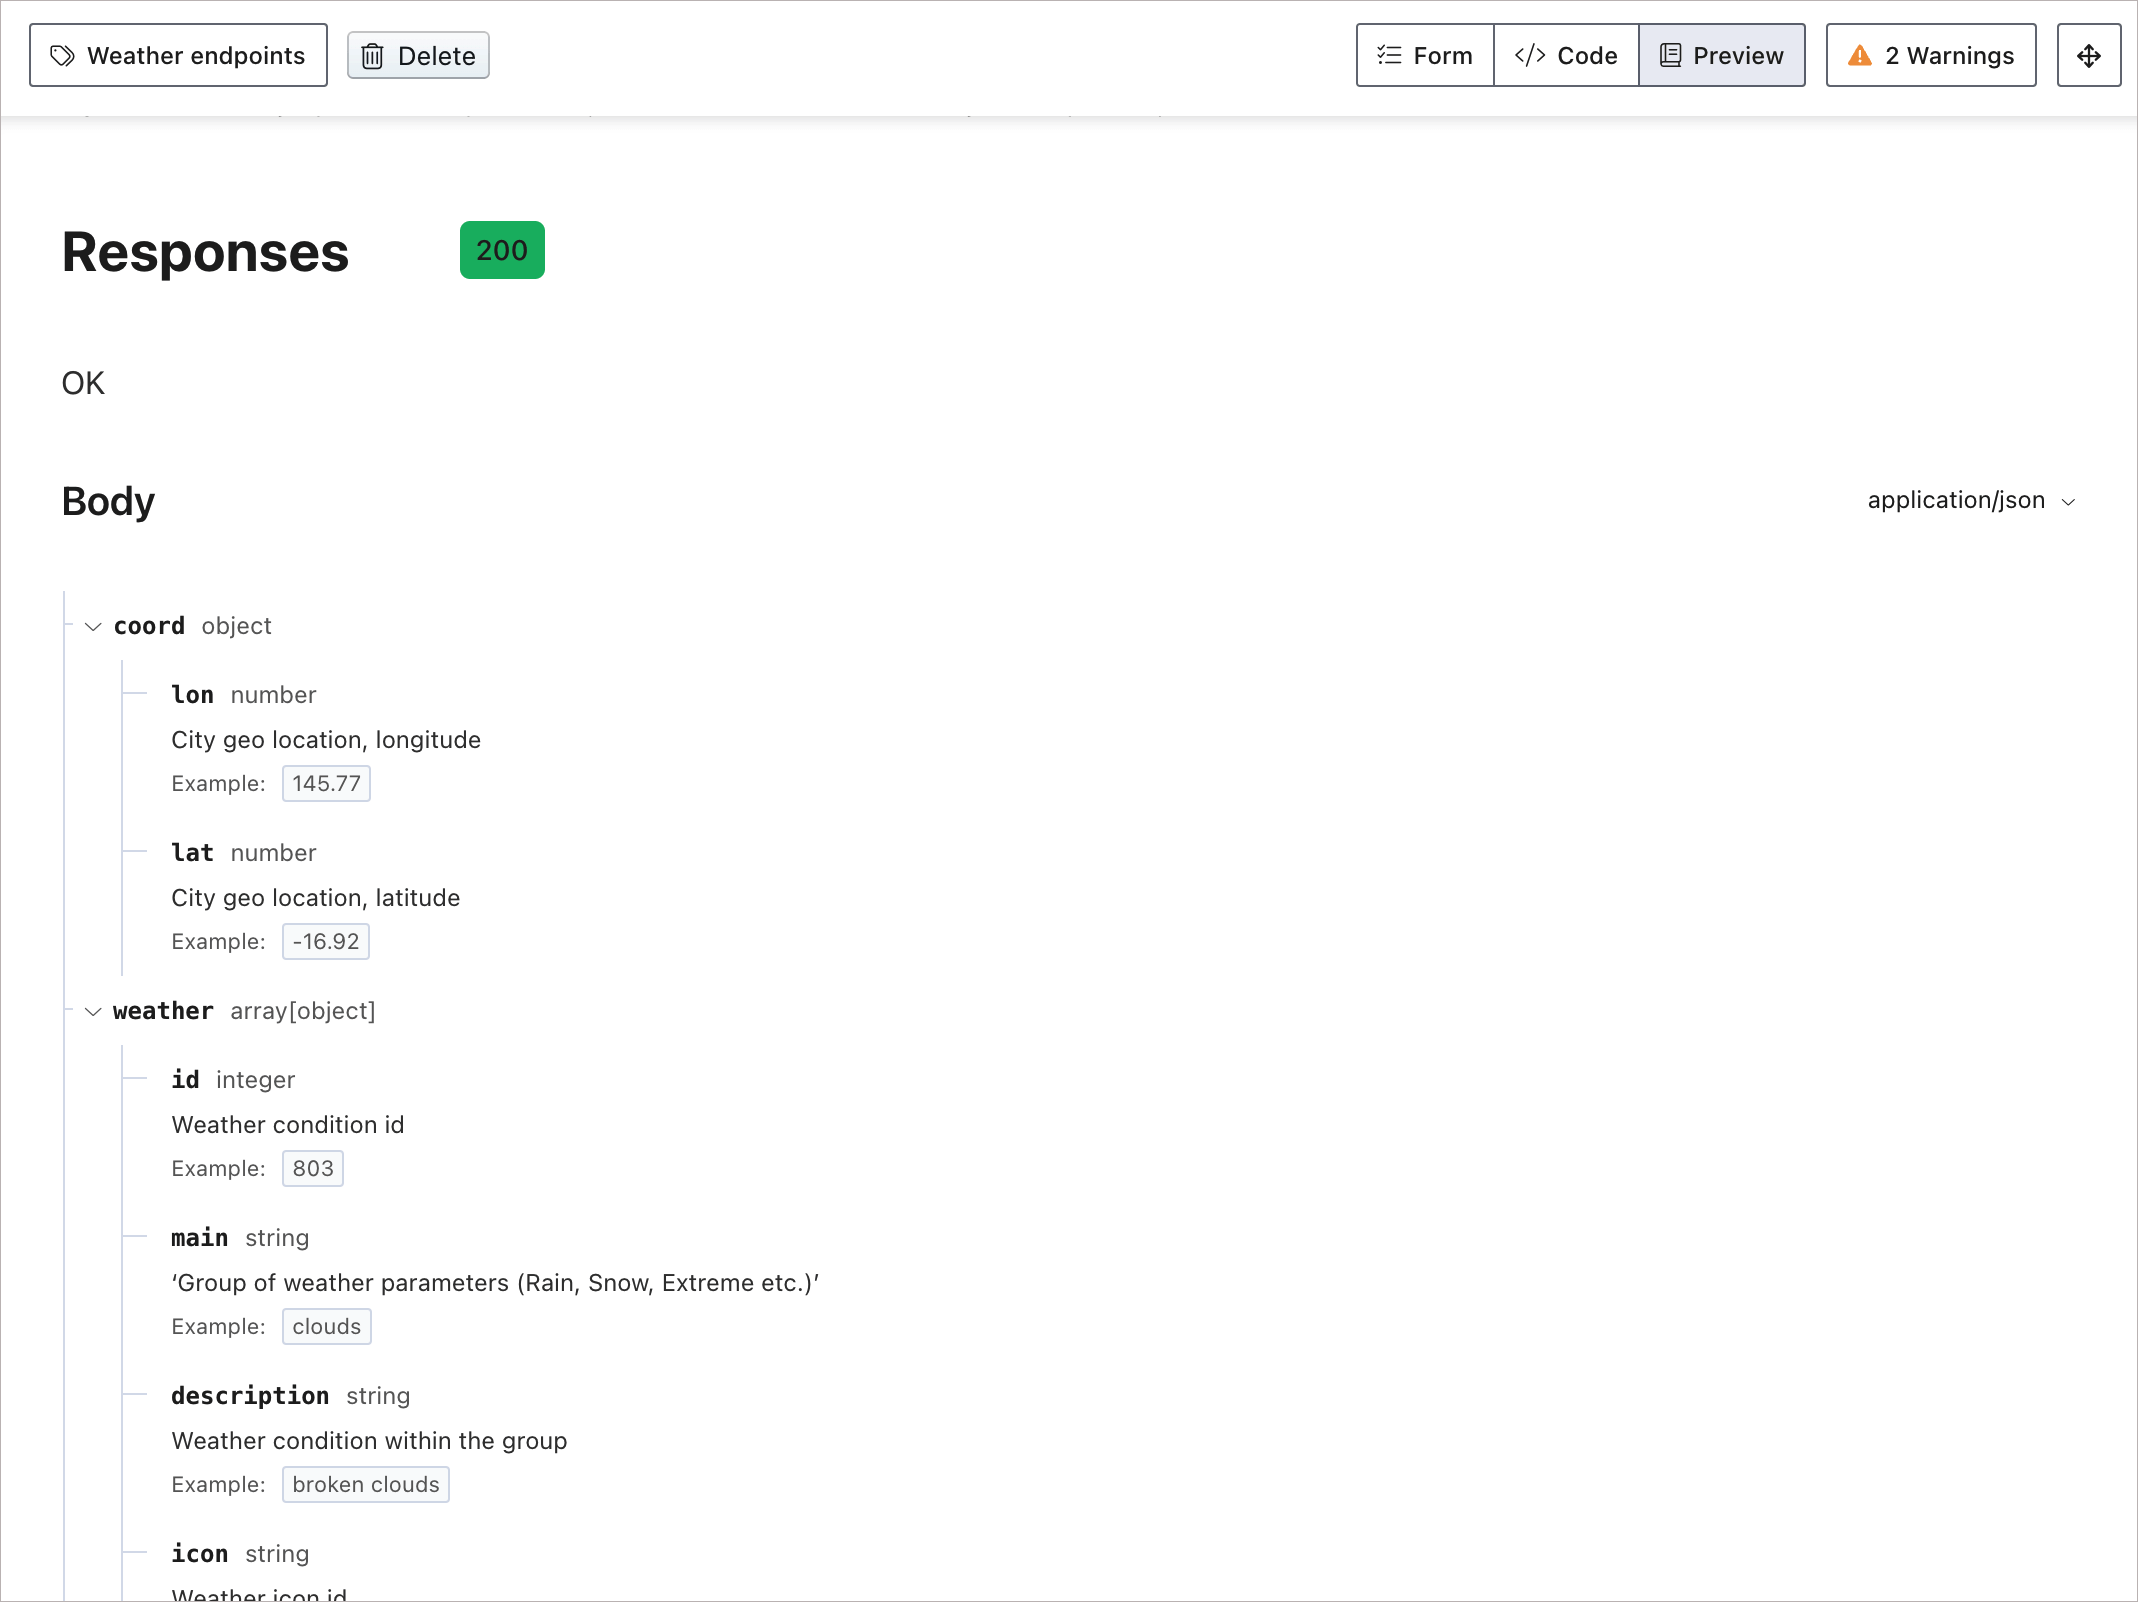
To preview the responses output, click **Preview**. See my [example here](https://web.archive.org/web/20240301183425/https://idratherbewriting.stoplight.io/docs/openweathermap4/YXBpOjExMTIxODY3-open-weather-map-api).
## Step 6: Preview, test, and publish the output
You’ve finished creating your OpenAPI spec, so let’s preview, test, and publish test the documentation:
1. Click the **Preview** button in the upper-right corner.
2. In the sidebar, select the **/weather** endpoint.
3. Click the **Try It** tab near the top of the screen.
4. Enter your API key for the `appid` parameter. For details on getting the OpenWeatherMap API key, see [Get an OpenWeatherMap API Key](https://idratherbewriting.com/learnapidoc/docapis_get_auth_keys.html#openweathermap_apikey).
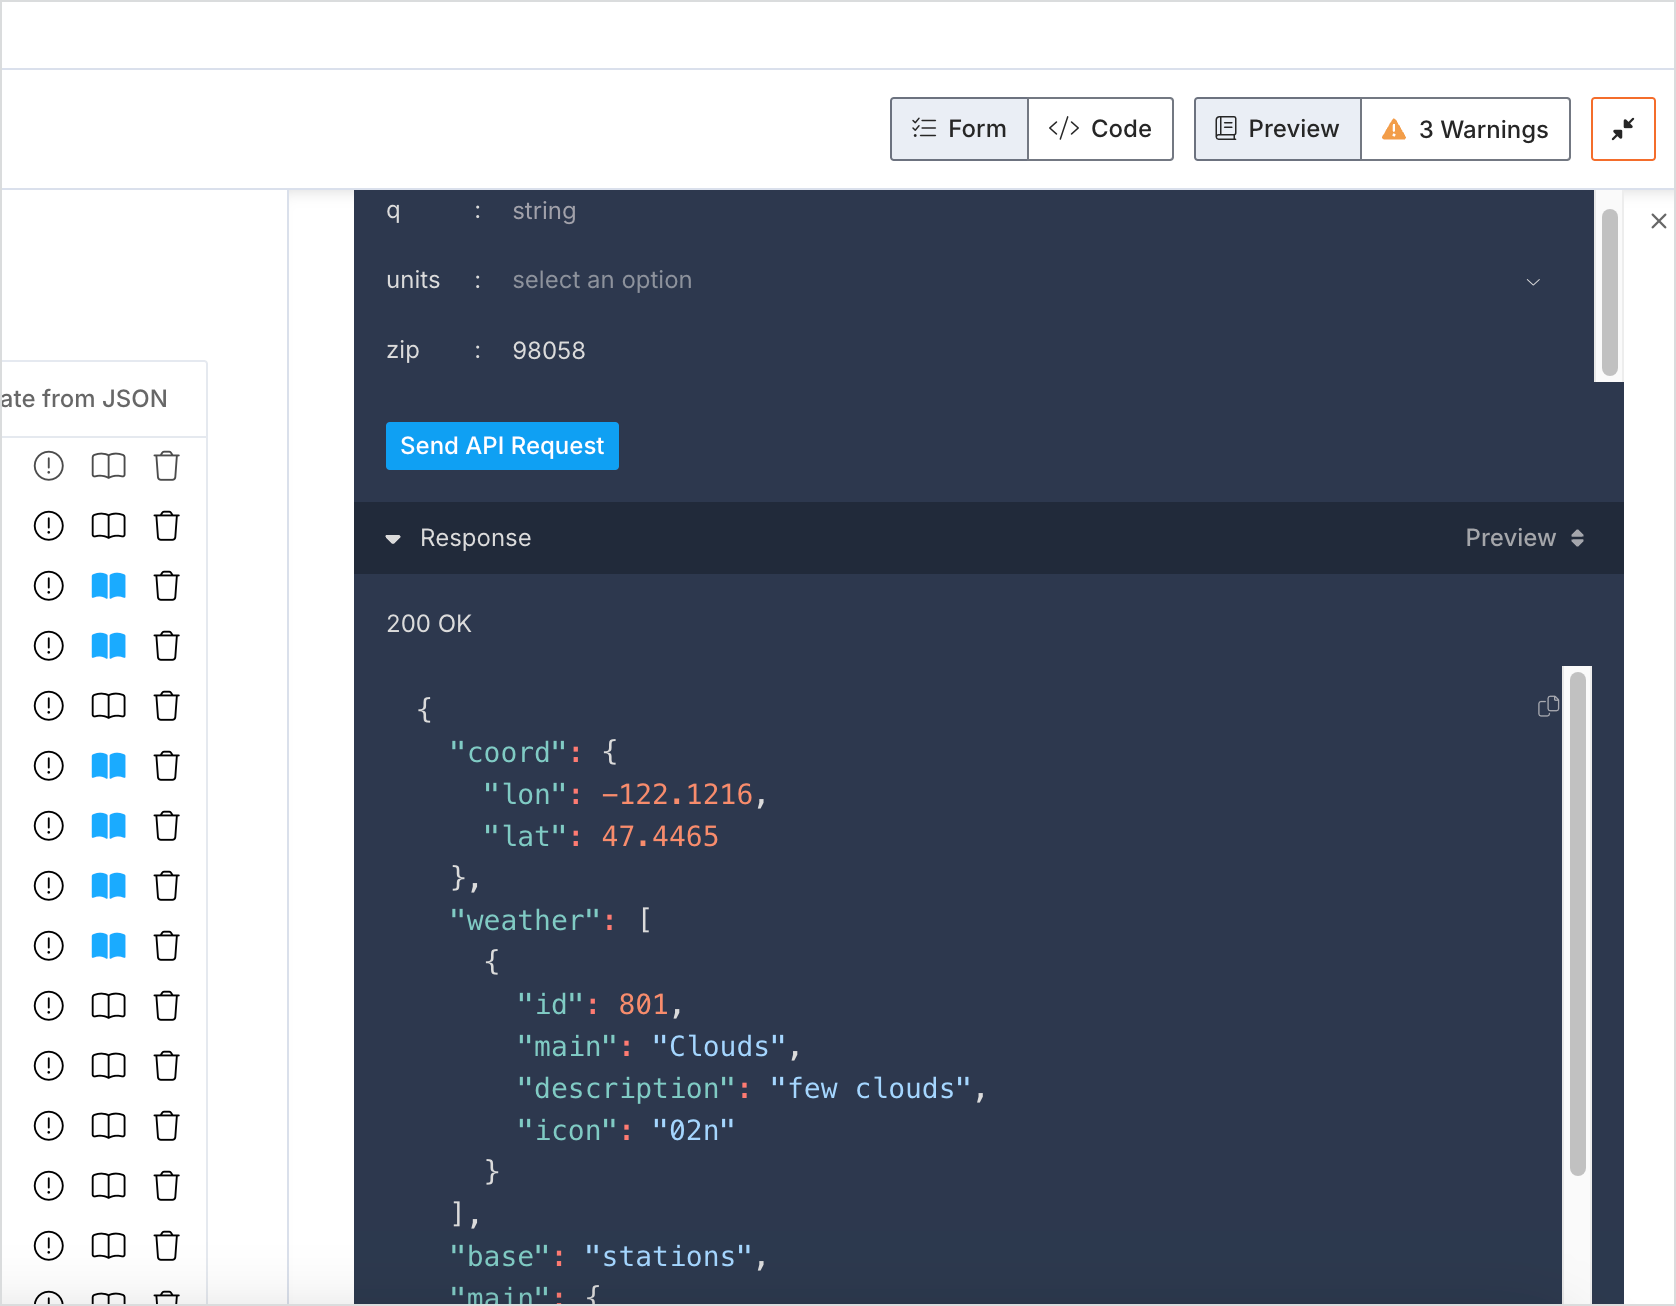
5. Leave the other parameters blank. Just enter your zip code for the `zip` parameter (for example, 98058). You might have to scroll to find the zip parameter as they are sorted alphabetically. The screen should look like this:
6. At this point, you can either publish or export your API documentation. To publish, click the green **Publish** button in the top left.
7. To set the visibility:
1. Click on **Go to Docs** on the top-left to exit Stoplight.
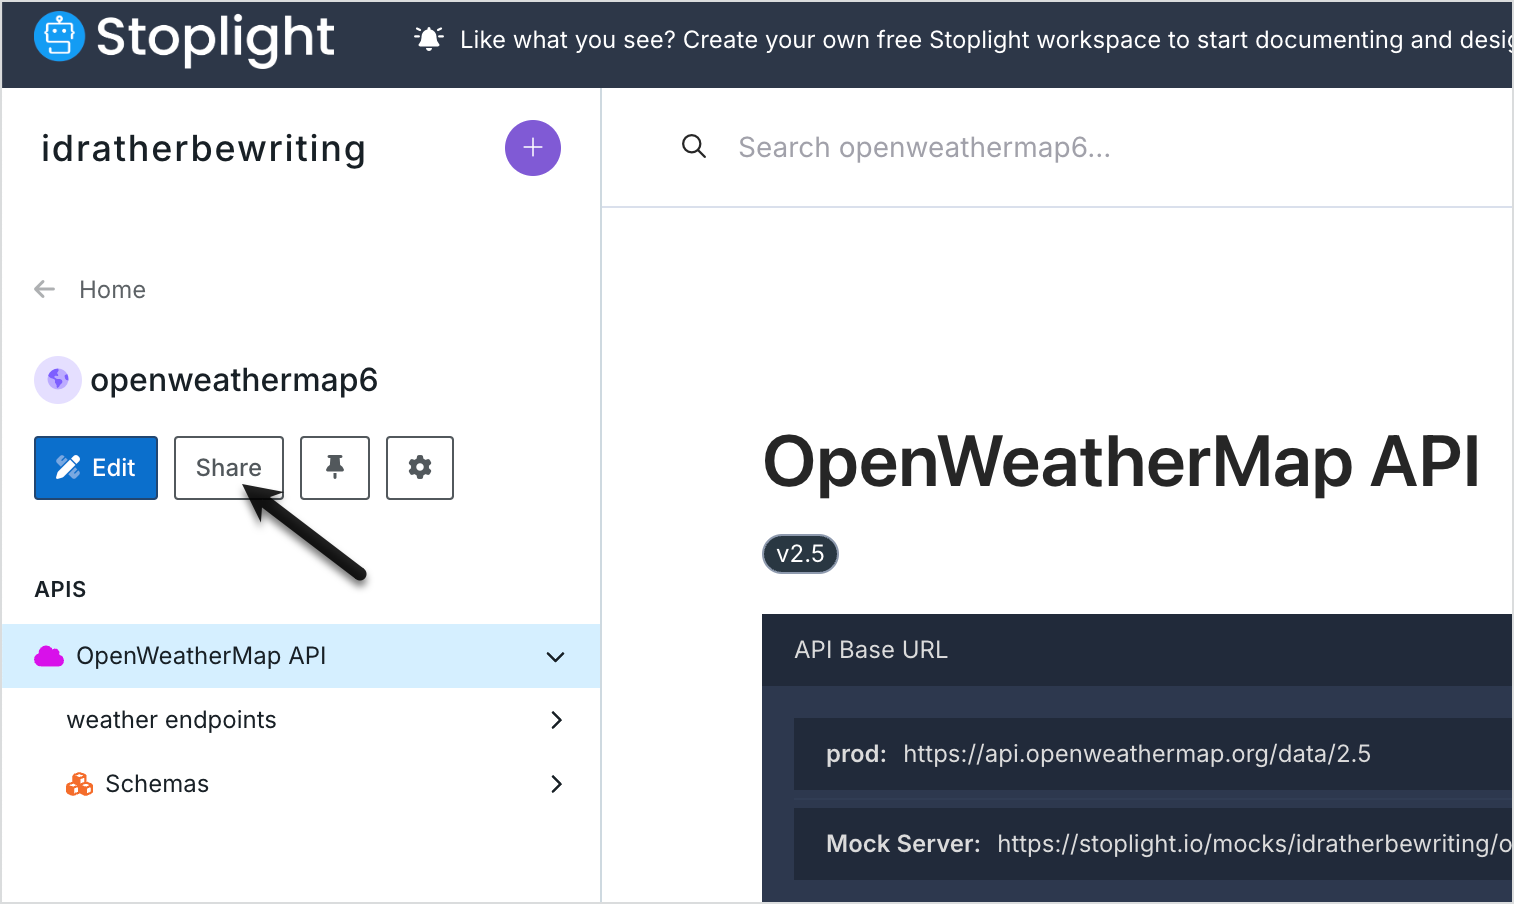
2. From your workspace, look at the sidebar on the left. Click the **Share** button and choose the visibility settings for your documentation (it is set to Public by default). You can also invite other team members from the share dialog.
8. If you don’t want to publish docs through Stoplight, you can export your OpenAPI spec file from Stoplight. From the workspace home, click the **Export** button and choose the type of code you want:
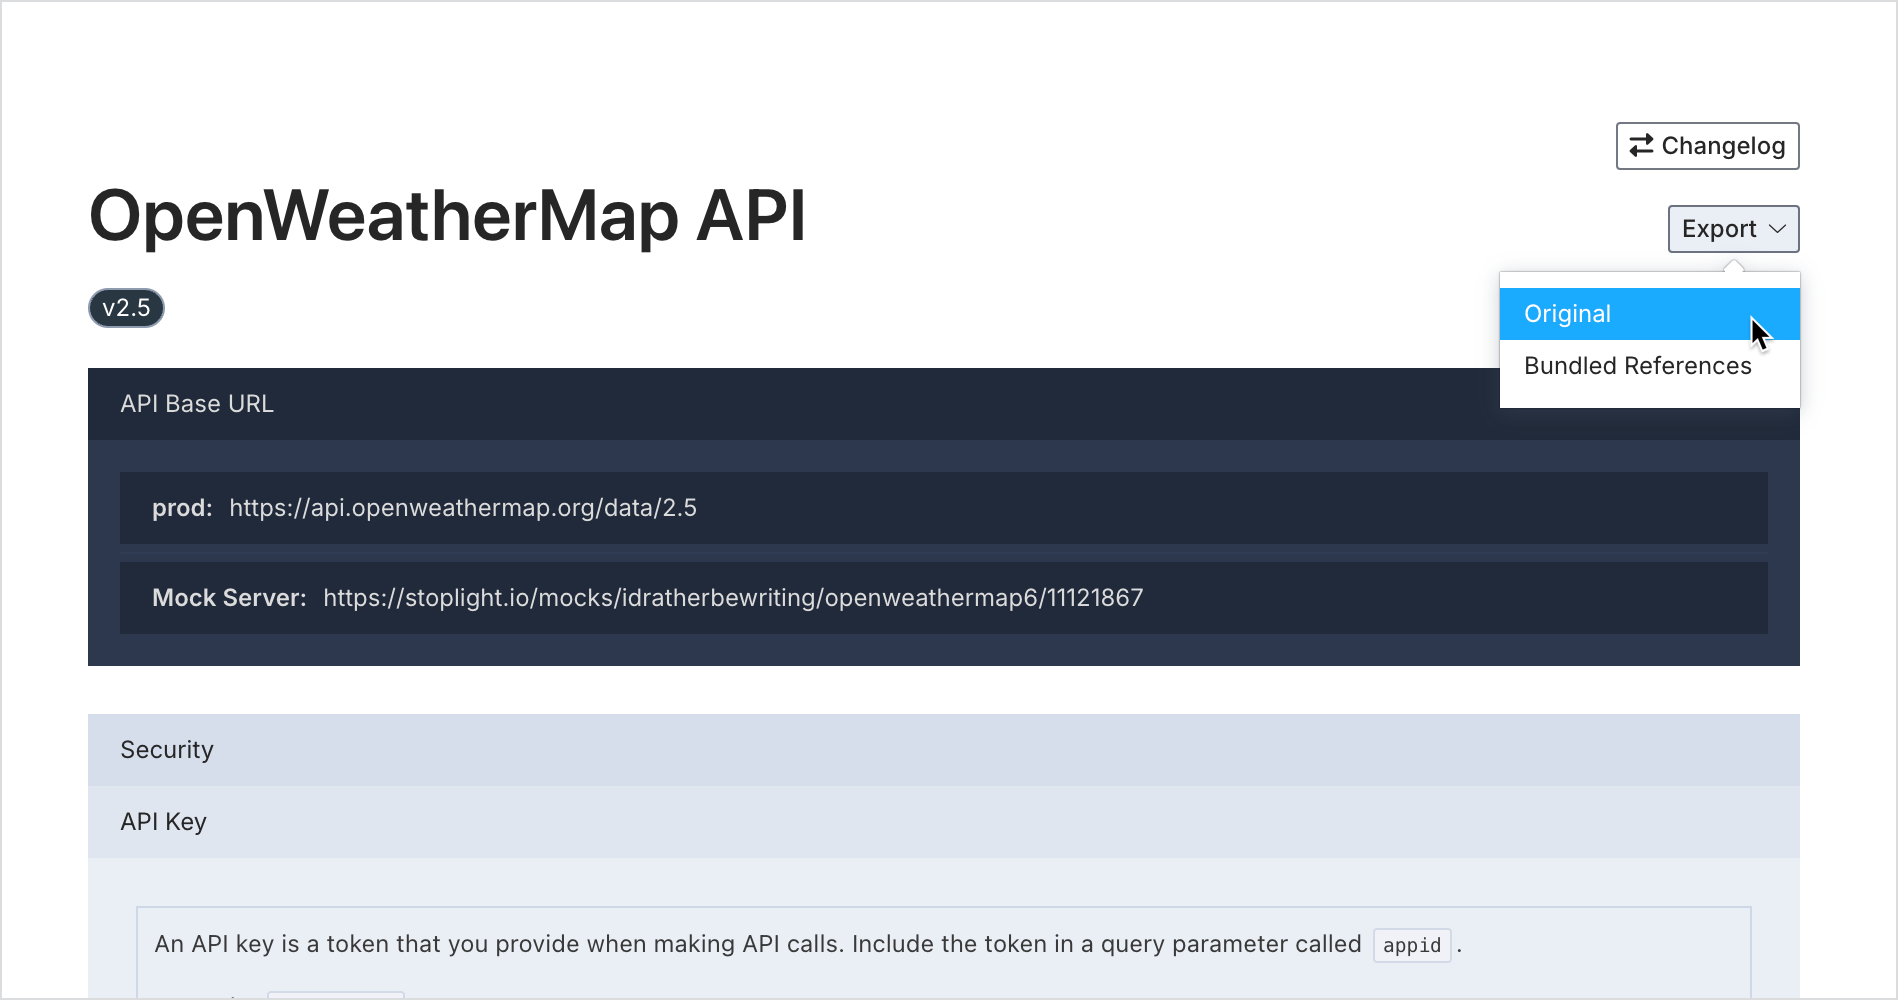
The Bundled References will resolve any `$ref` code and place them in the components section so there’s no duplication. The Original will export any `$ref` code, but not resolve them. The option you choose depends on what’s supported in the editor you’re bringing it to.
For publishing options outside of Stoplight, you can use your OpenAPI definition with [Redocly](https://github.com/Redocly/redoc), [Swagger UI](https://idratherbewriting.com/learnapidoc/pubapis_swagger.html), [Spectacle](https://github.com/sourcey/spectacle), [Docsy](https://github.com/google/docsy), and other tools. See [Openapi.tools](https://openapi.tools/#documentation) for a list of possibilities. You can find a [Redoc tutorial in this course here](https://idratherbewriting.com/learnapidoc/pubapis_redocly.html).
You can view my [OpenWeatherMap API documentation on Stoplight here](https://web.archive.org/web/20240301183425/https://idratherbewriting.stoplight.io/docs/openweathermap4/YXBpOjExMTIxODY3-open-weather-map-api). If you got stuck in the tutorial somewhere along the way, you can click Export to download my code and paste it into your code. For various demos of Stoplight with different API docs, see [Stoplight demos](https://idratherbewriting.com/learnapidoc/pubapis_stoplight.html#stoplight_demos).
For help using Stoplight, see the documentation at [docs.stoplight.io](https://docs.stoplight.io/).