
Five strategies for documenting code
In this section, we’ll dive into approaches for actually documenting code. There are a number of approaches writers and engineers take here, and I’ve covered five of them with examples and commentary.
- Approach 1: Separate the “how” into inline comments, the “why” into external docs
- Approach 2: Juxtaposed commentary in a third column
- Approach 3: The Lego approach
- Approach 4: The Nautilus approach
- Approach 5: Interactive browser experiences
- Conclusion
- Activity: Classify code documentation into one of the five types
Approach 1: Separate the “how” into inline comments, the “why” into external docs
After reading the intro to this section (When code is too complex to understand), one reader shared her approach to documenting code. Morgan Craft said,
I tend to split my documentation up into the ‘how’ (inline comments) and the ‘why’ (external markdown docs).
I think this general division and arrangement of code comments makes sense. Separate your explanations into two general categories: how and why. Then insert the how comments inline with the code (every 5-10 lines or so). In contrast, put the why comments into external sections before or after the code. Granted, explanations of how might prompt details about why, and vice versa, so separating the two might not be so easy in practice. But this general pattern likely holds true.
Additionally, I like this approach because it prompts you to specifically consider the why. As technical writers documenting code (that others write), we might fail to consider the “why” behind the choices made. It might be difficult to even see what “why” questions exist. Why use this class instead of another? Why approach it like this instead of like that? There are often many different ways to accomplish a similar end, so why go down this path rather than some other?
When you interview developers about the code samples, include a few “why” questions:
- Are there other approaches that you rejected here? Why?
- Are users free to implement some other approach, or do we specifically want them to follow this method? Why?
- Why use this language/tool/framework/library rather than some other?
As for inserting inline comments regarding how, a best practice is to insert short comments for every 5-10 lines of code — not so many comments that you make the code unreadable, but not so few that you omit explanation of what’s going on.
Also, note that inline code comments can be somewhat controversial. If you’re just explaining what the code is doing, it can be redundant to someone who reads the language. As discussed in What research tells us about documenting code, some developers feel that simple code documents itself — its meaning is clear to those who read the language, without the need for explanation. However, this statement tends to cater to advanced users and doesn’t extend to cases where code is complex.
Approach 2: Juxtaposed commentary in a third column
Best practices for documentation in general (not just code documentation) involve placing helpful instruction next to the area of confusion, and within the context of code documentation, this might mean adding inline comments peppered throughout code. But suppose you want a longer running commentary about what’s going on in the code (because the level of complexity can’t be relayed in a short informal comment). How do you juxtapose your lengthy conceptual/explanatory information next to the code?
If your commentary dwarfs the code, you risk making the code unreadable. If you arrange the commentary in sections that come long before or after the code, you risk creating a chasm between the explanation and the code, such that readers won’t know what parts of the code your explanation refers to.
One solution to this location problem for code docs is to create an additional, third column in your layout. You devote the middle column to your conceptual explanation and your right column to the code. This way the code and the narration are juxtaposed in a way that readers can glance at the code while reading your conceptual explanations — in other words, the third column maintains the needed context between the code and explanations. Here’s an example from Twilio showing this juxtaposed approach:
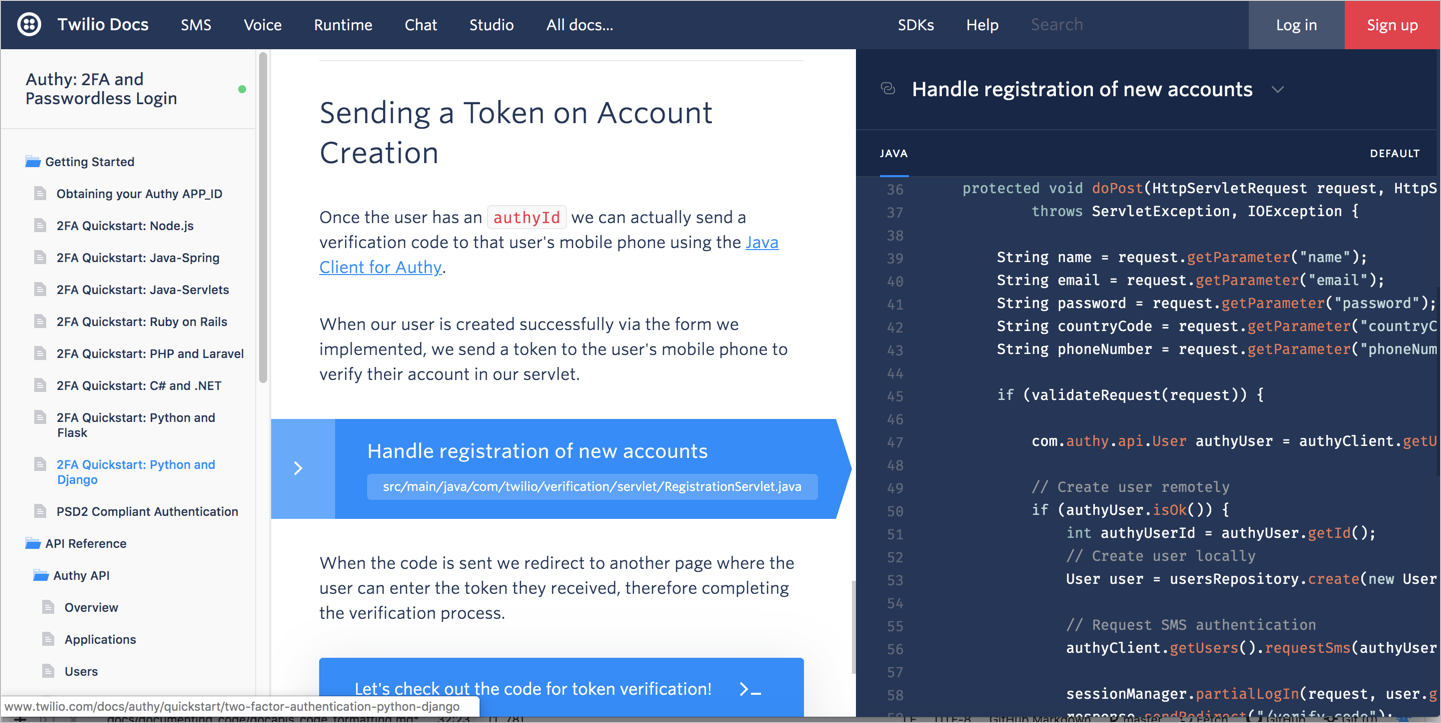
In this example, the conceptual content and steps appear in the middle column, the code on the right, with a dark background behind the code to create visual contrast.
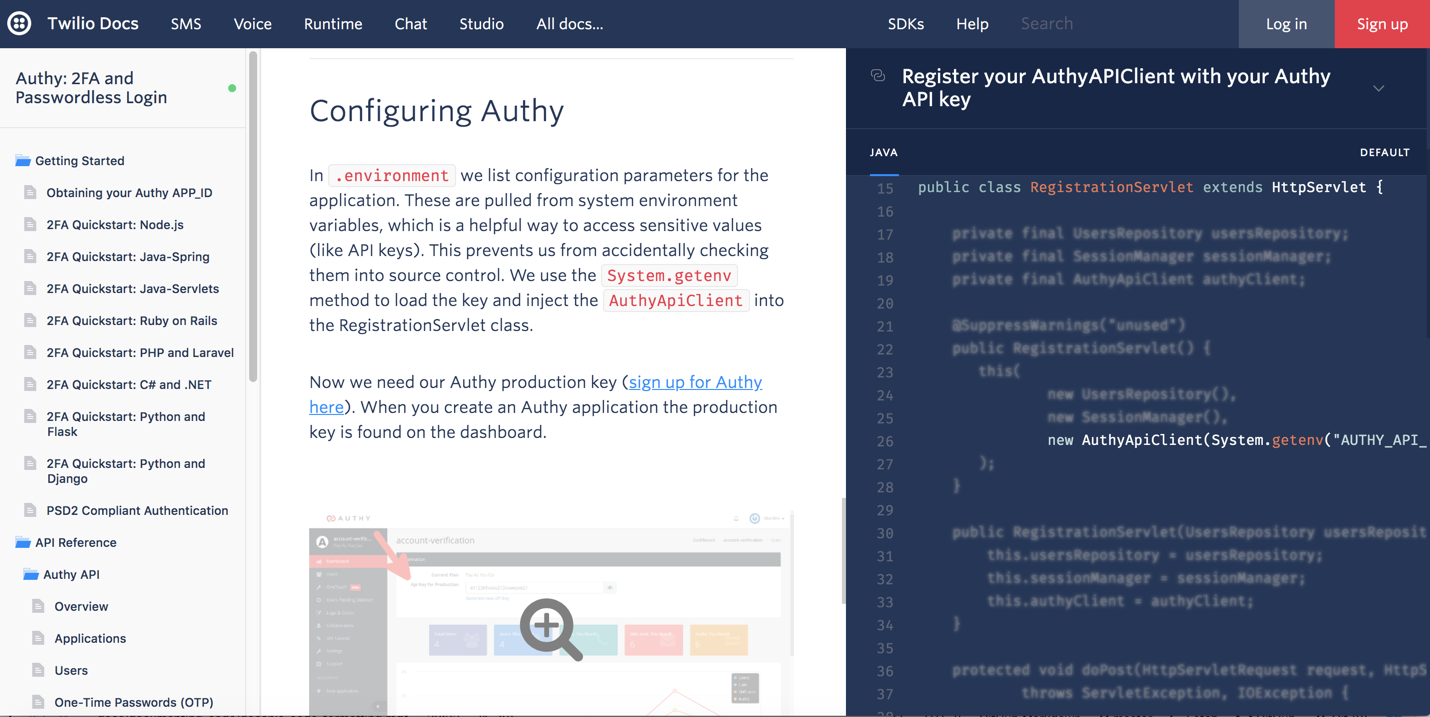
Some of Twilio’s screens actually blur out the irrelevant code, allowing you to focus your attention on the lines articulated in the conceptual area, like this:
One challenge with this juxtaposed approach is screen space. To pull off a third-column design, you need to occupy the whole screen, without margins. (I’m surprised Twilio doesn’t include a switch to collapse the left-side navigation, which would give more space for the code.)
As is, the code is only partially visible (on my 13” Macbook Pro screen). The code extends horizontally with an option to scroll right, but surely the designers must have cringed in developing a UI that involves a healthy dose of back-and-forth horizontal scrolling.
Additionally, implementing blur and focus views based on the line the user is at in the tutorial must be technically challenging and somewhat cumbersome to keep track of.
Another challenge is that the code and explanations of the code rarely line up all the way down. Suppose you have one method in the code that occupies just a single line, but describing this method occupies three long paragraphs of conceptual explanation. By the time the user reaches the bottom of the conceptual explanation, the referenced code is no longer juxtaposed. Now the user not only has to scroll horizontally to see the code but the user also has to scroll up and down the column to locate the relevant code. Designing a UI to accommodate all of these moving parts not only seems challenging, but also puts more burden on the user as well.
Another challenge with this juxtaposed design is that code is often spread out across multiple files. The view on the design column doesn’t indicate whether all the code appears in the same Java file, for example, or whether we’re seeing code from multiple Java files. Introducing tabs in your code column requires an even more complex documentation format. I doubt you can accomplish all this with Markdown syntax.
Approach 3: The Lego approach
Another approach is to build the code from the ground up level by level, which I’m calling the Lego approach. For an example of the Lego approach, take a look at this example from the eBay Shopping API: Searching By Seller: Reviewing Information About A Seller.
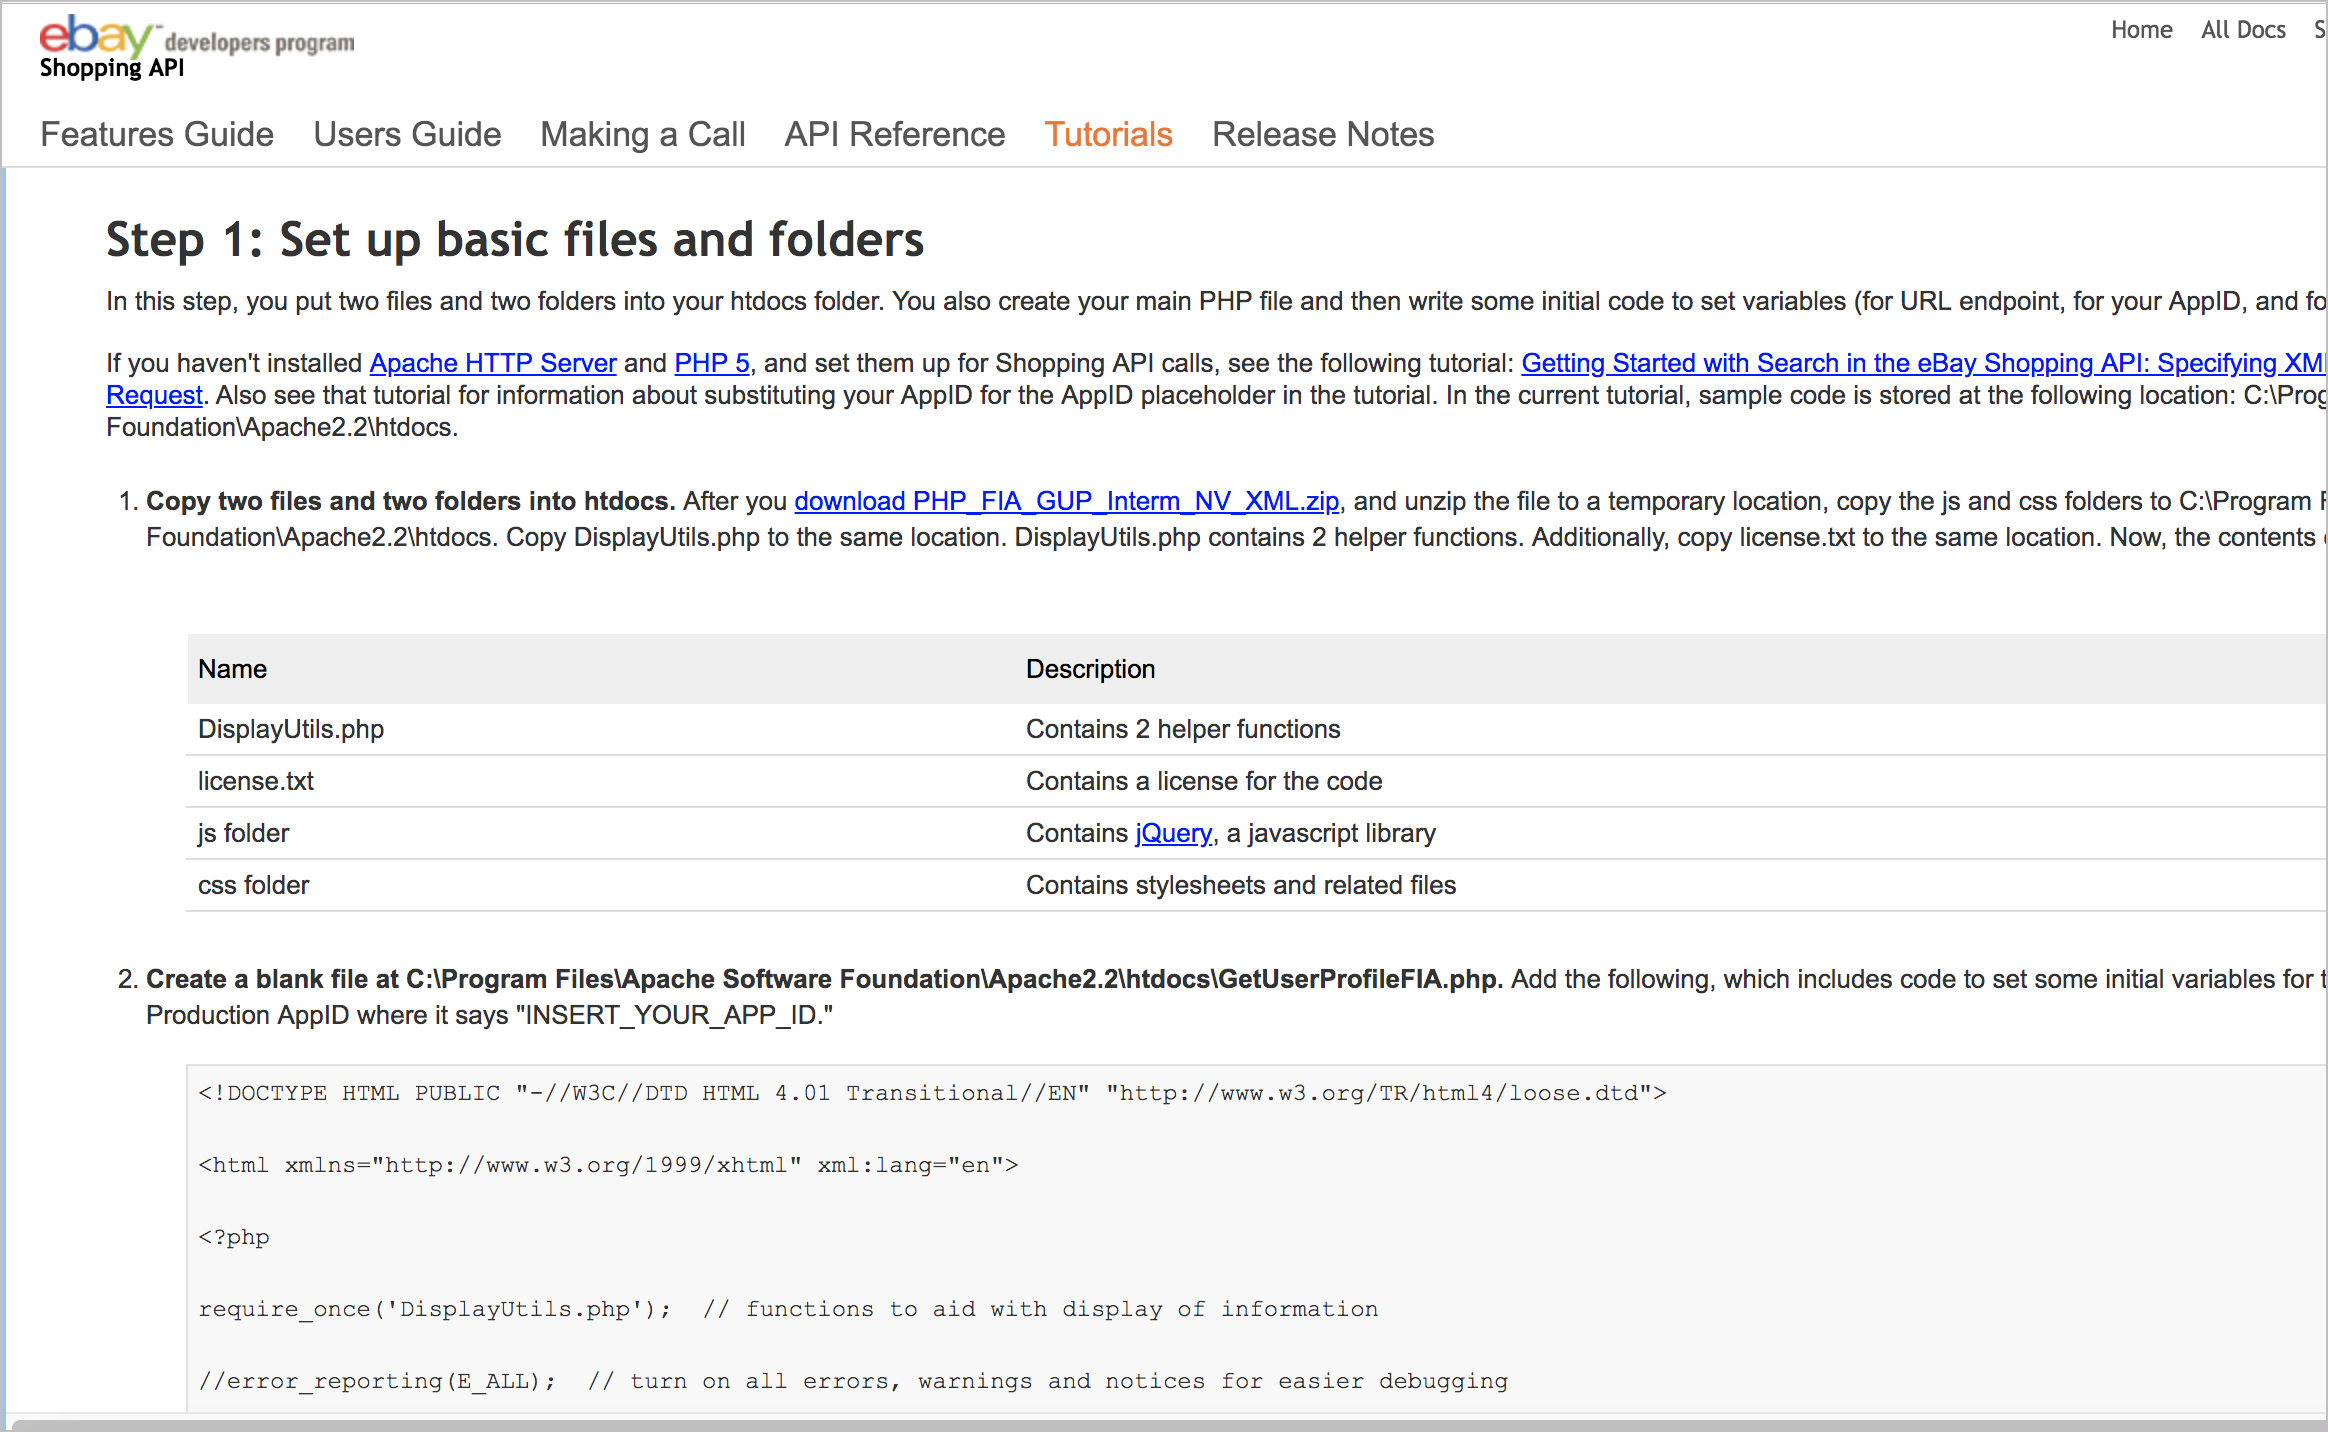
Their tutorial contains five steps:
- Step 1: Set up basic files and folders
- Step 2: Add code for making the GetUserProfile call and displaying the results
- Step 3: Add code for making the FindItemsAdvanced call and displaying the results
- Step 4: Add HTML and Javascript for the user interface
- Step 5: Run the code
With the Lego approach, you might start with a blank file. Then with each step, you add more and more code until you have a fully working example. Similar to building with Legos — you start with a base and then start bolting on piece after piece until you finish the design you intended to build.
The problem with this Lego approach is that as a technical writer, you likely won’t have the build-up logic that the developer followed. Developers will more likely just send you the finished piece of code to document, and then you might end up approaching it as I described in the intro to this section, where I divided my explanations of the code section by section.
Tackling code explanations section by section won’t necessarily match the Lego build order of the code, since code is non-linear. The code that appears at the top might have been like the icing on the cake for the developer — e.g., abstracting more complicated lines into variables that he or she uses to reduce the code’s working complexity. Finished code often has logic that is abstracted away into variables or other referenced functions so that certain parts of the final code remain cleaner and more concise, but other parts become more opaque. Finished code is often too messy and confusing to document in any teachable way.
Despite the challenges with the Lego approach, if you want to teach someone how to understand code, you have to start simple and work your way up. The next technique explains this simple-to-complex approach through the metaphor of the nautilus.
Approach 4: The Nautilus approach
The Nautilus approach is similar to the Lego approach, but rather than describing chunks of work that are tackled one by one in an assembly order, you describe the core, simple patterns that users need to know. You start with the simplest code and then let the user’s project grow larger and larger as needed, like the growing spiral pattern of the nautilus’ shell.
Paul Gustafson, who manages a technical writing staffing company in the Bay area called Expert Support, presents us with the metaphor of the nautilus in the approach described here. Paul says that the nautilus provides a good metaphor for technical communication because the nautilus follows a spiral pattern (Fibonacci sequence) that allows it to start small and gradually grow larger and larger as needed:

Paul writes:
Fostering understanding, which is what technical communications is all about, happens most efficiently by following a similar pattern….
When your understanding is small, you learn best when the first lesson imparts information for a small, simple task with traits importantly akin to the first nautilus chambers.
… The good news for the nautilus is that the small chambers follow the same basic plan as the bigger chambers. If the first tasks a learner masters are fundamentally similar to more complex tasks farther down the syllabus, the student begins to understand and apply those patterns. The sooner newbies learn to “think about things the right way,” the sooner they “get it,” which is exactly what both the instructor and the student want. (Lessons from a cephalopod)
Following the nautilus approach, you start with the simple, core patterns and then build up more and more code around it gradually as needed. You don’t start by describing the complex finished work from the start. That finished work likely involves all kinds of code abstractions and rearrangements for a clean, finished product.
I like the Nautilus approach. The problem is that we often want to explain how the finished code works, taking a user through it all from start to end. We might have 500 lines of code that we want to articulate, but the Nautilus approach would have us explain just several small pieces of that code (at least to begin with). Hence there’s an A-versus-Z type of problem: We describe A (the simplest core pattern), but the end product is Z. How exactly do you get from A to Z? How do you get from the simple patterns that maybe occupy 20 lines of code to the monstrously complex, finished code that spans 500 lines?
To the technical writer looking at the finalized code, there’s no clear sense of how the developer got there. We often can’t decouple the nautilus-like logic that the developer started with, which led him or her toward this more complex end. All we see is this complex end. How do you decompile the code to reconstruct the logic that the developer started with? How do you know what these initial nautilus patterns were that started the whole process? If you didn’t develop the code, nor are you a developer, it will be nearly impossible to reconstruct the nautilus pattern behind the code in your explanations.
As another analogy, consider teaching others how to paint. Suppose your task is to describe a finished painting to a would-be painter. You need to describe how to paint the Mona Lisa:

To document the process of producing this painting, would you start at the top and work your way to the bottom? No, that would be ludicrous. Most likely you would start by creating ovals for the head. Then maybe some general sketches for the eyes, and so on. Maybe you sketch our perspective lines and other basic structure lines first. You wouldn’t get to the colors and lighting and shadows until later, right? Same with code. You start with the foundation and then work your way towards more of the finishing detail.
However, if you’re not a painter, how would you know how to describe the process of creating a painting? You would need to know the painter’s logic — where to start, and how to proceed toward the end. If you instead just started at the end and tried to work your way backward, the tutorial would likely be insanely complex.
To illustrate this point more clearly, let me provide a code example. Although I’m not an engineer, I’m handy with Jekyll and theming, and the other day I set about creating a template that would take a content export from a ticketing tool (like JIRA) and render it as a documentation report on a web page.
My finished template looks like this:
<div class="sprintDuration">{{page.duration}}</div>

{% assign sprintYamlFile = page.sprint_yaml_file %}

<div class="metaReportInfo" markdown="span">
Tech writers: {% for member in page.team_members %}<a href="https://somesite.company.com/users/{{member}}">{{member}}</a>{% unless forloop.last %}, {% endunless %}{% endfor %}<br/>
Team: <a href="https://ourteamsite.company.com/">DevComm</a><br/>
Sprint: <a href="{{page.sprint_link}}">Link</a>
</div>

<div id="top"></div>
<div class="all-items">

<h2 id="high-level-summary">High-level Summary</h2>

{{page.high_level_summary}}

{% include sprintdisplaylogic.html %}

{% assign sprintYamlFileOpen = page.sprint_yaml_file_open %}

<h2>Open Issues</h2>
<p>ACME project has <b>{{page.open_items_acme}}</b> open issues. Beta project has has <b>{{page.open_items_beta}}</b> open issues.</p>

{% include sprintdisplaylogic_open.html %}

{% include sprintstylesandscripts.html %}
This code looks kind of like gibberish, really. I have some “include” files where I’ve abstracted away the logic because I’ll be repeating it from report to report. I don’t want the scripts and styles showing here, as they’ll clutter up the code, so I’ve abstracted them away into include files as well.
Imagine trying to document this code. If you started from the top and worked your way to the bottom, it would be a real mess. The lengthy explanation would also be hard to read and understand for users. It’s just a confusing ball of yarn. It doesn’t help that I put this together in haste, without much thought for a clean, elegant solution. I needed to get this report out fast, so I hacked together the template as quickly as I could. Developers building applications often implement similar hacks and other quick-fixes using “duct tape and WD-40”, as Joel Spolsky says, to get a working solution shipped to meet a deadline.
This kind of finalized code, with all of its quick hacks and inelegant implementations, is not instructive to someone looking to build their own report template. Instead, it would be more useful if I started from scratch with the core pattern. That pattern involves looping through a JSON file (the ticketing export) and pulling out the key values that I want to display. This key logic is available in the sprintdisplaylogic.html include above. Here’s the contents of that include:
{% assign shortIdList = page.short_ids %}
{% for item in shortIdList %}
{% assign sprintItems = site.data.sprints[sprintYamlFile]  | where_exp:"entry",
"entry.ShortId contains item" %}

<h2 id="{{item}}">{{item}} Resolved Doc Issues</h2>
{% for entry in sprintItems %}
<div class="entryTitle">{{entry.Title}}</div>
<div class="entryIssueUrl"><a href="{{entry.IssueUrl}}">{{entry.ShortId}}</a></div>
<blockquote>{{entry.Description | markdownify }}</blockquote>
{% endfor %}
<small><a href="#top">↑ Back to top</a></small>
{% endfor %}
Even this is confusing, as I have some weird stuff going on here with variables inserted as brackets in YAML file references.
To really pare this down into the core logic, this is what developers would start with:
{% assign sprintItems = site.data.sprints.someyamlfile %}
{% for entry in sprintItems %}
* {{entry.Title}}
* {{entry.Description }}
* {{entry.IssueUrl}}
{% endfor %}
This is the core logic of the report. It uses a for loop to look through items in a data file (accessed through site.data.sprints.someyamlfile), and then Jekyll prints these values out through tags like ``. Once users learn these core patterns, they can extend them into creating more complex solutions, such as inserting variables into the loop so that you can repeat the logic without duplicating the loop for every report category.
But if you didn’t develop the code, it would be extremely difficult to pinpoint the core, simple logic that is the basic pattern of the code. Where did the developer start? What is the essential pattern to learn?
To gather this information, you need to interview the developer. And when you interview the developer, you need to understand the language and explanations he or she communicates. Alternatively, you can try to steer the developer towards describing the logic of his or her own code through guidance with the right questions. For example, you might ask, What’s the fundamental core logic that the user needs to know here? What’s the really important line to focus on in all this code? Can you walk me through that specific part in detail?
Just a caution here — chances are if you ask developers these questions, they will quickly slip into advanced explanations and jargon and become impatient if you’re unable to follow the logic. If basic concepts are totally unfamiliar, it is unrealistic for a beginning to simply soak in the explanation. Plus, it can be hard to explain code. I even forgot many details about how my Jekyll code works about a hour after I wrote it. These explanations require a lot of mental work for developers to perform (their reluctance reinforces why they’re often not writing the documentation in the first place).
In these conversations, I highly recommend recording your interviews with developers. This will allow you to go back and listen to the explanations in slow motion, hitting stop and rewind as much as you want. If the engineer mentions an unfamiliar concept, you can use that as a springboard for your own study. This will give you a relevant list of topics to learn (rather than following some generic course that might never get around to addressing the specific code you actually need to know). At the very least, you could simply parrot out what the developer said from the recording — you’ll have all the lingo and phrasings ready to pull from.
As you decompile the logic of the code to the simplest pattern, you will face another challenge: where to draw the line about what to explain and what not to explain. This again is nearly impossible to answer without a more thorough understanding of your audience, and chances are the engineer won’t have any more sense of the audience than you, so the engineer will likely make the same assumption that technical writers often do — imagining a user not too unlike ourselves.
Approach 5: Interactive browser experiences
Teaching core patterns shifts the documentation more into the domain of a tutorial. Related to this type of learning are interactive browser experiences that combine action with learning. These browser-executable interfaces have as their goal the aim to help users better understand the results of inputs and outputs so that users can see for themselves how the code works through a more hands-on, try-it-for-yourself approach.
The most common example of interactive documentation for APIs is with Swagger UI, which I have already covered at length in OpenAPI tutorial using Swagger Editor and Swagger UI: Overview and showed in the Swagger UI Demo:
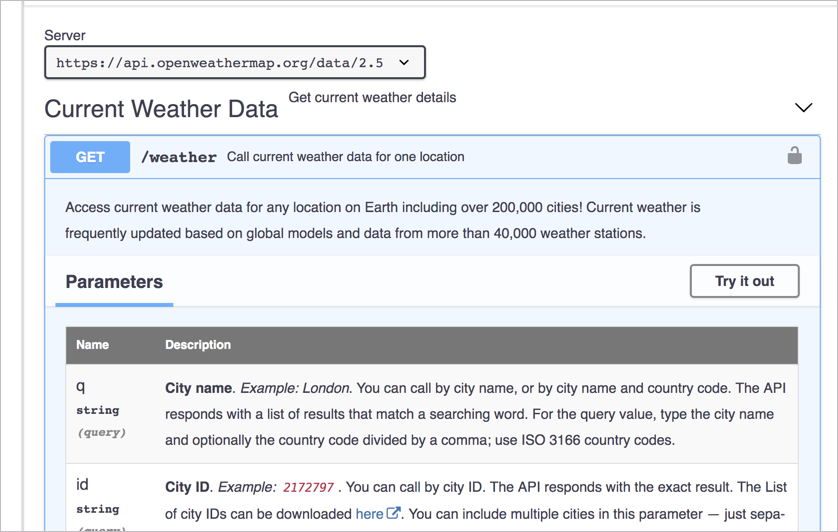
Swagger provides an ingenious blending of documentation and try-it-out interactions that help users learn your API (by both reading and doing). But making requests with REST API endpoints tends to be somewhat simple. More extensive code tutorials will be harder to make interactive in the browser. Even so, some “Notebooks” (as they’re often called) allow you to run code, specifically Jupyter Notebooks. Jupyter explains:
The Jupyter Notebook is an open-source web application that allows you to create and share documents that contain live code, equations, visualizations and narrative text. Uses include: data cleaning and transformation, numerical simulation, statistical modeling, data visualization, machine learning, and much more.
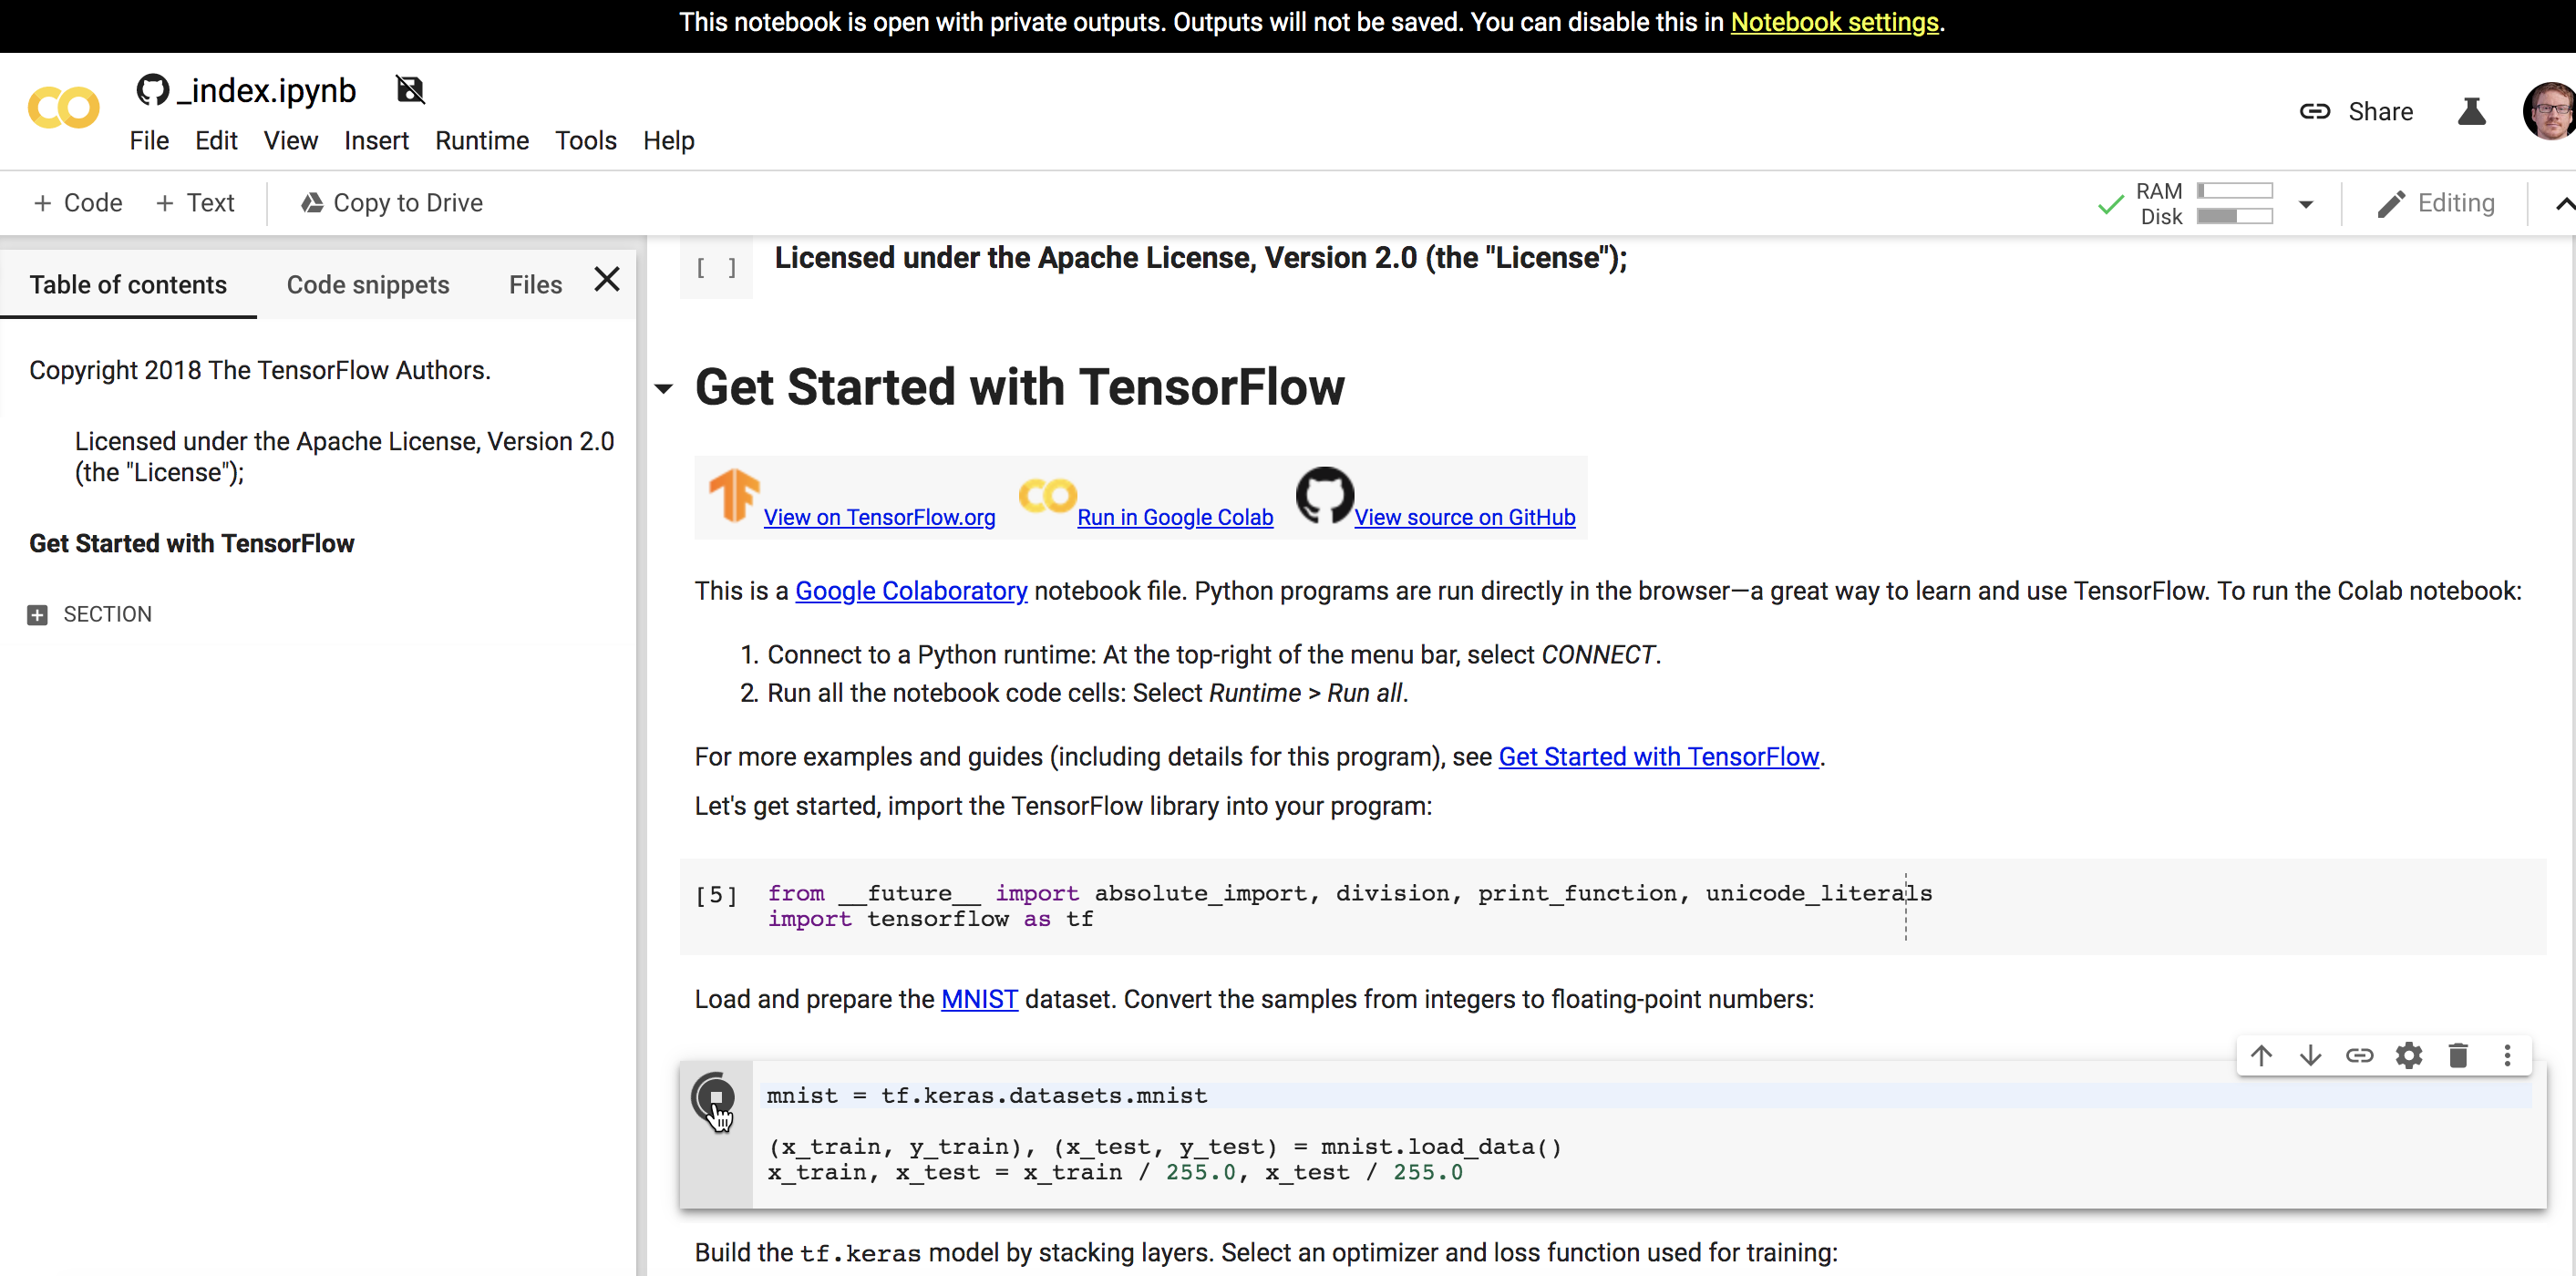
Google has some collaborative notebook options with TensorFlow documentation, which has operations that you can execute on web pages. In the following screenshot, you can see an option to “Run code now”:

Clicking “Run code now” takes you to Google’s interactive notebooks that actually run the code in the browser:
Although interactive notebooks look cool, they seem like a lot of work for something that could more easily be accomplished with a sample app. Instead of figuring out how you can compile Python code or some other language in the browser, why not just provide a sample app that users can download and then proceed through locally, using their own compiling tools and setup?
Sure, users might need to have some utilities and frameworks installed on their computer to make the sample apps run, as well as an IDE, but making code run in the browser might not fully inform users about all the required setup and preparation that will eventually be necessarily for them to make the code run locally. Browsers tend to be somewhat stiff and formal in what they can do — users might have more freedom to experiment (and learn from those experiments) with a sample app.
Conclusion
In this section, we looked at five approaches to documenting code:
- Approach 1: Separate the “how” into inline comments, the “why” into external docs
- Approach 2: Juxtaposed commentary in a third column
- Approach 3: The Lego approach
- Approach 4: The Nautilus approach
- Approach 5: Interactive browser experiences
Overall, use the approach that helps empower users with the knowledge for creating their own code.
Activity: Classify code documentation into one of the five types
Find a code tutorial within one of the API documentation sites you’ve been exploring. Or look at one of the API doc sites in this post by Nordic APIs on 5 Examples of Excellent API Documentation (and Why We Think So). This post lists five API doc sets: Stripe, Twilio, Dropbox, GitHub, and Twitter.
Find a code tutorial in the documentation. Figure out which approach the code documentation best aligns with.
About Tom Johnson

I'm an API technical writer based in the Seattle area. On this blog, I write about topics related to technical writing and communication — such as software documentation, API documentation, AI, information architecture, content strategy, writing processes, plain language, tech comm careers, and more. Check out my API documentation course if you're looking for more info about documenting APIs. Or see my posts on AI and AI course section for more on the latest in AI and tech comm.
If you're a technical writer and want to keep on top of the latest trends in the tech comm, be sure to subscribe to email updates below. You can also learn more about me or contact me. Finally, note that the opinions I express on my blog are my own points of view, not that of my employer.
81/165 pages complete. Only 84 more pages to go.