
Integrating Swagger UI with the rest of your docs
Whenever discussions about Swagger and other REST API specifications take place, technical writers invariably ask how they can integrate the Swagger output with the rest of their documentation. This question dominates tech writer discussions perhaps more than any other when it comes to Swagger.
- Background to the single source of truth idea
- Option 1: Put all the info into your spec through expand/collapse sections
- Option 2: Embed Swagger UI in your docs
- Option 3: Parse the OpenAPI specification document
- Option 4: Store content in YAML files that are sourced to both outputs
- Option 5: Use a tool that imports Swagger and allows additional docs
- Option 6: Change perspectives — Having two sites isn’t so bad
- Next steps
Background to the single source of truth idea
One of the core principles of tech writing is to generate content from a single source rather than copying and pasting duplicate information. When you start pushing your API documentation into another source file — in this case, a YAML or JSON file that is included in a Swagger UI file set, you end up splitting your single source of truth into multiple sources.
For example, you might have defined your endpoints and parameters in your regular documentation, and now the OpenAPI spec asks you to provide the same endpoints and descriptions in the spec. Do you copy and paste the same parameters and other information across both sites? Do you somehow generate the descriptions from the same source? In this topic, I tackle this conundrum.
Option 1: Put all the info into your spec through expand/collapse sections
You can try to squeeze all your documentation into the specification document itself. This only works if you have a relatively small amount of conceptual information to accompany your API. You may be surprised about how much information you can actually include in the spec. Any description element (not just the description property in the info object) allows you to use Markdown and HTML.
For example, here’s the info object in the OpenAPI spec where a description appears. (If desired, you can type a pipe > to break the content onto the next line and then indent two spaces. You can actually add a lot of content in description elements.)
info:
  title: OpenWeatherMap API
  description: 'Get the current weather, daily forecast for 16 days, and a three-hour-interval forecast for 5 days for your city. Helpful stats, graphics, and this day in history charts are available for your reference. Interactive maps show precipitation, clouds, pressure, wind around your location. Data is available in JSON, XML, or HTML format. **Note**: This sample Swagger file covers the `weather` endpoint only from the OpenWeatherMap API. <br/><br/> **Tip**: We recommend that you call the API by city ID (using the `id` parameter) to get unambiguous results for your city.'
  version: '2.5'
With one Swagger API project I worked on, I referenced Bootstrap CSS and JS in the header of the index.html of the Swagger UI project, and then incorporated Bootstrap alerts and expand/collapse buttons in this description element. Here’s an example:
info:
  description: >
    ACME offers a lot of configuration options...
    <div class="alert alert-success" role="alert"><i class="fa fa-info-circle"></i> <b>Tip: </b>See the resources available in the portal for more detail.</div>
    <div class="alert alert-warning" role="alert"><i class="fa fa-info-circle"></i> <b>Note: </b>The  network includes a firewall that protects your access to the resources...</div>

    <div class="container">
    <div class="apiConfigDetails">
    <button type="button" class="btn btn-warning" data-toggle="collapse" data-target="#demo">
    <span class="glyphicon glyphicon-collapse-down"></span> See API Configuration Details
    </button>
    <div id="demo" class="collapse">

    <h2>Identifiers Allowed</h2>

    <p>Based on this configuration, ACME will accept any of the following identifiers in requests.</p>

    <table class="table">
    <thead>
    <tr>
    <th>Request Codes</th>
    <th>Data Type</th>
    <th>Comparison Method</th>
    </tr>
    </thead>
    <tbody>
    <tr>
    ...
(Unfortunately, I can’t point to the output as this project was behind a firewall.)
The result was to compress much of the information into a single button that, when clicked, expanded with more details. By incorporating expand/collapse sections from Bootstrap, you can add a ton of information in this description object. (For the JavaScript you need, add script references in the header or footer of the same index.html file where you referenced your openapi.yaml file.)
Additionally, you can include modals that appear when clicked. Modals are dialog windows that dim the background outside the dialog window. Again, you can include all the JavaScript you want in the index.html file of the Swagger UI project.
If you incorporate Bootstrap, you will likely need to restrict the namespace so that it doesn’t affect other elements in the Swagger UI display. (See How to Isolate Bootstrap CSS to Avoid Conflicts for details on how to do this.)
Overall, if your API docs are relatively small, you can try putting all your information in the spec first. If you have a complex API or just an API that has a lot of extra information not relevant to the spec, look for alternative approaches. But try to fit it into the spec first. This keeps your information in one space.
There are many benefits to using a spec that you will miss out on if you choose another approach. When you store your information in a spec, many other tools can parse the spec and generate interactive displays. Putting your content in the OpenAPI spec format allows you to separate your content from the presentation layer, instantly taking advantage of any new API tooling or platform that can parse the spec.
Option 2: Embed Swagger UI in your docs
Another solution is to embed Swagger UI in your regular docs. You can see an example of this here: Swagger UI Demo. It’s pretty easy to embed Swagger into an HTML page — just copy the code from the index.html file from the dist folder into your doc page (more or less). The latest version of Swagger has a more responsive, liquid design. It almost looks designed to be embedded into another site.
However, the effect is still kind of clunky and is obvious that the content is embedded from some other document generator. It’s not a seamlessly branded experience. Here an example where Swagger is embedded directly in the docs: App Submission API
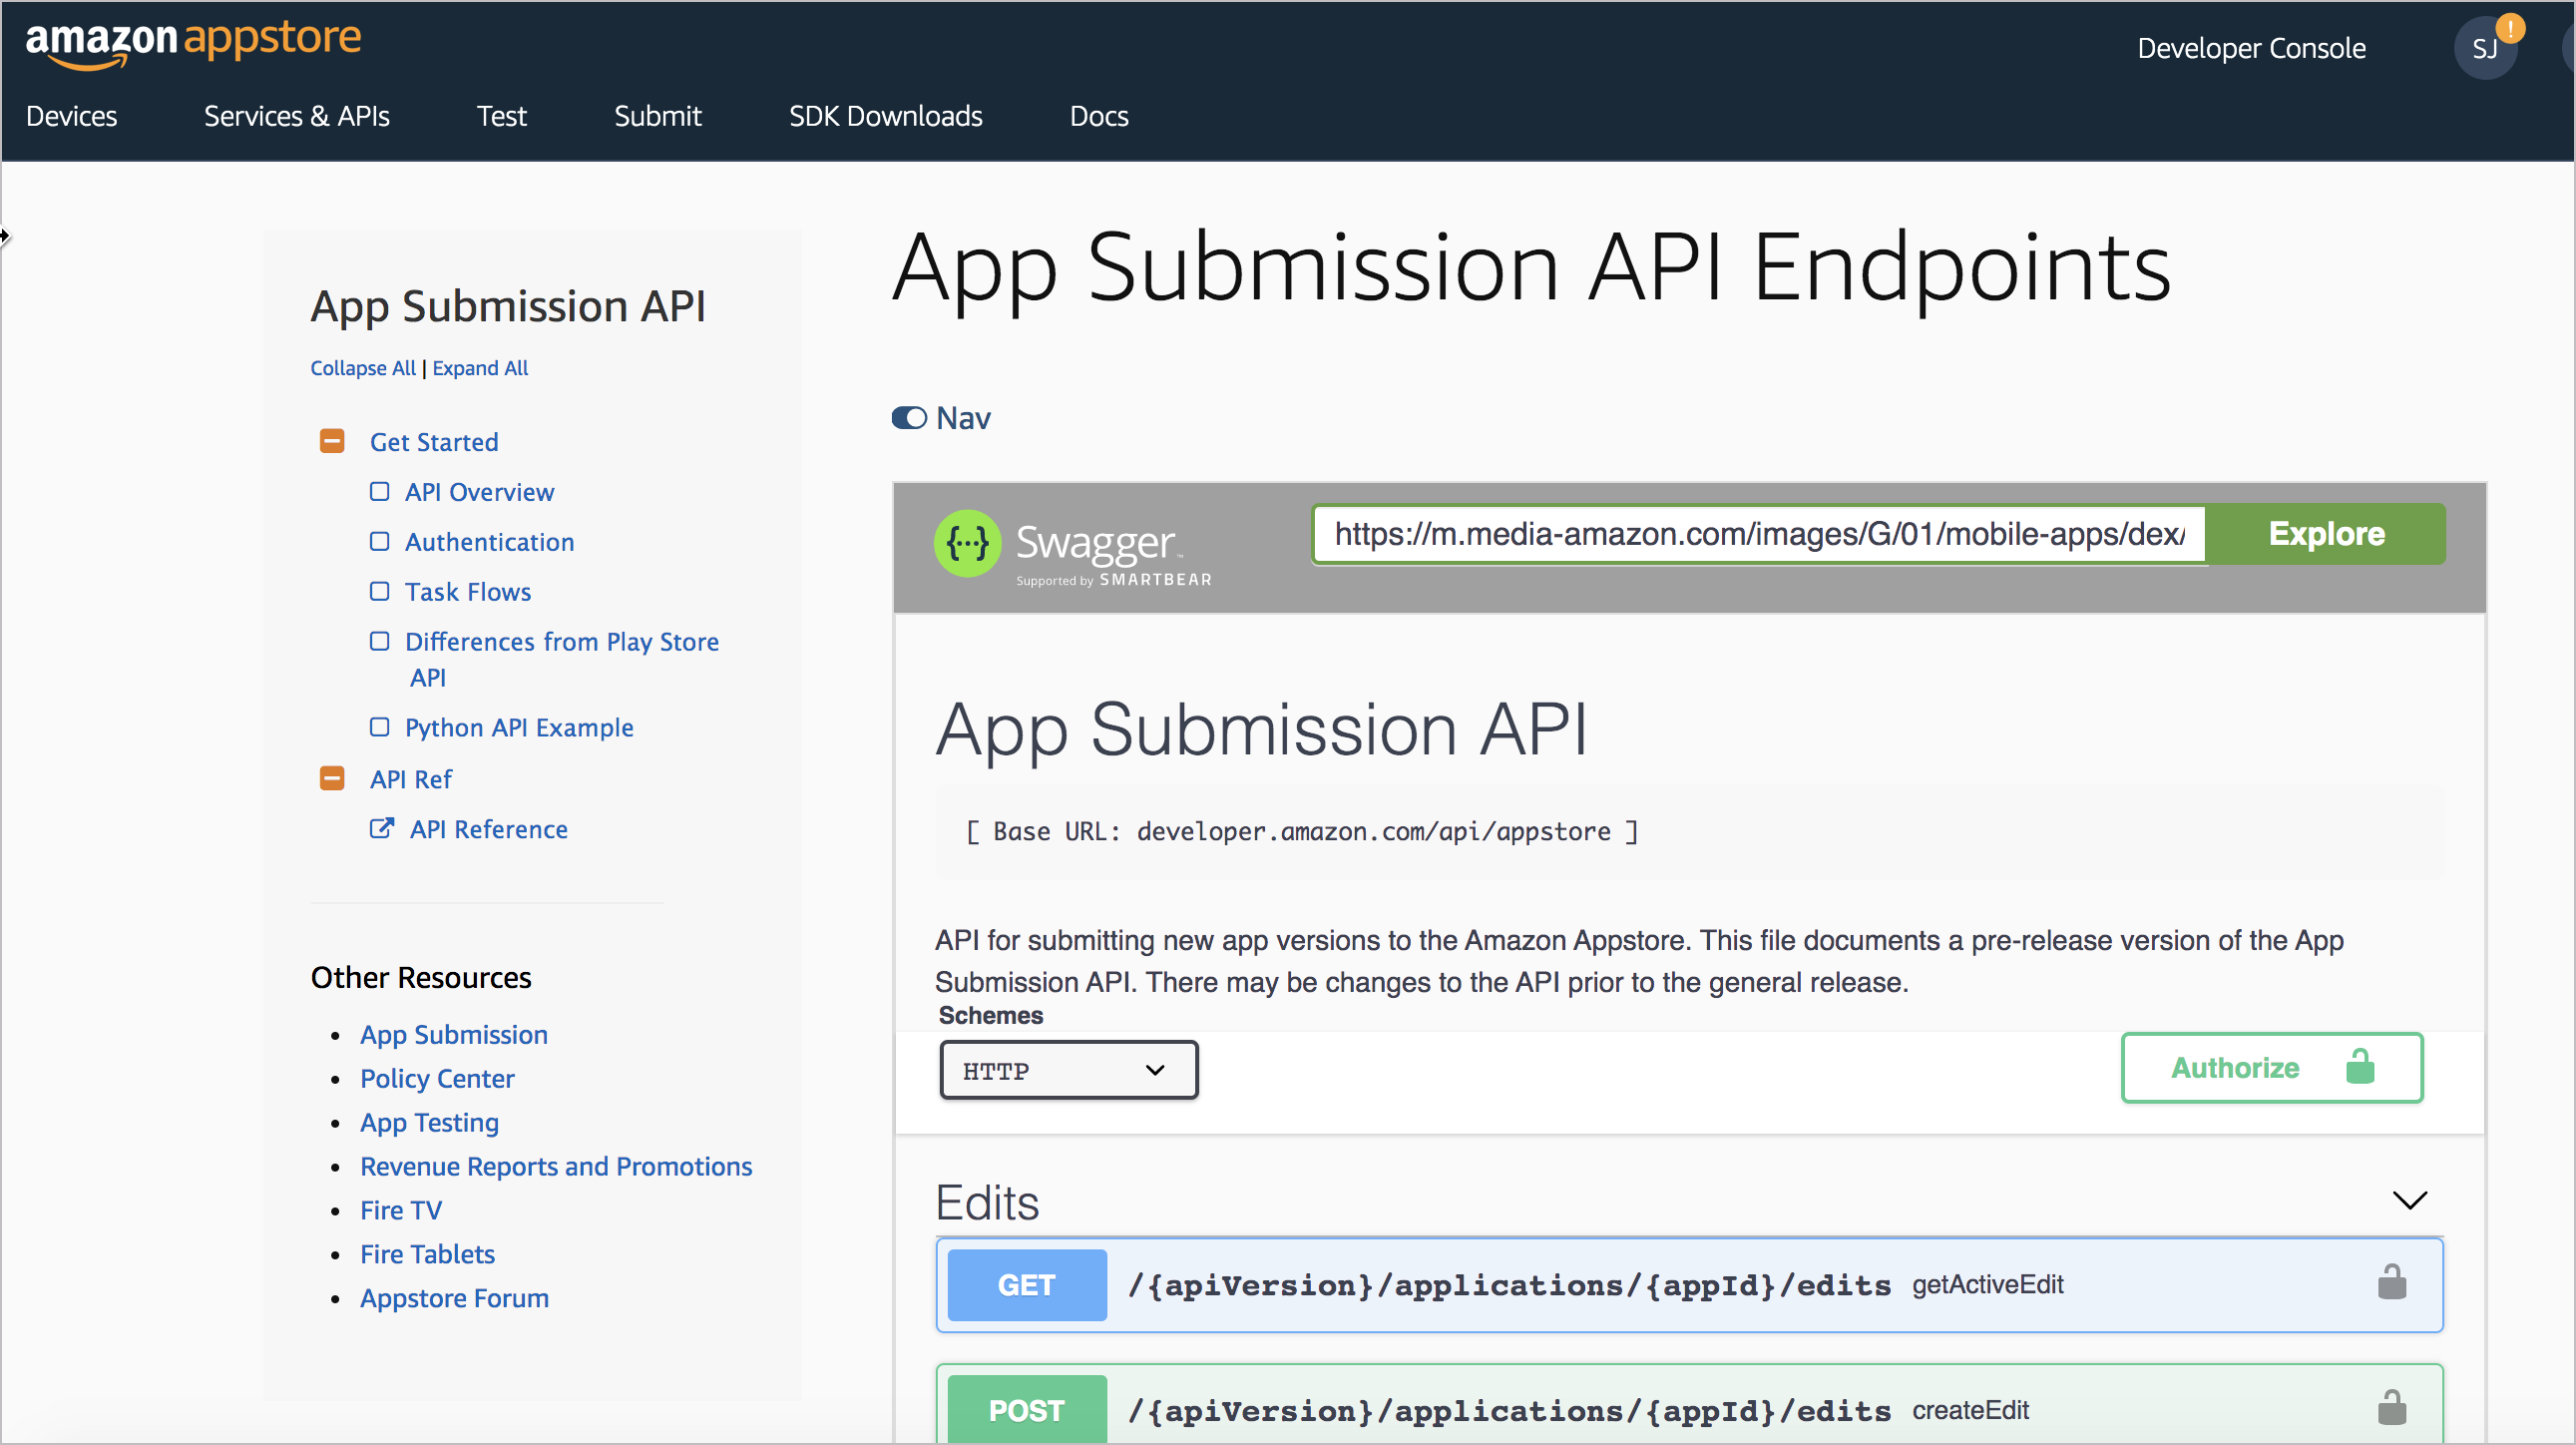
Another example of the same embedding technique is here: Moments Developer Guide
Notice that I’ve included a “Nav” toggle at the top of the embedded Swagger content. This little JS trick will collapse your sidebar, giving your embedded Swagger display full width (which is usually needed for readability). This Nav toggle isn’t part of the Swagger UI display but is something that’s easy to add.
To include a Nav toggle, first make sure you’re including Font Awesome and jQuery in your site. Then add the Nav icon with this class at the top of your page:
<p><a id="tg-sb-link" href="#"><i id="tg-sb-icon" class="fa fa-toggle-on"></i> Nav</a></p>
Now add a toggleClass script that will toggle your sidebar. You’ll need to customize this a bit with the classes used in your own site. My script looks like this:
<script>
        $(document).ready(function() {
            $("#tg-sb-link").click(function() {
                $("#sidebar").toggleClass('navToggle');
                $(".container").toggleClass('expand');
                $("#tg-sb-icon").toggleClass('fa-toggle-on');
                $("#tg-sb-icon").toggleClass('fa-toggle-off');
            });
        });
</script>
Then embed this style:
<style>
.navToggle {
  display: none !important;
}
.expand {
  width: 100%;
  margin-left: 10%;
  margin-right: 10%;
}
#tg-sb-link:hover, #tg-sb-link:active, #tg-sb-link {
  text-decoration: none !important;
}
</style>
Here’s how this script works. When users click the element ID tg-sb-link, the anonymous function fires above. The toggleClass looks for the sidebar element and injects a class called navToggle into it. The embedded styles define navToggle with a display: none property. This makes your sidebar element disappear. (If your sidebar has some other class, customize sidebar with the name of your website’s sidebar element.)
Continuing on with the script, the toggleClass function looks for the container class and injects an element called expand. The embedded styles for this element expand the main container to a larger width. (Again, you’ll need to customize container to use the main container element for your website.) Hopefully you get the gist of how this toggleClass jQuery function is working. When you click the Nav button again, the same function removes the injected classes. For more details, check out the source code of the Swagger UI Demo on GitHub here.
Besides the clunkiness of the “site-within-a-site” look, an additional problem with embedding is that some of the Models aren’t constrained within their container, so they expand beyond their limits. Try expanding the Model section in the demo — you’ll see what I’m talking about.
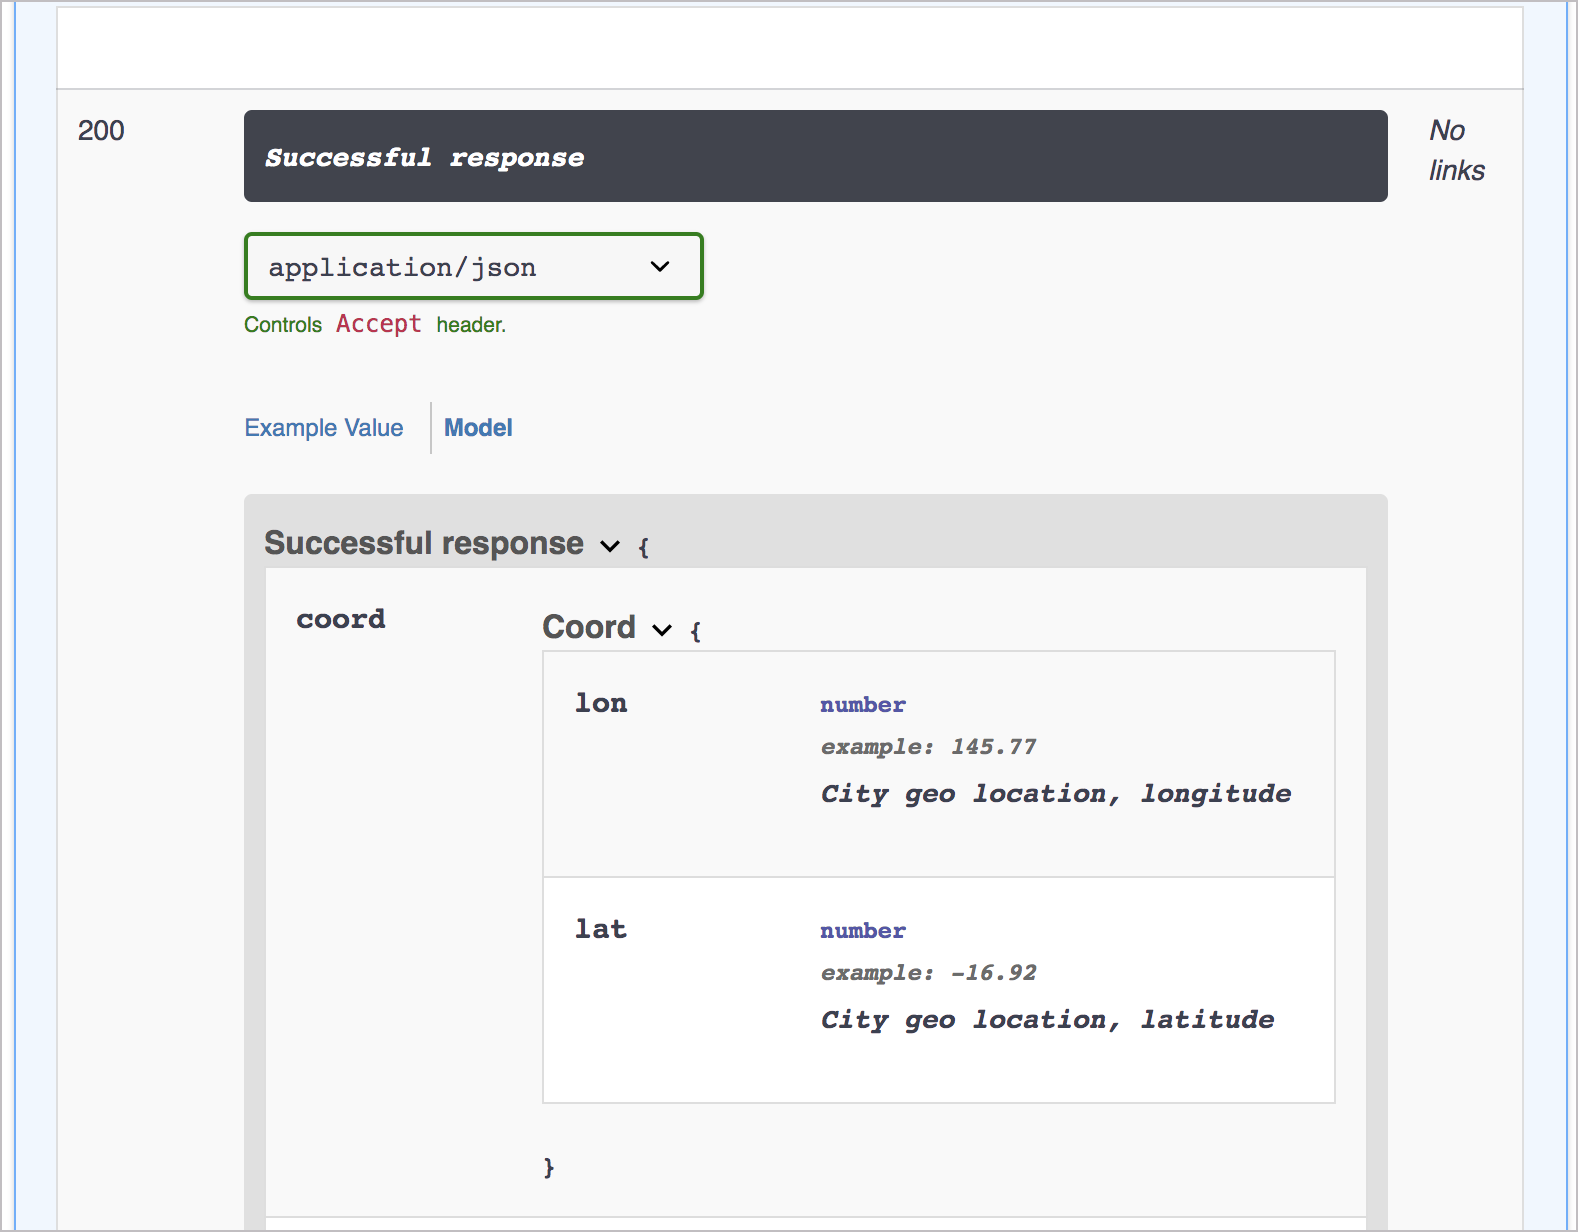
I’m not sure if some ninja styling prowess could simply overcome this uncontained behavior. Probably, but I’m not a CSS ninja, and I haven’t fiddled around with this enough to say that it can actually be done. I did end up adding some custom styles to make some adjustments to Swagger UI in various places. If you view the source of the demo page and check out the second <style> block, you can see the styles I added.
With the embedded option, you can still use the official Swagger UI tooling to read the spec, and you can include the Swagger UI output in your main documentation. Swagger UI reads the latest version of the OpenAPI specification, which is something many tools don’t yet support. Additionally, Swagger UI has the familiar interface that API developers are probably already familiar with. However, if the styling overflows in ugly ways in your Model sections, you might want to avoid the embedded approach.
Option 3: Parse the OpenAPI specification document
If you’re using a tool such as Jekyll, which incorporates a scripting language called Liquid, you can use Jekyll’s instance of Liquid to read the OpenAPI specification document (which is, after all, just YAML syntax). For example, you could use a for loop to iterate through the OpenAPI spec values. Here’s a code sample. In this example, the swagger.yml file is stored inside Jekyll’s _data directory.
<table>
    <thead>
    <tr><th>Name</th><th>Type</th><th>Description</th><th>Required?</th></tr>
    </thead>
    {% for parameter in site.data.swagger.paths.get.parameters %}
        {% if parameter.in == "query" %}
        <tr>
            <td><code>{{ parameter.name }}</code></td>
            <td><code>{{ parameter.type }}</code></td>
            <td>
            {% assign found = false %}
            {% for param in site.data.swagger.paths.get.parameters %}
                {% if parameter.name == param.name %}
                    {{ param.description }}
                    {% assign found = true %}
                {% endif %}
            {% endfor %}
            {% if found == false %}
                ** New parameter **
            {% endif %}
            </td>
            <td><code>{{ parameter.required }}</code></td>
        </tr>
        {% endif %}
    {% endfor %}
</table>
Special thanks to Peter Henderson for sharing this technique and the code. With this approach, you may have to figure out the right Liquid syntax to iterate through your OpenAPI spec, and it may take a while. But this might work if you’re looking for tight integration into your authoring tool. (Note that many static site generators can parse YAML, not just Jekyll.)
For more information on this approach, see Peter’s write-up at Integrating Autogenerated Content Into Your Documentation Site Using Swagger and Jekyll and this sample GitHub code.
Option 4: Store content in YAML files that are sourced to both outputs
Another approach to integrating Swagger’s output with your other docs might be to store your descriptions and other info in YAML data files in your project, and then include the data references in your specification document. I’m most familiar with Jekyll, so I’ll describe the process using Jekyll (but similar techniques exist for other static site generators).
In Jekyll, you can store content in YAML files in your _data folder. For example, suppose you have a file called parameters.yml inside _data with the following content:
acme_parameter: >
  This is a description of my parameter ...
You can then include that reference using tags like this:
{{site.data.parameters.acme_parameter}}
In your Jekyll project, you would include this reference your spec like this:
info:
  description: >
    {{site.data.parameters.acme_parameter}}
You would then take the output from Jekyll that contains the content pushed into each spec property. In this model, you’re generating the OpenAPI spec from your Jekyll project.
I’ve tried this approach. It’s not a bad way to go, but it’s hard to ensure that your OpenAPI spec remains valid as you write content. When you have references like this in your spec content ({{site.data.parameters.acme_parameter}}), you can’t benefit from the real-time spec validation that you get when using the Swagger Editor.
Most likely, you’d need to include the entire Swagger UI project in your Jekyll site. At the top of your Swagger.yml file, add frontmatter dashes with layout: null to ensure Jekyll processes the file:
---
layout: null
---
In your jekyll serve command, configure the destination to build your output into an htdocs folder where you have a simple local HTTP server running. With each build, check the display to see whether it’s valid or not.
By storing the values in data files, you can then include them elsewhere in your doc as well. For example, you might have a parameters section in your doc where you would also include the {{site.data.parameters.acme_parameter}} description.
Again, although I experimented with this approach, I grew frustrated at not being able to validate my spec immediately. It was more challenging to track down the exact culprits behind my validation errors, and I eventually gave up.
Option 5: Use a tool that imports Swagger and allows additional docs
Another approach is to use a tool like Readme.com or Stoplight that allows you to both import your OpenAPI spec and also add your own separate documentation pages. Readme provides one of the most attractive outputs and is fully inclusive of almost every documentation feature you could want or need. I explore Readme with more depth in Hybrid documentation systems. Readme.com requires third-party hosting, but some other doc tools allow you to incorporate Swagger as well. I explored Stoplight in depth in a previous topic: Stoplight — visual modeling tools for creating your OpenAPI spec.
Sites like Apiary and Mulesoft also let you import your OpenAPI spec while also adding custom documentation pages. These sites offer full-service management for APIs, so if your engineers are already using one of these platforms, it could make sense to store your docs there too.
Cherryleaf has an interesting post called Example of API documentation portal using MadCap Flare. In the post, Ellis Pratt shows a proof of concept with a Flare project that reads an OpenAPI spec and generates static HTML content from it. If you’re using Flare, it might be worth exploring.
Option 6: Change perspectives — Having two sites isn’t so bad
Finally, ask yourself, what’s so bad about having two different sites? One site for your reference information, and another for your conceptual documentation. Programmers might find the Swagger-based reference information convenient because it distills and simplifies the body of information. Rather than having a massive site to navigate, the Swagger output provides the core reference information they need. When they want conceptual information, they can consult the accompanying guide. Think of the Swagger UI output as your API’s quick reference guide.
The truth is that programmers have been operating this way for years with Javadocs, Doxygen, and other document-generator tools that generate documentation from Java, C++, C#, Python, Ruby, and other programming sources. Auto-generating the reference information from source code into a standalone output is extremely common and wouldn’t be viewed as a fragmented information experience by programmers.
So in the end, instead of feeling that having two outputs is fragmented or disjointed, reframe your perspective. Your Swagger output provides a clear go-to source for reference information about the endpoints, parameters, requests, and responses. The rest of your docs provide tutorials and other conceptual information. Your two outputs just became an organizational strategy for your documentation.
Next steps
Now that you’ve had your head buried in API reference documentation, it’s time to dive into testing. As you work with API endpoints and other code, you’ll need to test these endpoints yourself, both to gather and verify the information in your documentation. Testing isn’t always straightforward, so I devote an entire section to this topic. Continue to Overview of testing your docs.
About Tom Johnson

I'm an API technical writer based in the Seattle area. On this blog, I write about topics related to technical writing and communication — such as software documentation, API documentation, AI, information architecture, content strategy, writing processes, plain language, tech comm careers, and more. Check out my API documentation course if you're looking for more info about documenting APIs. Or see my posts on AI and AI course section for more on the latest in AI and tech comm.
If you're a technical writer and want to keep on top of the latest trends in the tech comm, be sure to subscribe to email updates below. You can also learn more about me or contact me. Finally, note that the opinions I express on my blog are my own points of view, not that of my employer.
44/165 pages complete. Only 121 more pages to go.