
Introduction to the OpenAPI specification
OpenAPI is a specification for describing REST APIs. If you’re familiar with tech comm specifications, you can think of the OpenAPI specification like the DITA specification. With DITA, there are specific XML elements used to define help components, and a required order and hierarchy to those elements. Different tools can read DITA and build out a documentation website from the elements.
With OpenAPI, instead of XML elements, you have a set of JSON objects, with a specific schema that defines their naming, order, and contents. This JSON file (often expressed in YAML instead of JSON) describes each part of your API. By describing your API in a standard format, publishing tools can programmatically parse the information about your API and display each component in a stylized, interactive display.
If you want to jump straight into a step-by-step tutorial for creating the OpenAPI specification document, see Getting started tutorial: Using Stoplight Studio to create an OpenAPI specification document, or to code it manually, see the OpenAPI tutorial using Swagger Editor and Swagger UI – overview.
- Glancing at the OpenAPI specification
- Auto-generation options for creating the OpenAPI spec
- Spec-first development of the OpenAPI spec
- Rendering Your OpenAPI specification with Swagger UI
- Activity: Explore Swagger UI through the Petstore Demo
- The tech writer’s role with the OpenAPI spec
- Should I even use the OpenAPI spec? What if I just created the reference content manually in my own format and tool?
Glancing at the OpenAPI specification
To get a better sense of the OpenAPI specification, let’s take a glance at some specification excerpts. We’ll dive deeper into each element in an upcoming tutorial.
The official description of the OpenAPI specification is available in a Github repository here. Some of the OpenAPI elements are paths, parameters, responses, and security. Each of these elements is a JSON object that holds some properties and arrays.
In the OpenAPI specification, your endpoints are paths. If you had an endpoint called “pets”, your OpenAPI specification for this endpoint might look as follows:
paths:
  /pets:
    get:
      summary: List all pets
      operationId: listPets
      tags:
        - pets
      parameters:
        - name: limit
          in: query
          description: How many items to return at one time (max 100)
          required: false
          schema:
            type: integer
            format: int32
      responses:
        '200':
          description: An paged array of pets
          headers:
            x-next:
              description: A link to the next page of responses
              schema:
                type: string
          content:
            application/json:
              schema:
                $ref: "#/components/schemas/Pets"
        default:
          description: unexpected error
          content:
            application/json:
              schema:
                $ref: "#/components/schemas/Error"
This YAML code comes from the Swagger Petstore demo.
Here’s what these objects mean:
-
/petsis the endpoint path. -
getis the HTTP method. -
parameterslists the parameters for the endpoint. -
responseslists the response from the request. -
200is the HTTP status code. -
$refis a reference to another part of your implementation where the response is defined (incomponents). OpenAPI has a lot of$refmarkers like this to keep your code clean and to facilitate re-use.
Learning the OpenAPI spec and constructing the YAML or JSON code by hand the first time, when you’re also trying to sort out what the values should be, can be daunting. It might be easier to start in a visual editor like Stoplight and then, if desired, transition into more of a direct code-based approach. For this reason I have arranged the sequence of this course to start out first in the visual editor, with Create an OpenAPI document using a visual editor (Stoplight Studio), and then later in the course provide an OpenAPI tutorial overview using Swagger Editor and Swagger UI. However, you can probably do most everything from within the visual editor.
Auto-generation options for creating the OpenAPI spec
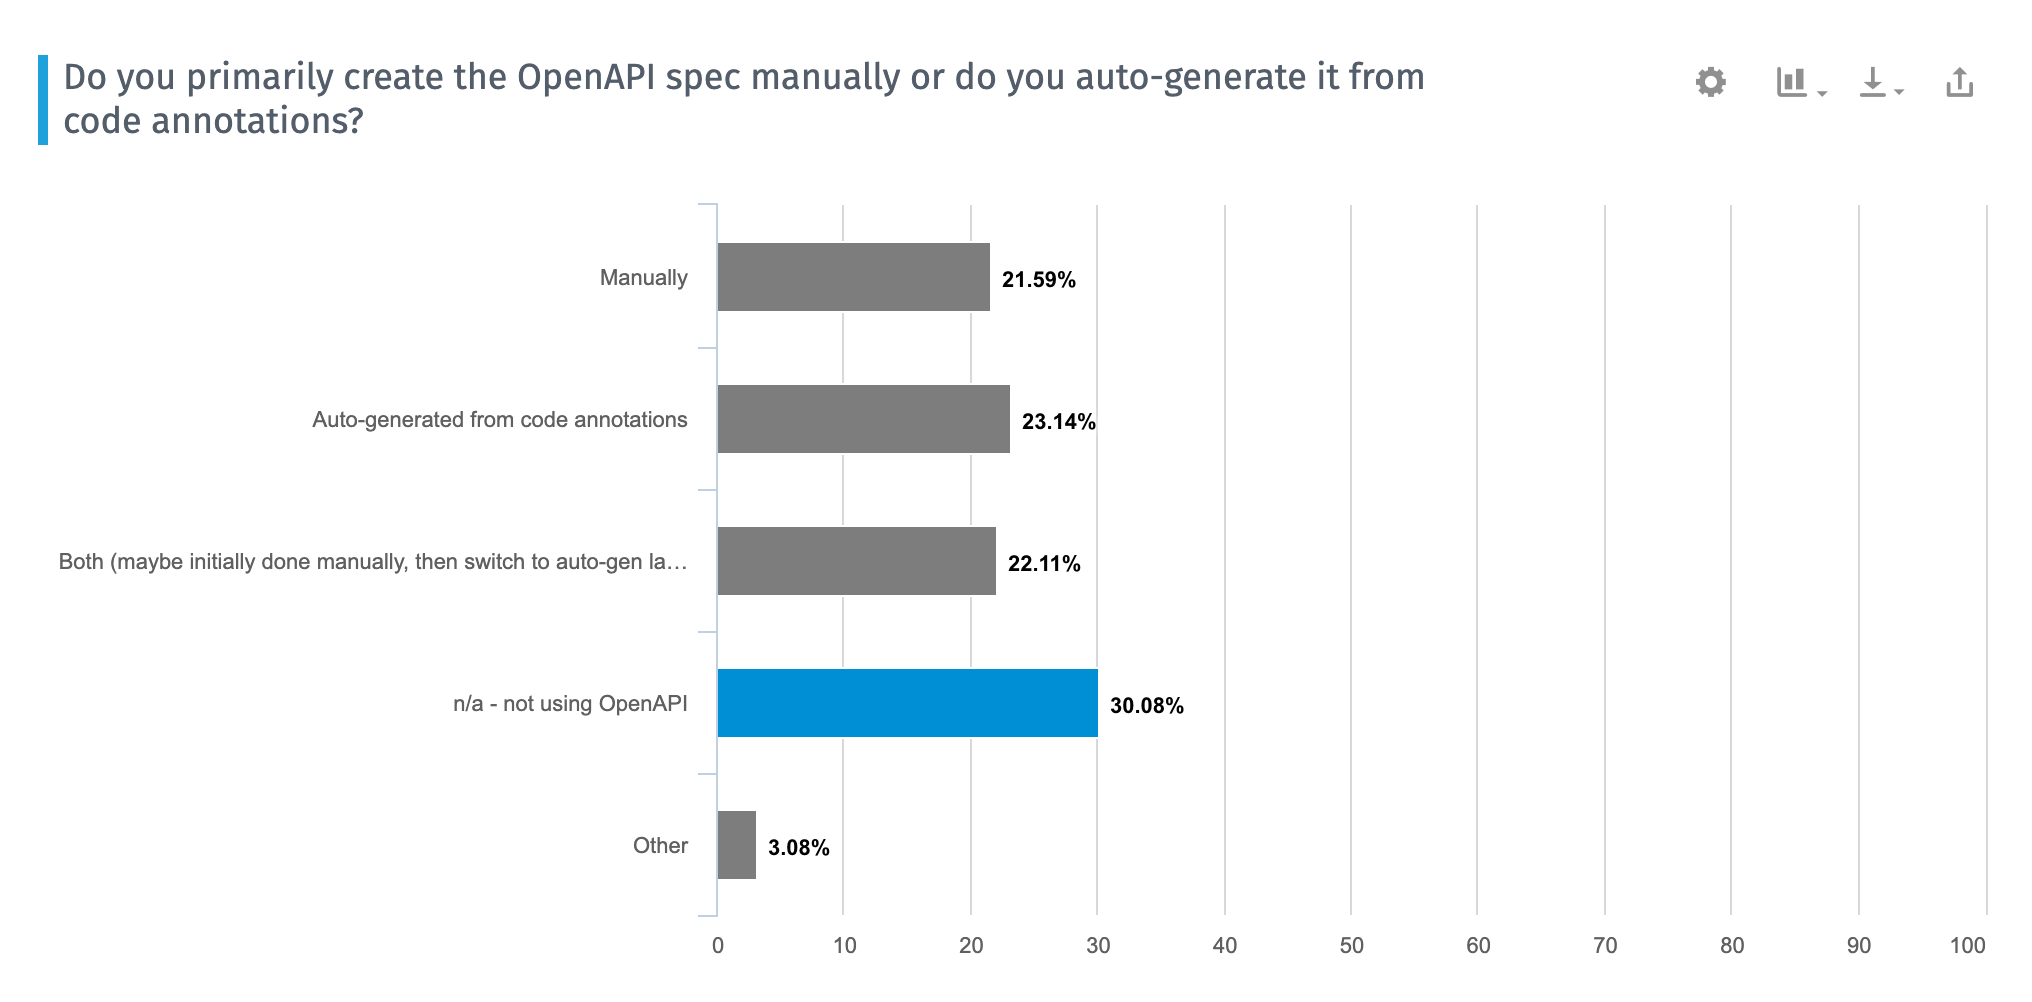
Before we dive into ways to manually create the OpenAPI specification document, it’s worth noting some other approaches to the task, beyond choosing whether to use a visual editor or manually write the code. You can also choose to auto-generate the OpenAPI spec from annotations in your programming code. This developer-centric approach may make sense if you have a large number of APIs or if it’s not practical for technical writers to create this documentation. In my 2020 Developer Documentation Trends survey, approaches for auto-generating the spec versus manually generating it were split:
If you want to go the code-generation route, Swagger offers a variety of libraries that you can add to your programming code to generate the specification document. These Swagger libraries then parse the annotations that developers add and generate the OpenAPI specification document. These libraries are considered part of the “Swagger Codegen” project. The annotation methods vary based on the programming language. For example, here’s a tutorial on annotating code with Swagger for Scalatra.
See There’s No Reason to Write OpenAPI By Hand by Phil Sturgeon for some more discussion. For example, Phil provides this sample of code annotations in Java:
class UserController {
  @OpenApi(
      path = "/users",
      method = HttpMethod.POST,
      // ...
  )
  public static void createUser(Context ctx) {
      // ...
  }
}
And the approach in JavaScript:
/**
 * @swagger
 * /users:
 *   get:
 *     description: Returns users
 *     produces:
 *      - application/json
 *     responses:
 *       200:
 *         description: users
 *         schema:
 *           type: array
 *           items:
 *             $ref: '#/definitions/User'
 */
app.get('/users', (req, res) => {
  // implementation logic ...
});
You can see that the annotations differ by language, mostly following the allowed annotations and traditional syntax for that language. So if you want to go this route, first find out what Swagger Codegen libraries are available for that language. For more information on Codegen, see Comparison of Automatic API Code Generation Tools For Swagger by Kin Lane, aka the API Evangelist. For additional tools and libraries, see Swagger services and tools and Open Source Integrations. Note that currently, most of the Codegen libraries only work with version 2.0 of the OpenAPI. Codegen tool have been slow to transition to version 3.0.
Although this code-generation approach “automates” the spec’s generation, someone still has to know what annotations to add and how to add them (the process isn’t too unlike Javadoc’s comments and annotations). Then someone has to write content for each of the annotation’s values (describing the endpoint, the parameters, and so on).
In short, this process isn’t without effort — the automated part is having the Codegen libraries generate the model definitions and the valid specification document that conforms to the OpenAPI schema. The end result is an OpenAPI specification document that you’ll then need to feed into another tool such as Swagger UI, Redocly, or another tool to generate out the documentation.
Still, many developers get excited about this approach because it offers a way to generate documentation from code annotations, which is what developers have been doing for years with other programming languages such as Java (using Javadoc) or C++ (using Doxygen). They usually feel that generating documentation from the code results in less documentation drift. Docs are likely to remain up to date if the doc is tightly coupled with the code.
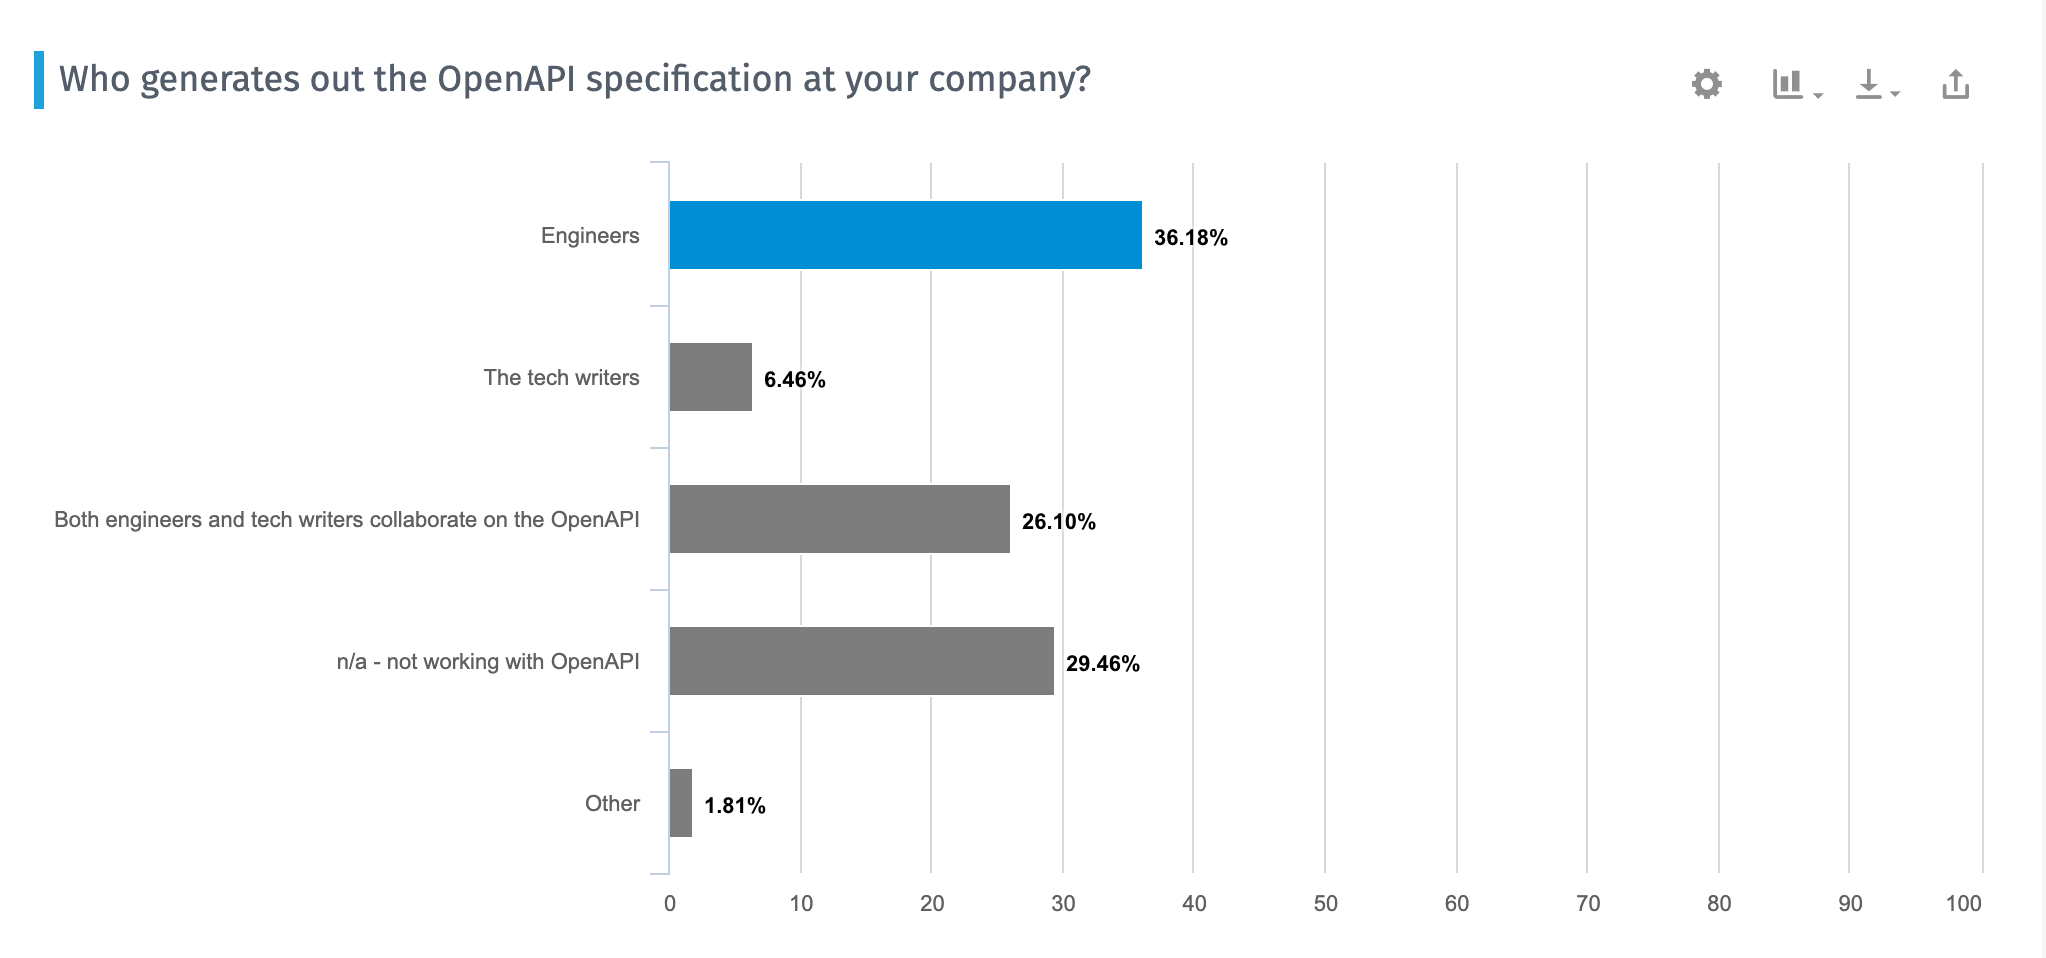
It’s common that engineers generate the OpenAPI spec, so you wouldn’t be out of place to simply ask developers to generate out this file from their code, writing and maintaining their own reference documentation. In my 2020 Developer Documentation Trends survey, I asked respondents who typically generates the OpenAPI spec. Their answers trends towards either engineers or engineers + tech writers in collaboration:
If engineers are generating the OpenAPI spec and they want to auto-generate it from annotations in their code, you might want to follow their preference. If you go the auto-generation route, make sure you get access to the source code to make edits to the annotations and ramp up on Git. Otherwise, your developers will be writing your reference docs.
In this course, however, I will not be covering code annotations and ways to auto-generate the spec. I focus exclusively on manually creating the code, since this follows a best practice in the industry. The main weakness of generating your OpenAPI spec from code is that the spec can no longer serve as the blueprint for creating the API, and instead becomes an afterthought. I’ll explain this in more depth in the next section, Spec-first development of the OpenAPI spec.
Spec-first development of the OpenAPI spec
Now let’s talk about the spec-first approach. Many feel that auto-generation, described in the previous section, is not the best approach. In Undisturbed REST: A Guide to Designing the Perfect API, Michael Stowe recommends that teams implement the OpenAPI specification by hand and then treat the specification document as a contract that developers use when doing the actual coding. This approach is often referred to as “spec-first development.”

In other words, developers consult the OpenAPI specification document to see what the parameter names should be called, what the responses should be, and so on. After this “contract” or “blueprint” has been established, Stowe says you can then put the annotations in your code (if you want) to generate the specification document in a more automated way. But don’t code without first having a spec.
Too often, development teams quickly jump to coding the API endpoints, parameters, and responses without doing much user testing or research into whether the API aligns with what users want. Since versioning APIs is extremely difficult (you have to support each new version going forward with full backward-compatibility to previous versions), you want to avoid the “fail fast” approach that agile enthusiasts so commonly celebrate. There’s nothing worse than releasing a new version of your API that invalidates endpoints or parameters used in previous releases. Constant versioning in APIs can become a documentation nightmare.
Even before the API has been coded, your spec can generate a mock response by adding response definitions in your spec. The mock server generates a response that looks like it’s coming from a real server, but in reality it’s just a pre-defined response in your code and appears to be dynamic to the user.
If the OpenAPI spec isn’t used as the blueprint for the API, what is? Most likely, the descriptions about the endpoints and what they return will be stored on a wiki page or Word document, often incomplete in terms of all the details (e.g., casing of the responses, the structure and what’s included), so developers will make these decisions on the fly while coding.
Rendering Your OpenAPI specification with Swagger UI
After you have a valid OpenAPI specification document that describes your API, you can then feed this specification to different tools to parse it and generate the interactive documentation similar to the Petstore demo.
Probably the most common tool used to parse the OpenAPI specification is Swagger UI. (Remember, “Swagger” refers to API tooling, whereas “OpenAPI” refers to the vendor-neutral, tool agnostic specification.) After you download Swagger UI, it’s pretty easy to configure it with your own specification file. I provide a Swagger UI tutorial in an upcoming section.
The Swagger UI code generates a display that looks like this:
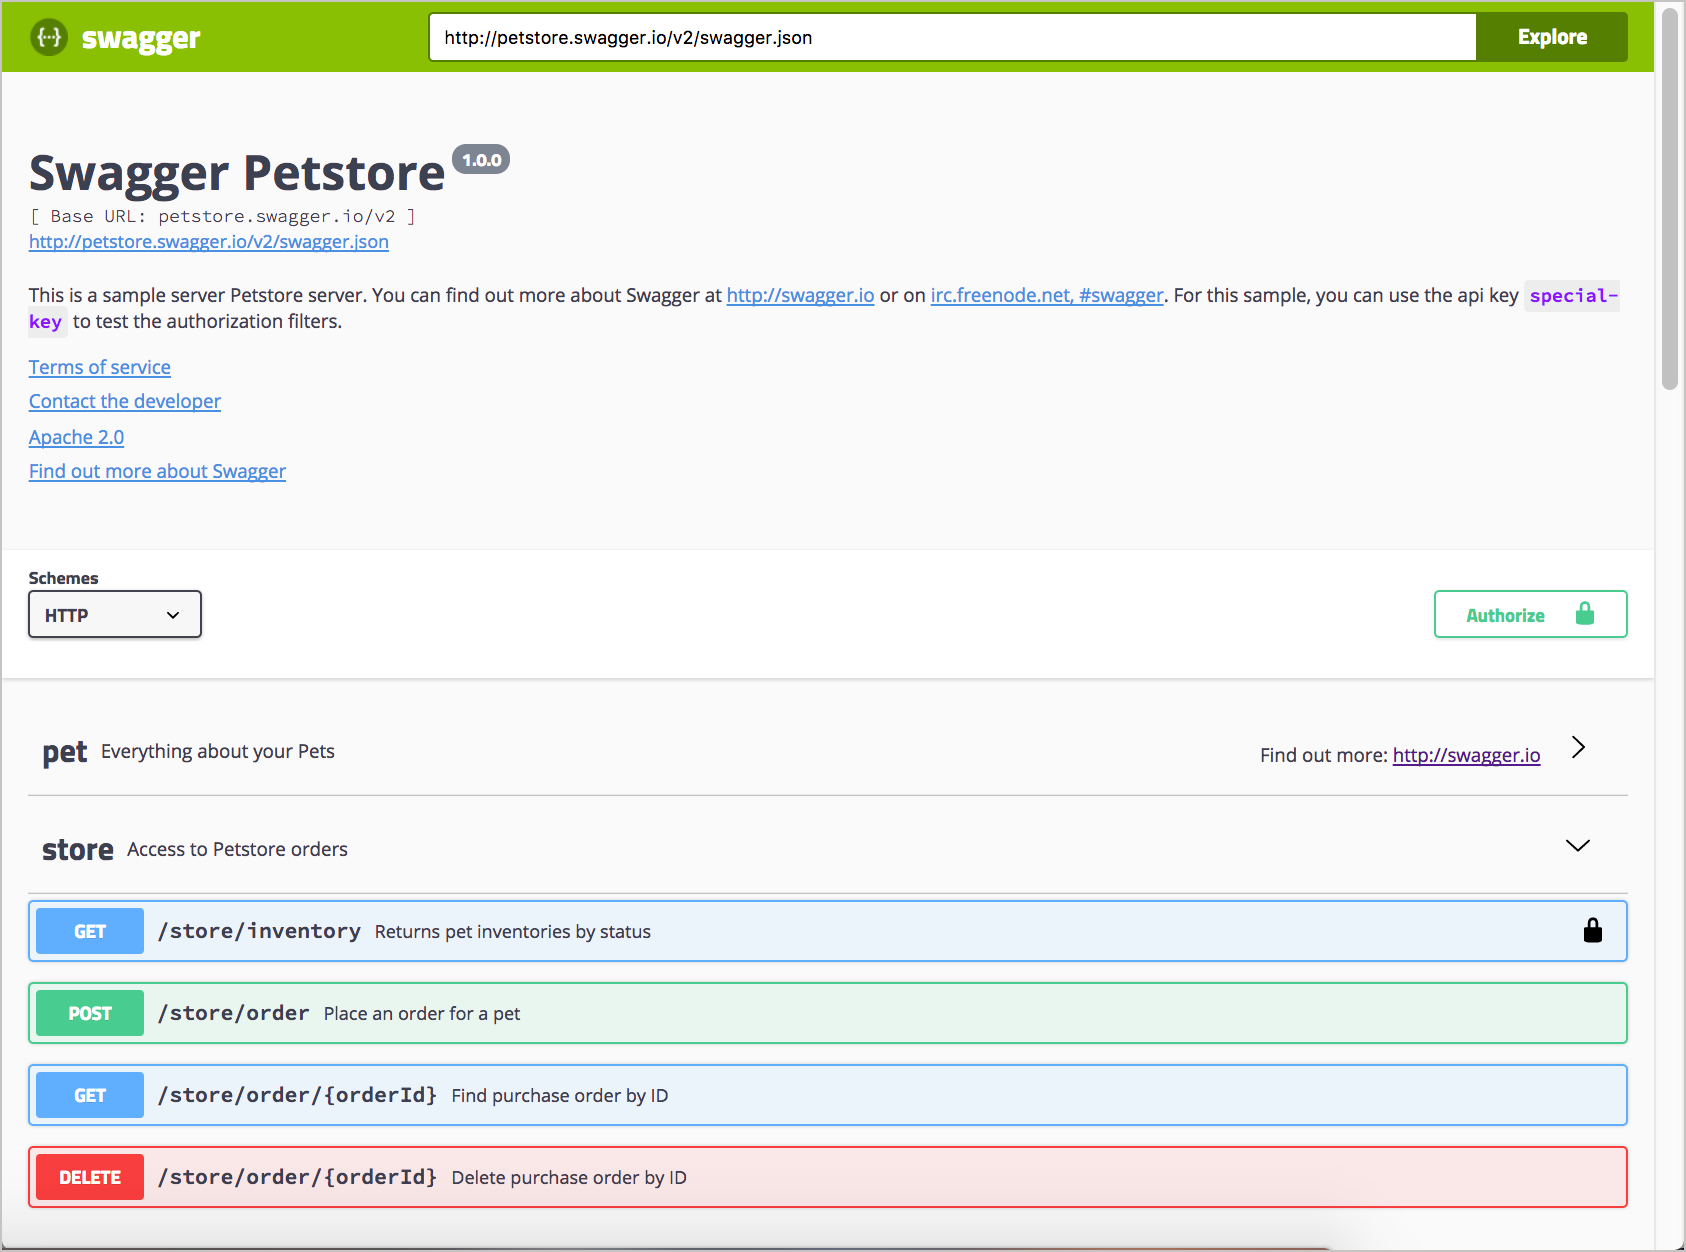
You can also check out the sample Swagger UI integration with a simple weather API used as a course example.
Some designers criticize Swagger UI’s expandable/collapsible output as being dated. At the same time, developers find the one-page model attractive and like the ability to zoom out or in for details. By consolidating all endpoints on the same page in one view, users can take in the whole API at a glance. This display gives users a glimpse of the whole, which helps reduce complexity and enables them to get started. In many ways, the Swagger UI display is a quick-reference guide for your API.
Activity: Explore Swagger UI through the Petstore Demo
Let’s get some hands-on experience with Swagger UI using the Petstore demo. The Petstore demo provides a good example of how the OpenAPI specification can be rendered visually.
-
Go to the Swagger Pet Store Demo.
As with most Swagger-based outputs, Swagger UI provides a “Try it out” button. To make it work, you must first authorize Swagger by clicking Authorize and entering your API key in the Authorization modal. However, the Petstore authorization modal is just for demo purposes. There isn’t any real code authorizing those requests, so you can close the Authorization modal or skip it altogether.

Authorization modal in Swagger UI -
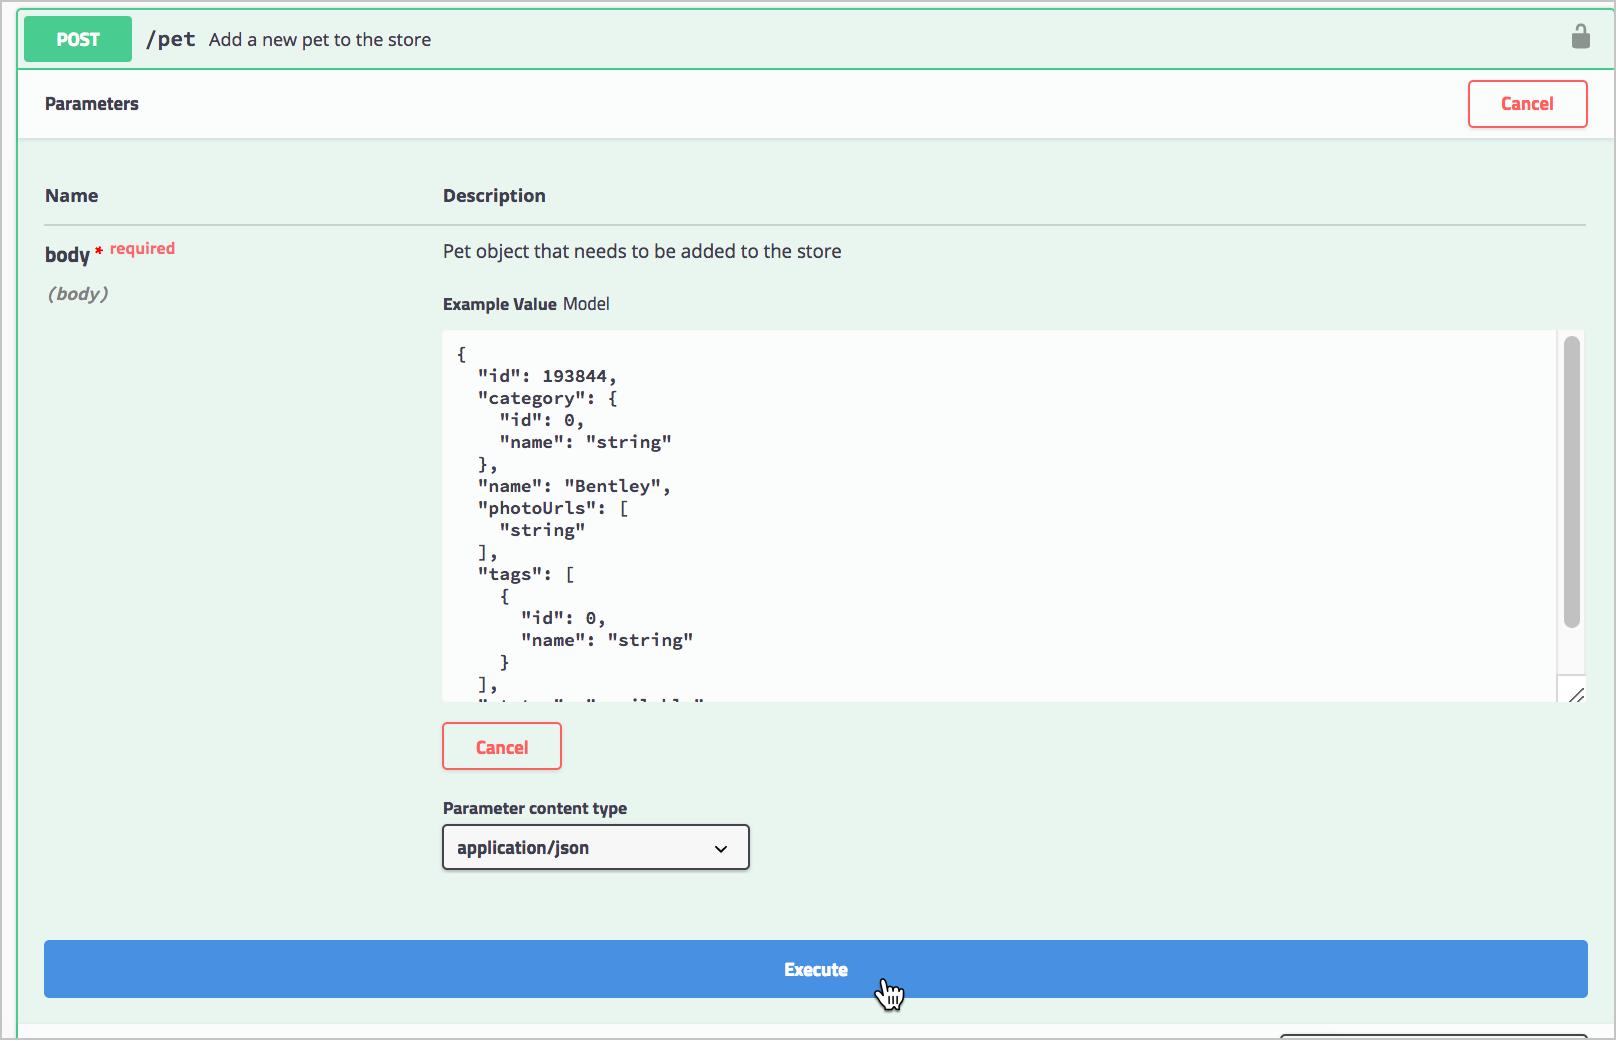
Expand the POST
/petendpoint.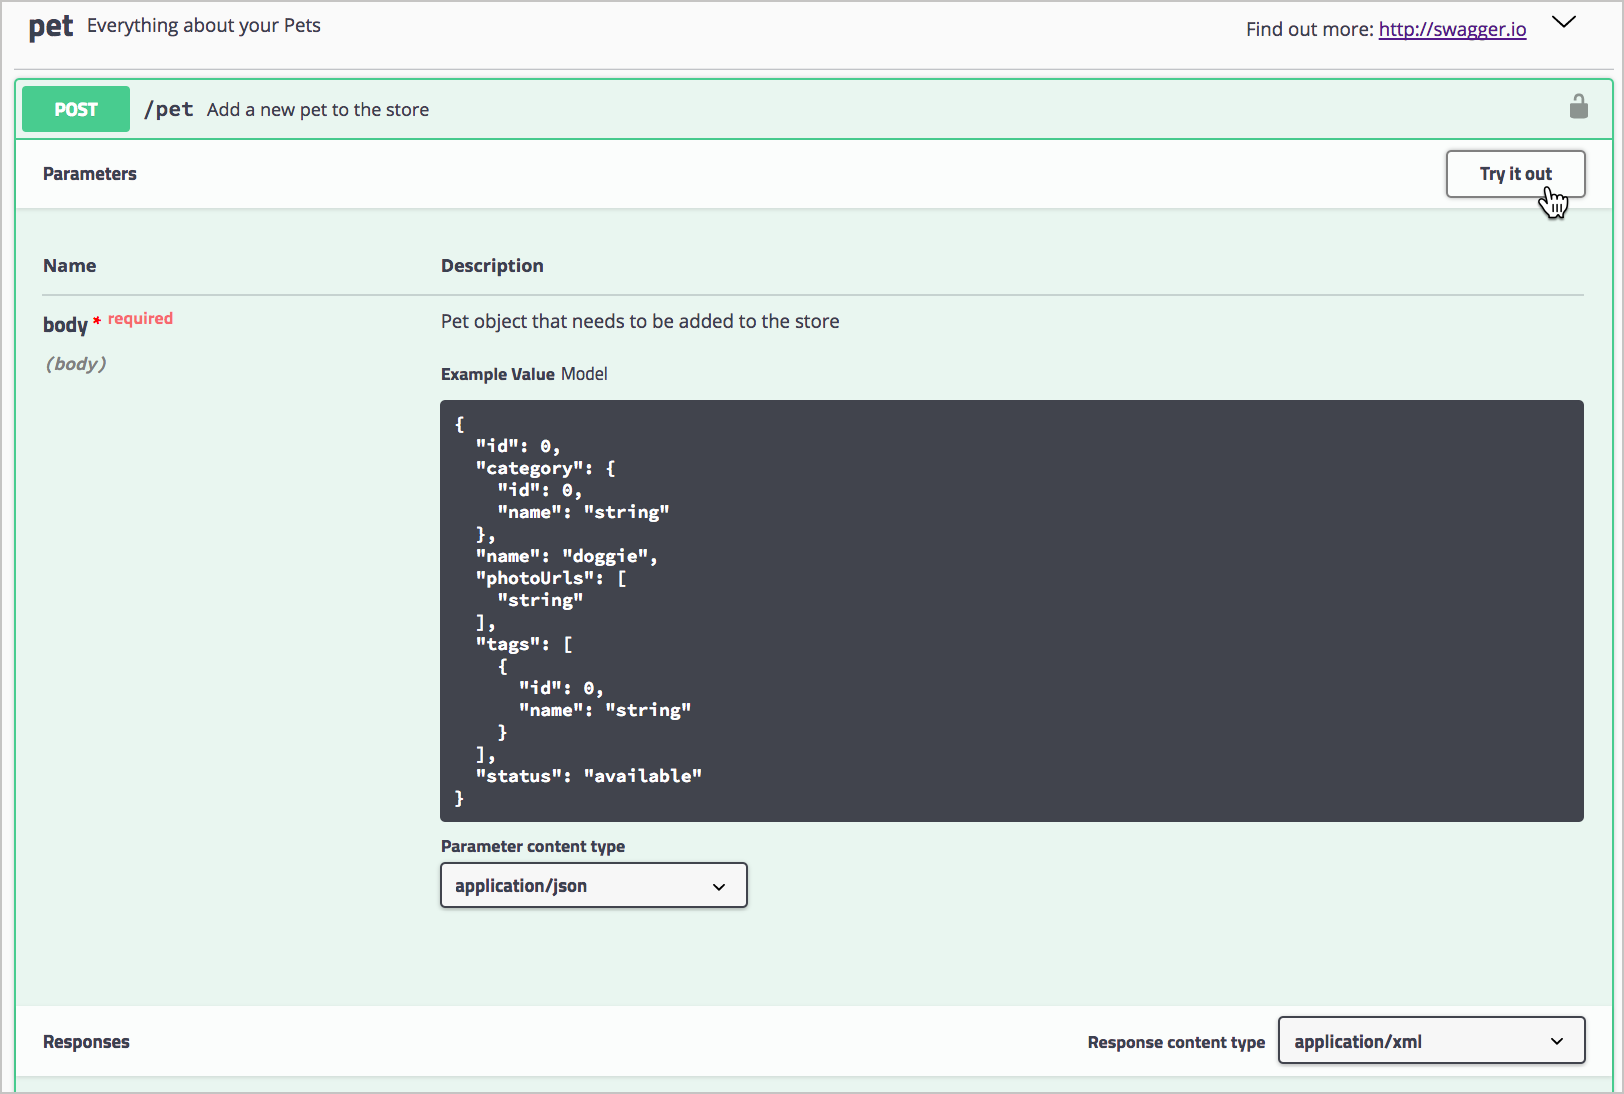
POST /pet endpoint and Try it out button in Swagger UI -
Click Try it out.
After you click Try it out, the example value in the Request Body field becomes editable.
- In the example value, change the first
idvalue to a unique (and unlikely to be repeated) whole number (such as24329). Change the namedoggieto a pet name you can remember (e.g.,Ponyo). -
Click Execute.
Executing a sample Petstore request Swagger UI submits the request and shows the curl that was submitted. For example, here’s the curl Swagger UI sent:
curl -X POST "https://petstore.swagger.io/v2/pet" -H "accept: application/xml" -H "Content-Type: application/json" -d "{ \"id\": 1000, \"category\": { \"id\": 0, \"name\": \"string\" }, \"name\": \"Ponyo\", \"photoUrls\": [ \"string\" ], \"tags\": [ { \"id\": 0, \"name\": \"string\" } ], \"status\": \"available\"}"Notice that, with the
-d(data) parameter, the request body is escaped and added directly into the curl command rather than being loaded from a file (as explained in Common curl commands related to REST).The Responses section in Swagger UI shows the response from the server. By default, the response returns JSON:
{ "id": 1000, "category": { "id": 0, "name": "string" }, "name": "Ponyo", "photoUrls": [ "string" ], "tags": [ { "id": 0, "name": "string" } ], "status": "available" } - The Petstore is a functioning API, and you have actually created a pet. For fun, expand the GET/pet/{petId} endpoint, click Try it out, enter the pet
idyou used in the previous operation, and then execute the request. You should see your pet’s name returned.
There are other tools besides Swagger UI that can parse your OpenAPI specification document. Some of these tools include Apiary, Apigee, Lucybot, Gelato, Readme.com, swagger2postman, swagger-ui responsive theme, and more.
Some web designers have created integrations of OpenAPI with static site generators such as Jekyll (see Carte and Readme). You can also embed Swagger UI into web pages as well. More tools roll out regularly for parsing and displaying content from an OpenAPI specification document.
In fact, once you have a valid OpenAPI specification, using a tool called API Transformer, you can even transform it into other API specification formats, such as RAML or API Blueprint. These additional formats allow you to expand your tool horizons even wider.
The tech writer’s role with the OpenAPI spec
In many of my projects, developers haven’t been that familiar with OpenAPI, so I usually create the OpenAPI specification document manually. Additionally, I don’t always have access to the programming source code, and our developers speak English as a second or third language only. They aren’t eager to be in the documentation business.
You will most likely find that engineers in your company aren’t familiar with OpenAPI but are interested in using it as an approach to API documentation. (I think the spec’s schema-based approach fits the engineering mindset, so it’s not hard to get buy-in for the approach.) But you’ll probably need to take the lead to guide engineers in the needed information, approach, and other details that align with best practices toward creating the spec.
In this regard, tech writers can play a key role in collaborating with the API team in producing the spec. If you’re following a spec-first development philosophy, this leading role can help you shape the API before it gets coded and locked down. This means you might have the opportunity to influence the names of the endpoints, the consistency and patterns, simplicity, and other factors that go into the design of an API (which tech writers are usually absent from). See API design and usability for details on how to influence good API design.
Should I even use the OpenAPI spec? What if I just created the reference content manually in my own format and tool?
One of the main reasons for tech writers to use the OpenAPI spec is to auto-generate out the reference documentation in a neat display that lets users try out requests. There are a host of tools that will read an OpenAPI spec and then generate out docs. I’ll go into more depth with these approaches in later sections (such as the Stoplight tutorial, Swagger UI tutorial, and Redoc tutorial).
However, up front you should be aware that there are tradeoffs to using the OpenAPI approach. If you write your reference docs using the OpenAPI spec and then settle on your preferred way of generating out the interactive docs, you’re probably going to run into these challenges:
-
Tutorial/how-to docs and reference docs become fragmented: The OpenAPI specification and the rendering tool typically cover only reference documentation. The OpenAPI provides the basics of each endpoint, including a description, the parameters, a sample request, and a response. It doesn’t provide space for a getting started tutorial, information about how to get API keys, how to download and configure a sample app, information about rate limits, or the hundred other details that go into the conceptual topics for developers. So even though you have this cool, interactive tool for users to explore and learn about your API, you still have to provide a user guide. Your docs will likely have a standalone reference output that acts as a companion to the tutorial content. Some platforms let you mix the two (e.g., Stoplight, Readme.com, and others), but then you’ll be paying for a hosted documentation service. I talk more about this issue in Integrating Swagger UI with the rest of your docs.
-
Redundancy/duplication of information: With OpenAPI in the mix, you potentially have two places where you’re describing your endpoints and parameters (both the reference output and your user guide), and you have to either keep the two in sync, embed one in the other, or otherwise link between the two. The OpenAPI lets you re-use parameter and response information through the
componentsobject, but you couldn’t easily re-use the information outside the reference material. -
Complexity of API workflows: The complexity of your API can also be a factor to consider in your approach. Peter Gruenbaum, who has published several tutorials on writing API documentation on Udemy, says that automated tools work best when the APIs are simple. When you have endpoints that have complex interdependencies and require special setup workflows or other unintuitive treatment, the straightforward nature of a Try-it-out interface (by this I mean the generated output from tools such as Swagger UI or Redoc) may likely leave users scratching their heads. For example, if you must first configure an API service before an endpoint returns anything, and then use one endpoint to get a certain object that you pass into the parameters of another endpoint, and so on, the Try-it-out features in the output won’t make a lot of sense to users without a detailed tutorial to follow.
-
Executing requests against real data: Some users may not realize that clicking “Try it out” makes actual calls against their own accounts based on the API keys they’re using. Mixing an invitation to use an exploratory sandbox with real data can create some headaches later on when users ask how they can remove all of the test data, or why their actual data is now messed up. For these scenarios, it’s best to either remove the Try-it-out options or set up a sandbox or test account for users. But this is easier said than done. You might find that your company doesn’t provide a sandbox for testing out the API. All API calls execute against real data.
-
Extensive request bodies problematic: Finally, I found that endpoints with lengthy request bodies tend to be problematic. One API I had to document included requests with request bodies that were hundreds of lines long (the request body was used to configure an API server). With this sort of request body, many of these tools that create docs from the OpenAPI spec fall short of being usable. You might have an unwieldy list of parameters or some other custom/complex setup and might want more control over your docs.
Despite these shortcomings, OpenAPI is quickly becoming a way for more and more tools (from Postman Run buttons to nearly every API platform) to quickly ingest the information about your API and make it discoverable and interactive with robust, instructive tooling. Through your OpenAPI specification, you can port your API onto many platforms and systems as well as automatically set up unit testing and prototyping. Your OpenAPI spec is machine-readable and will give much more life and flexibility to your API docs.
Additionally, the generated docs from the OpenAPI provide a nice visual shape for an API. You can easily see all the endpoints and their parameters ‐ it acts like a quick-reference guide. Based on this framework, you can help users grasp the basics of your API at a glance.
I’ve also found that learning the OpenAPI specification and describing my API with these objects and properties helped inform my own API vocabulary. For example, I realized that there were four main types of parameters: “path” parameters, “header” parameters, “query” parameters, and “request body” parameters. I learned that parameter data types with REST were a “Boolean,” “number,” “integer,” or “string.” I learned that responses provided “objects” containing “strings” or “arrays.” In short, implementing the specification gave me an education about API terminology, which in turn helped me describe the various components of my API in credible ways.
OpenAPI may not be the right approach for every API, but it’s an industry standard and can be a powerful complement to your API documentation. You can give users the ability to try out requests and responses for themselves. With this interactive element, your documentation becomes more than just information. Through OpenAPI and the interactive docs you generate from it, you create a space for users to both read your documentation and experiment with your API at the same time. That combination tends to provide a powerful learning experience for users.
About Tom Johnson

I'm an API technical writer based in the Seattle area. On this blog, I write about topics related to technical writing and communication — such as software documentation, API documentation, AI, information architecture, content strategy, writing processes, plain language, tech comm careers, and more. Check out my API documentation course if you're looking for more info about documenting APIs. Or see my posts on AI and AI course section for more on the latest in AI and tech comm.
If you're a technical writer and want to keep on top of the latest trends in the tech comm, be sure to subscribe to email updates below. You can also learn more about me or contact me. Finally, note that the opinions I express on my blog are my own points of view, not that of my employer.
38/165 pages complete. Only 127 more pages to go.