
Submit requests through Postman
When you’re testing endpoints with different parameters, you can use one of the many GUI REST clients available to make the requests. (By “GUI,” I mean there’s a graphical user interface with boxes and buttons for you to click.) You can also use curl (which we’ll cover soon), but GUI clients tend to simplify testing with REST APIs.
- Why use a GUI client
- Popular GUI clients
- Activity: Make requests with Postman
- Same request but in Paw instead of Postman
- Enter several requests for the Aeris API into Postman
- Automatically import the Postman collections
Why use a GUI client
With a GUI REST client, you can:
- Save your requests (and numerous variations) in a way that’s easy to run again
- More easily enter information in the right format
- See the response in a prettified JSON view or a raw format
- Easily include header information
With a GUI REST client, you won’t have to worry about getting curl syntax right and analyzing requests and responses from the command line.
Popular GUI clients
Some popular GUI clients include the following:
- Postman
- Insomnia
- Paw
- Advanced REST Client (Chrome browser extension)
Of the various GUI clients available, Postman is probably the best option, since it allows you to save both calls and responses, is free, works on both Mac and PC, and is easy to configure.
A lot of times, abstract concepts don’t make sense until you can contextualize them with an action. In this course, I’m following more of an “experience-first” methodology. After you do an activity, we’ll explore the concepts in more depth. So if it seems like I’m glossing over concepts now, such as what a GET method is or an endpoint, hang in there. When we deep dive into these points in Documenting API endpoints, these concepts will be a lot clearer.
Activity: Make requests with Postman
In this exercise, you’ll use Postman to make a request using OpenWeatherMap’s current weather data API endpoint. To make the request:
- If you haven’t already done so, download and install the Postman app at https://www.getpostman.com/downloads/. (Make sure you download the app and not the deprecated Chrome extension.)
- Start the Postman app and sign in when prompted. Close any welcome screens so you can make a request.
- Insert the following endpoint into the box next to GET:
https://api.openweathermap.org/data/2.5/weather -
Click the Params tab (below the box where you inserted the endpoint) and then add the following three parameters in the key and value rows:
- key:
zip/ value:95050 - key:
units/ value:imperial - key:
appid/ value: <insert your own API key>
For the value for
appid, use your own API key. Your Postman UI should look like this: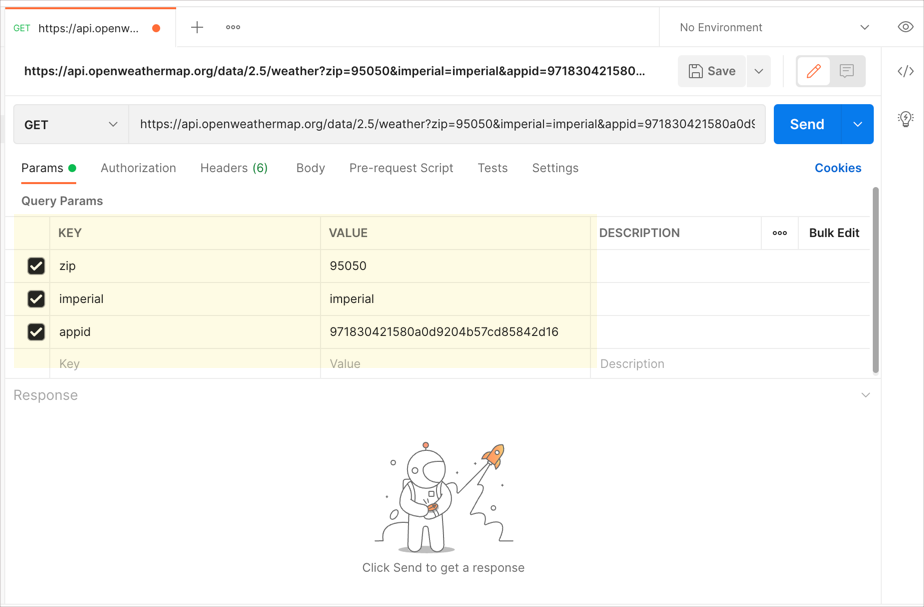
When you add these parameters, they appear as a query string to the endpoint URL in the GET box. For example, your endpoint will now look like this:
https://api.openweathermap.org/data/2.5/weather?zip=95050&units=imperial&appid=APIKEY(but with different query string values and with your own API key instead ofAPIKEY). Query string parameters appear after the question mark?symbol and are separated by ampersands&. The order of query string parameters doesn’t matter.Note that many APIs pass the API key in the header rather than as a query string parameter in the request URL. (If that were the case, you would click the Headers tab and insert the required key-value pairs in the header. But OpenWeatherMap passes the API key as a query string parameter.)
- key:
-
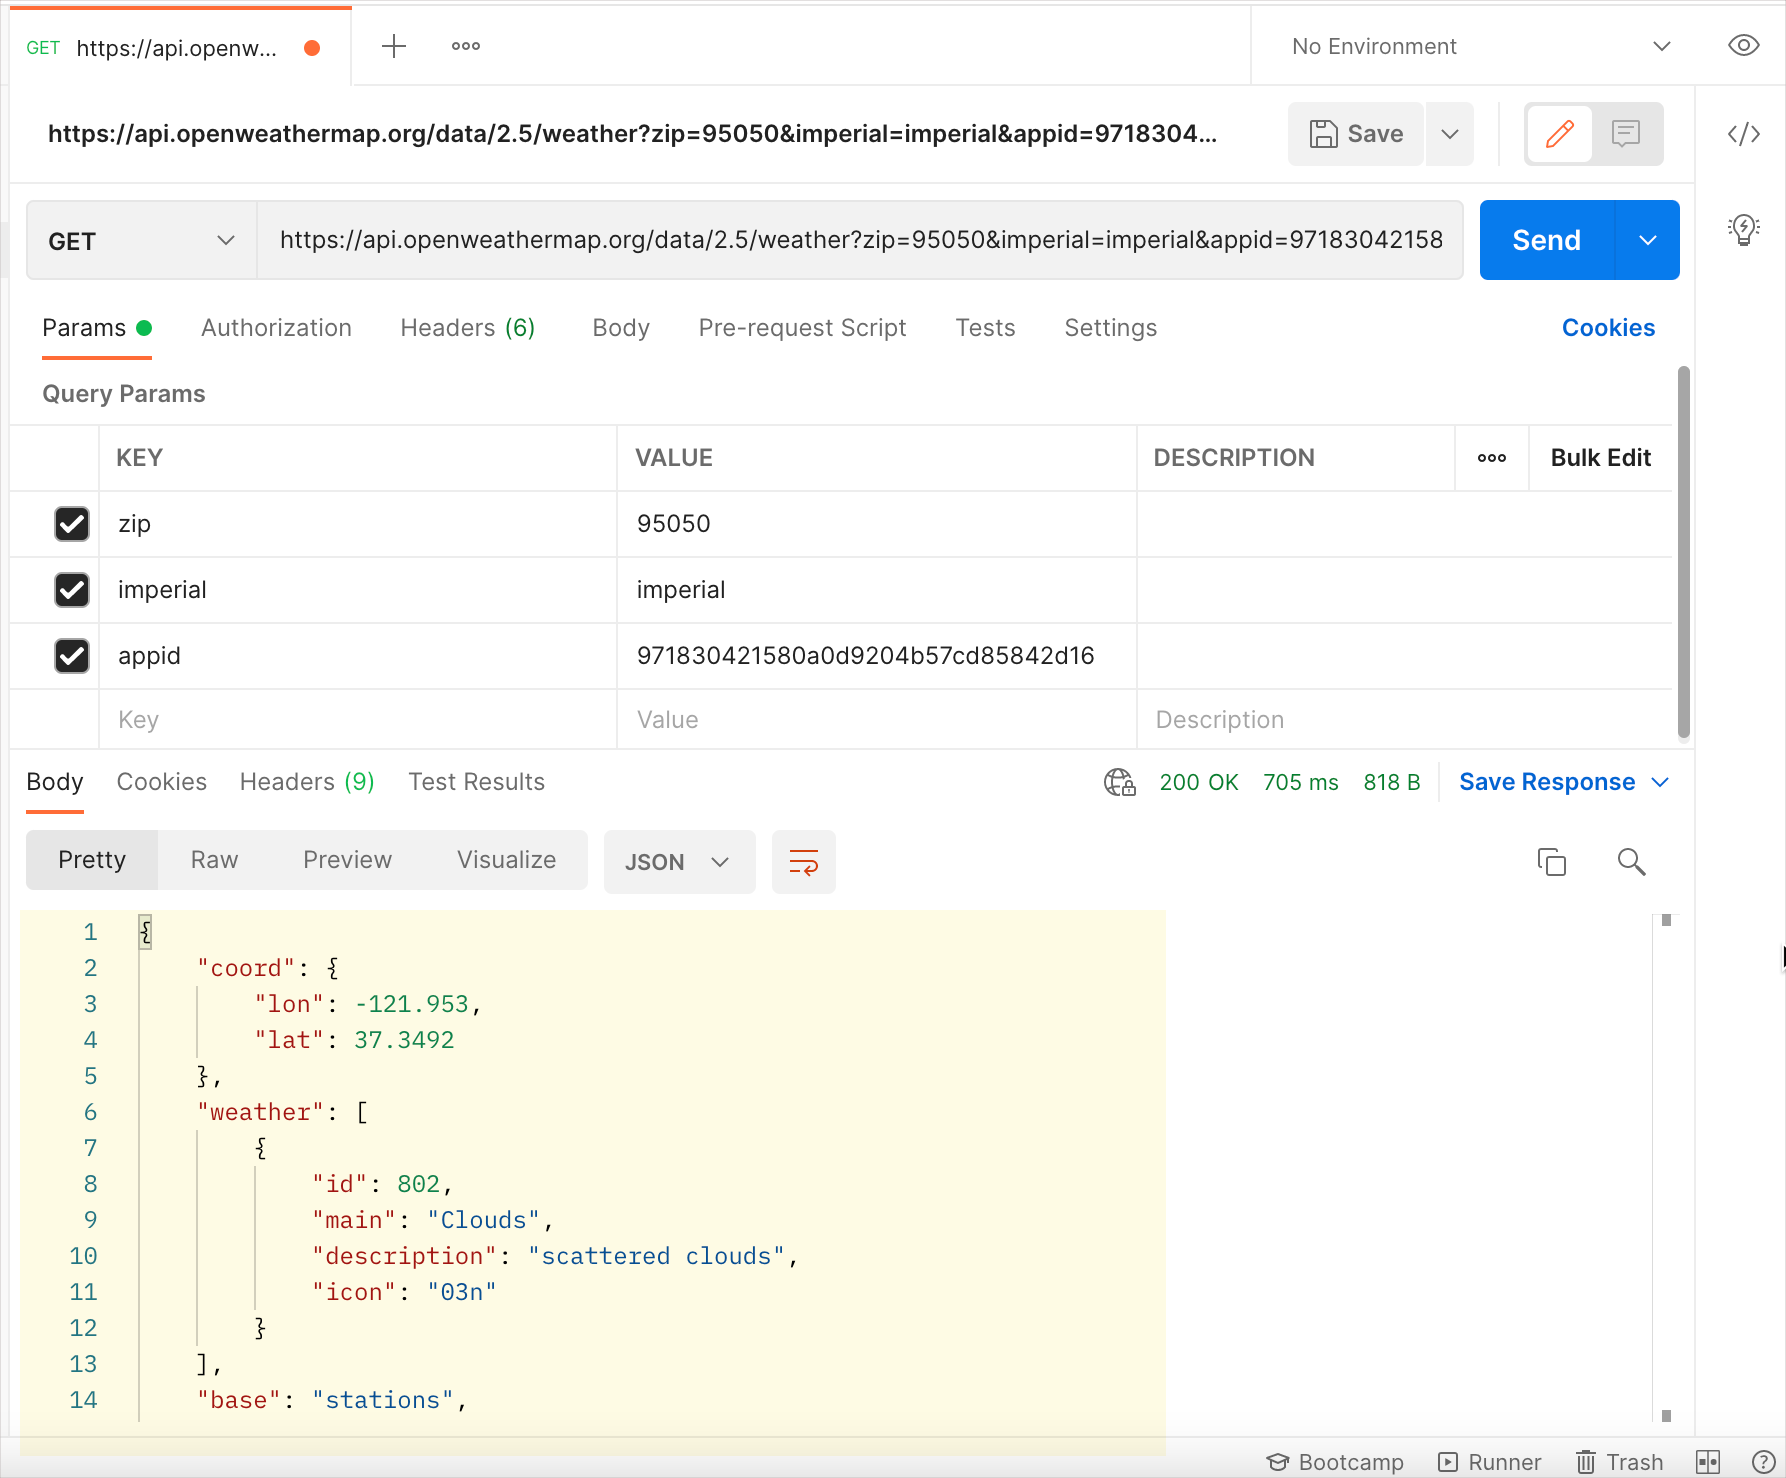
Click Send.
The response appears in the lower pane. For example:
Save the request
- In Postman, click the Save button (above Send). The Save Request dialog box appears.
- In the Request name box, type a friendly name for the request, such as “OpenWeatherMap Current API.”
- In the Request description (Optional) field, type a description such as “gets the current weather for 95050 in imperial units.”
-
Scroll down a bit and click New Collection to create a folder to save the request in. Name your new collection (e.g., “OpenWeatherMap”) and click the orange check mark. Then select the new collection you just created.
After you create the collection, the Save button will be enabled. Your Postman collection should look something like this:
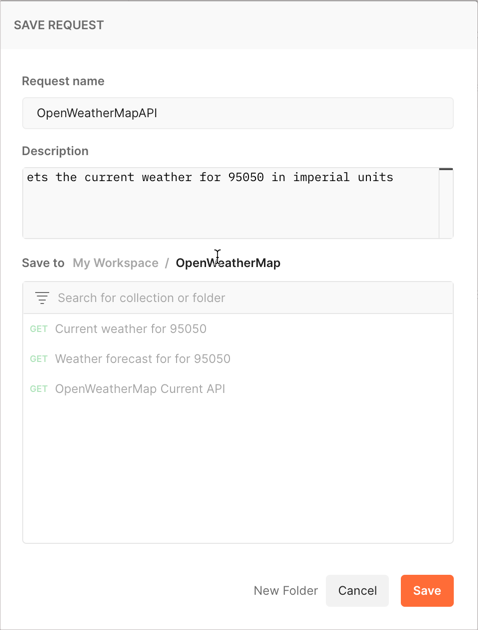
Collection dialog box -
Click Save.
Saved requests appear in the left side pane on the Collections tab. (If you don’t see the Collections pane, click the Show Sidebar button
 in the lower-left corner to expand it.
(Optional) Make a request for the OpenWeatherMap 5 day forecast
Now instead of getting the current weather, let’s use another OpenWeatherMap endpoint to get the forecast. Enter details into Postman for the 5 day forecast request. In Postman, you can click a new tab, or click the arrow next to Save and choose Save As. Then choose your collection and request name.
A sample endpoint for the 5 day forecast, which specifies location by zip code, looks like this:
https://api.openweathermap.org/data/2.5/forecast?zip=95050,us
Add in the query parameters for the API key and units:
https://api.openweathermap.org/data/2.5/forecast?zip=95050&appid=APIKEY&units=imperial
(In the above code, replace APIKEY with your own API key.)
Observe how the response contains a list that provides the forecast details for five days.
(Optional) Make one more OpenWeatherMap API request
Make one more OpenWeatherMap API request, this time changing the way you specify the location. Instead of specifying the location by zip code, specify the location using lat and lon geocoordinates instead. For example:
https://api.openweathermap.org/data/2.5/weather?lat=37.3565982&lon=-121.9689848&units=imperial&appid=APIKEY
(In the above code, replace APIKEY with your actual API key.)
Postman has a lot of other functionality you can use. We’ll revisit Postman later in the course for some other activities.
Same request but in Paw instead of Postman
Although Postman is a popular REST client, you can also use others, such as Paw. The following image shows the same current weather API request made in Paw (for Mac):
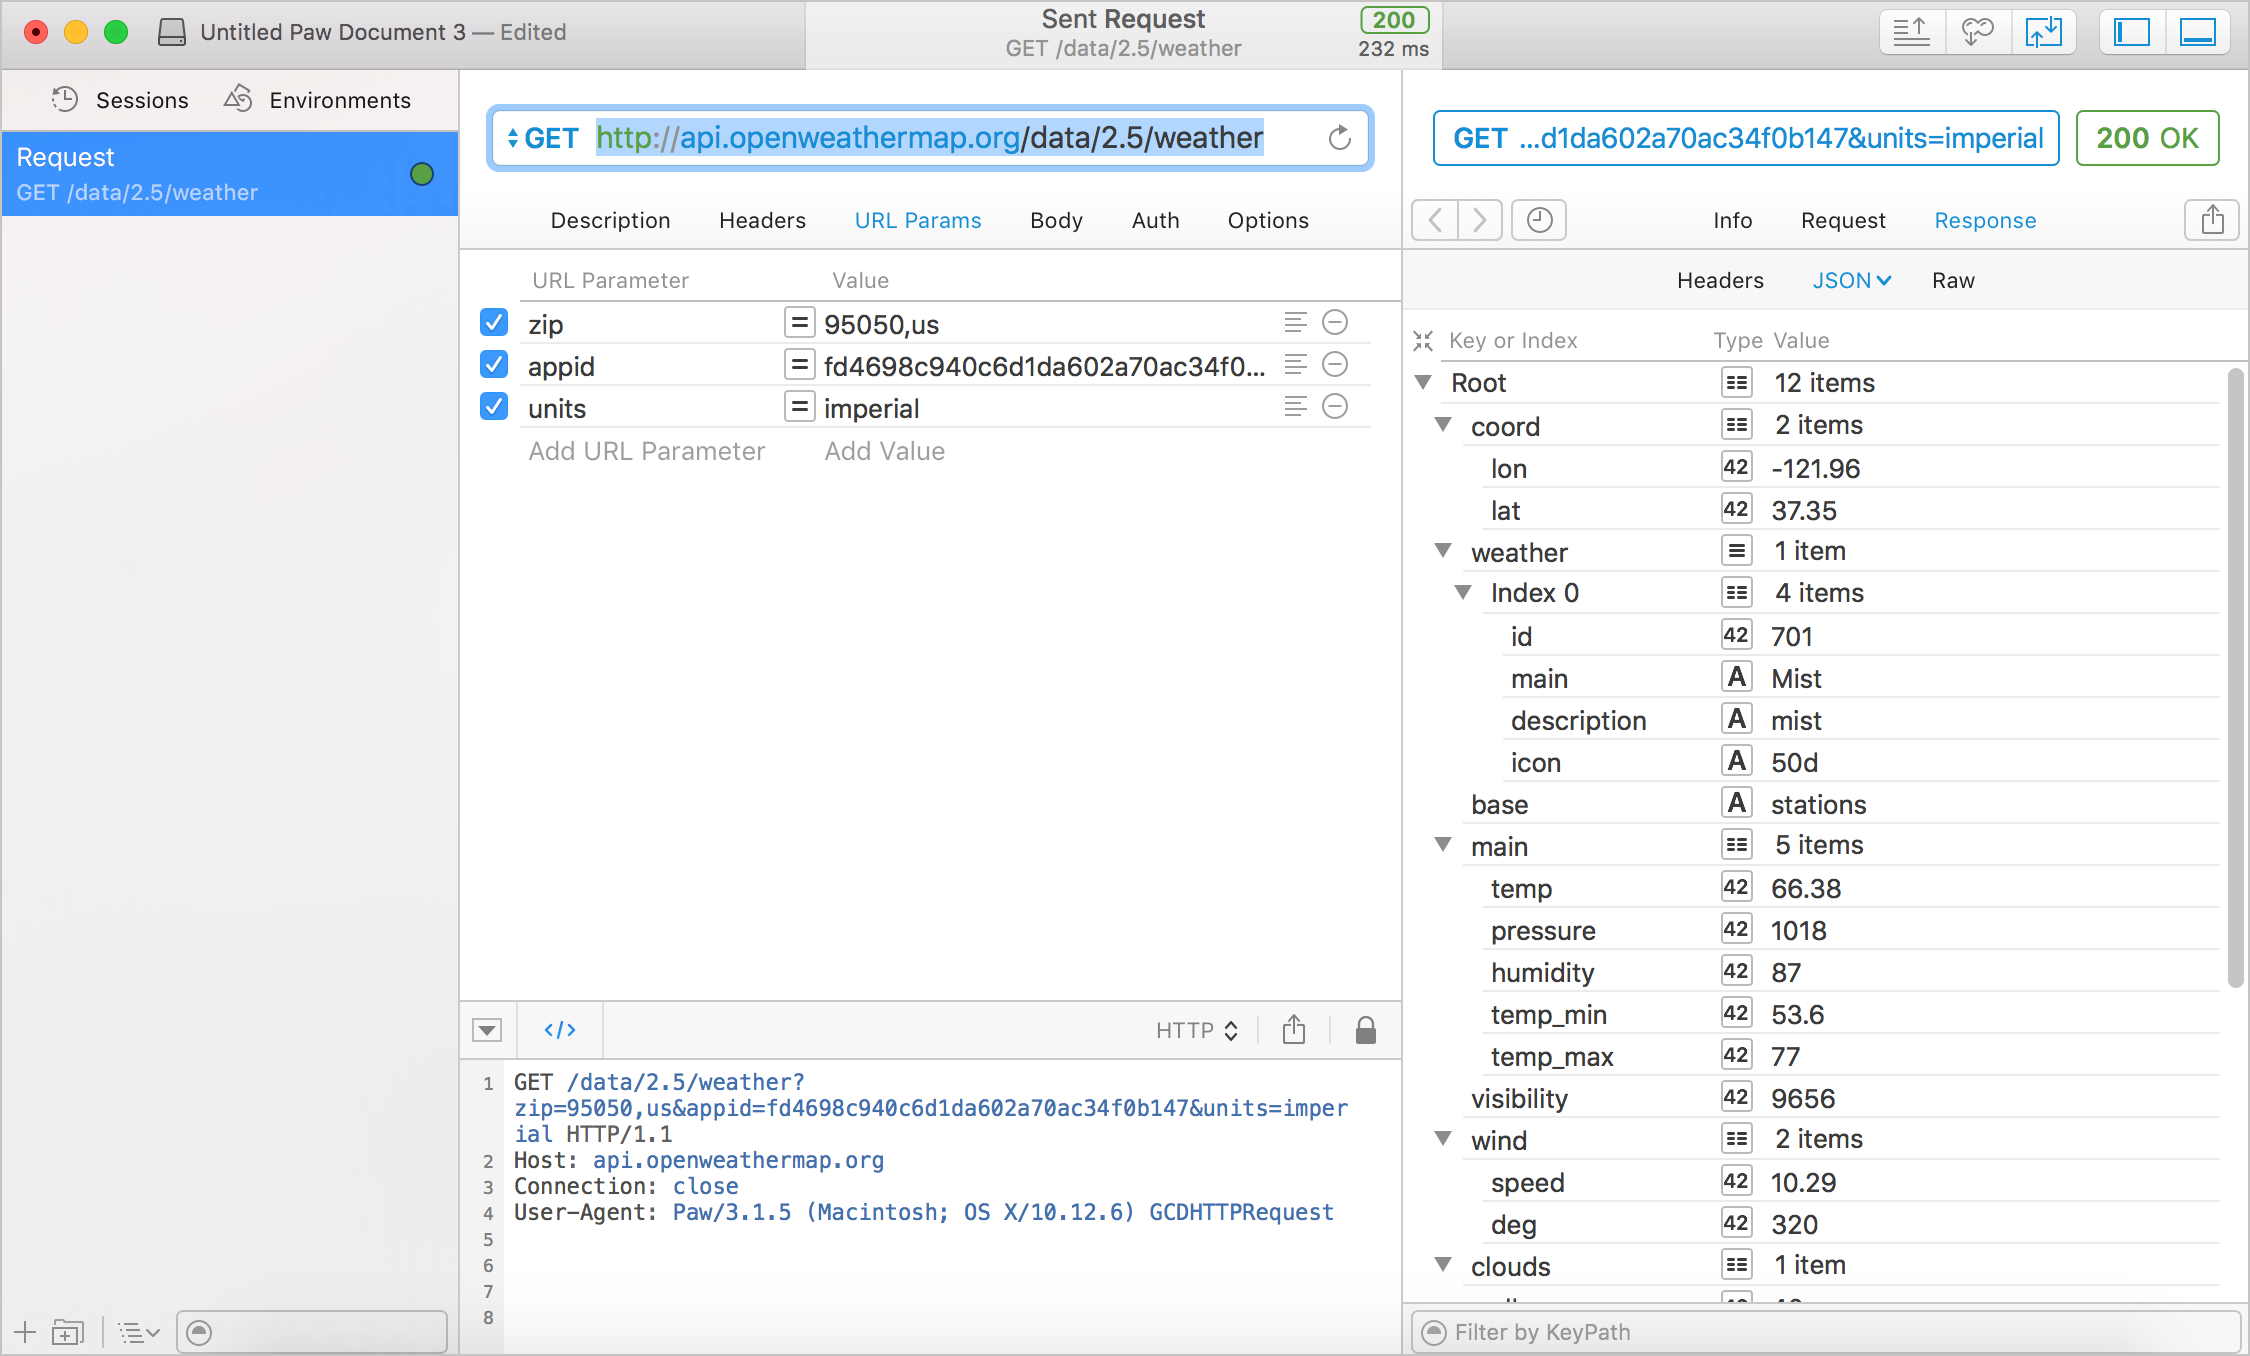
Like Postman, Paw also allows you to easily see the request headers, response headers, URL parameters, and other data. I like that Paw shows the response in an expandable/collapsible way. The expand/collapse feature can make it easier to explore the response. Note that Paw is specific to Mac only, and like most products for Mac users, costs money.
Enter several requests for the Aeris API into Postman
Now let’s switch APIs a bit and see some weather information from the Aeris Weather API, which you explored a bit in Scenarios for using a weather API. Constructing the endpoints for the Aeris Weather API is a bit more complicated since there are many different queries, filters, and other parameters you can use to configure the endpoint.
Here are a few pre-configured requests to configure for Aeris. You can paste the requests directly into the URL request box in Postman (after customizing the CLIENTID AND CLIENTSECRET values), and the parameters will auto-populate in the parameter fields.
As with the OpenWeather Map API, the Aeris API doesn’t use a Header field to pass the API keys — the key and secret are passed directly in the request URL as part of the query string.
When you make the following requests, insert your own values for the CLIENTID and CLIENTSECRET (assuming you retrieved them in Get the authorization keys).
Get the weather forecast for your area using the observations endpoint:
http://api.aerisapi.com/observations/Santa+Clara,CA?client_id=CLIENTID&client_secret=CLIENTSECRET&limit=1
Get the weather from a city on the equator — Chimborazo, Ecuador using the same observations endpoint:
http://api.aerisapi.com/observations/Chimborazo,Ecuador?client_id=CLIENTID&client_secret=CLIENTSECRET&limit=1
Find out if all the country music in Knoxville, Tennessee is giving people migraines using the indices endpoint:
http://api.aerisapi.com/indices/migraine/Knoxville,TN?client_id=CLIENTID&client_secret=CLIENTSECRET
You’re thinking of moving to Arizona, but you want to find a place that’s cool. Use the normals endpoint:
http://api.aerisapi.com/normals/flagstaff,az?client_id=CLIENTID&client_secret=CLIENTSECRET&limit=5&filter=hassnow
With both the OpenWeatherMap and Aeris Weather API, you can also make these requests by simply going to the URL in your address bar (because the API keys are passed in the query string rather than the header). If so, use the JSON Formatter extension for Chrome to automatically format the JSON response in the browser view.
By looking at these two different weather APIs, you can see some differences in the way the information is called and returned. However, fundamentally both APIs have endpoints that you can configure with parameters. When you make requests with the endpoints, you get responses that contain information, often in JSON format. This is the core of how REST APIs work — you send a request and get a response.
Automatically import the Postman collections
Postman has a nifty import feature that will automatically pull in the same requests you’ve been entering. You can click the Run in Postman buttons below to automatically import these two collections into your own instance of Postman.
OpenWeatherMap API collection
If this button doesn’t work for you, copy this import link.
Aeris Weather API collection
If this button doesn’t work for you, copy this import link.
Clicking the Run in Postman buttons should automatically prompt you to import the collections into Postman. If it doesn’t work, copy the import link address and, in Postman, click Import in the upper-left corner. Then click the Import From Link tab, paste in the address and click Import.
If you’d like to learn more about Postman, listen to this interview with the Postman founder. We recorded this as part of the Write the Docs podcast and focused on the documentation features within Postman. For more information on creating the Run in Postman buttons, see the Run in Postman button section in the Getting started tutorial.
About Tom Johnson

I'm an API technical writer based in the Seattle area. On this blog, I write about topics related to technical writing and communication — such as software documentation, API documentation, AI, information architecture, content strategy, writing processes, plain language, tech comm careers, and more. Check out my API documentation course if you're looking for more info about documenting APIs. Or see my posts on AI and AI course section for more on the latest in AI and tech comm.
If you're a technical writer and want to keep on top of the latest trends in the tech comm, be sure to subscribe to email updates below. You can also learn more about me or contact me. Finally, note that the opinions I express on my blog are my own points of view, not that of my employer.
16/165 pages complete. Only 149 more pages to go.