Recording with the right microphone (Voiceover techniques)
I've postponed writing about microphones for several reasons. First, there are hundreds of different microphones suited for all kinds of situations, from vocal music to kickdrums to broadcasting and more. Also, microphones can get expensive, and not everyone has the same budget. So there is no right voiceover microphone for every person and situation. However, I'll try to present a simplified view of microphones.
Condenser versus Dynamic
You can choose between two main categories of microphones: condenser and dynamic. Condenser microphones are more sensitive and are more typically used in studios. For layman voiceover recordings, you don't want a condenser mic. Condenser mics pick up every little breathing noise and mouth movement on a microscopic scale that will drive you crazy. Also, if you're recording in conference rooms at your work, you want to drown out the noise around you, not pick it up.
Dynamic mics aren't as sensitive. They're also a lot more durable. You can probably drop them on the floor a few dozen times and they'll still function well.
Cardiod or Omnidirectional
You can also choose another characteristic in a microphone: cardiod or omnidirectional. Cardiod microphones capture the sound immediately around the mic in a heart shape pattern, with the smallest capture behind directly behind the mic. Omnidirectional mics capture sound in all directions. Unless you want to record all the ambient noises in your room, you want a cardiod mic to focus on your immediate voice. (There are other patterns, such as unidirectional and figure 8, but they're less common.)
USB or XLR
You also can choose between a USB or XLR mic. The USB mic plugs directly into your computer. In contrast, the XLR mic has a fatter, traditional three-pin connector that you can't plug into your computer. Instead, you have to plug the XLR mic into a mixer. You then need to convert the analog signal from the mixer to a digital signal through a digital converter. The digital converter has a USB cable that you plug into your computer.

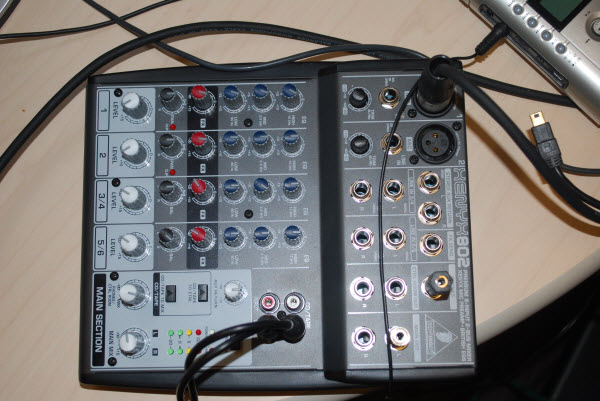
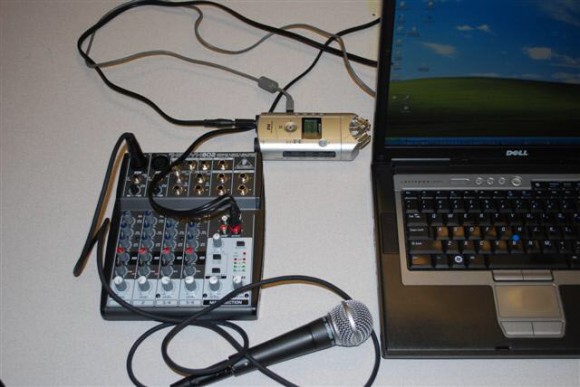
As you can guess, the XLR route is considerably more expensive. But in my opinion, the sound is much richer and deeper. You can buy an inexpensive mixer for $60, such as the Behringer UB802 Eurorack (pictured above). But unless you convert the sound from analog to digital, you'll hear a static background noise. A digital converter (such as one from M-Audio) costs around $150. I use my Zoom H4 microphone to convert the signal from analog to digital, but the Zoom is about $300. You can see how I've set that up below.

I've actually been told that I don't need the mixer, and it's true. You can plug your XLR mic directly into a digital converter. But I like the addition of the mixer because it gives me more volume and control over the sound.
Wireless microphones are yet another option, but in my experience, you have to spend a lot of money on wireless to get a decent sound. I once bought an inexpensive wireless mic from Sam Ash and returned it the next day because it sounded like a cracker jack mic.
Handheld, Headphone, or Lapel
You can also choose between a handheld, headphone set, or lapel mic. The handheld is the most traditional, but it gets in your way visually when you're recording a software screencast, especially if you have a pop filter attached. The headset provides a constant distance between your mic and the mouth, but if you want to step away from the mic to swallow, or record without the headphones, you're out of luck. The lapel mics may look convenient, but they often don't sound as good as the handheld or headset mics, because your mouth is farther from the mic.
Specific Microphone Brands
As far as specific microphone brands, I can only speak from experience with the mics I've used. One site that does provide a lot of comparisons and analyses of microphones is New Media Gear. See the 2008 best podcasting mics post, another post on broadcast mics, and many more posts.
For a while I recorded with a $30 headset from Best Buy. I then upgraded to an H4 Zoom recorder. I then started using a Shure SM58 that I plugged into my H4 Zoom, which was then plugged into my laptop. I then added a Behringer mixer into the equation. Finally, out of a driving curiosity, I bought a $400 Electro-Voice RE20 handheld microphone (supposedly the same that Rush Limbaugh and Frazier Crane use—not that I am a fan of either).
I now run the EV RE20 to my Behringer mixer, and then run the mixer to my H4 Zoom, which connects to my laptop. In all honesty, the EV RE20 doesn't sound all that different from my Shure SM58, which costs a fourth of the price. Here's the EV RE20 with a pop-filter.

There's yet another layer of sound processing that I have not yet tried: the DBX286A vocal processor. I'm not entirely sure what that would add, and I ran out of money a while ago, so I'll leave it at that.
Microphone Stands
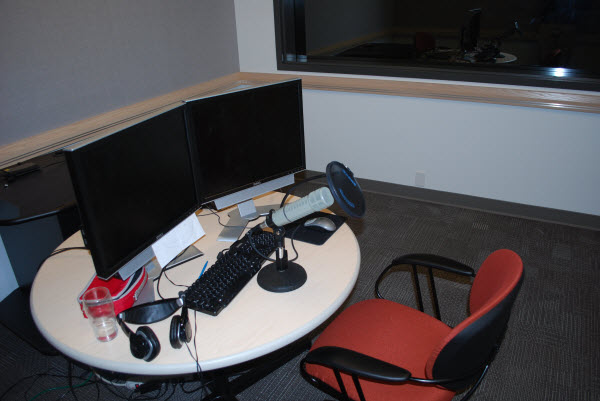
As if there weren't enough choices already, you also have to figure out what kind of microphone stand to use. You can go to Radio Shack and buy a cheap little 6 inch stand that attaches onto a base plate for about $30 (shown in the image above). If you have a heavy mic, though, it might not stable enough.
Also, as you record screencast demos, you will soon realize that any time you type on your keyboard or click your mouse, that sound transmits from the table through your microphone and records as well. When you type, it can sound like hail pounding on the roof.
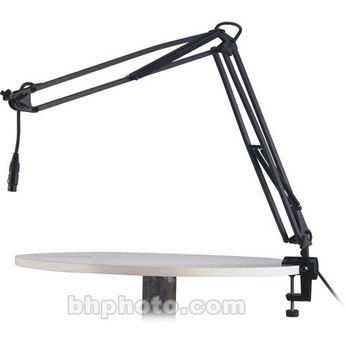
The solution is twofold. First, instead of a traditional clip mount, you put your microphone in a shock/suspension mount. This spider-like contraption suspends the microphone in a much more isolated way. But to add to the shock mount coolness, you also need a scissor stand. The scissor stand is a giant arm that attaches to your table (kind of like a arm-swing desk lamp) and swings out toward you.
I don't have a scissor stand or shock mount, unfortunately. It would have been another $170 to my microphone setup, and as I said, I ran out of money several paragraphs ago. But one day I might try to create my own from some parts at Home Depot.
This Is Only an Introduction
I hope that I perhaps exposed you to some of the complexity behind the microphone setup. You can spend as little as $30 on a microphone and as much as $10,000 or more. Whatever you do, if you're looking for a good voiceover mic, look for a dynamic cardiod microphone. If you're prepared to get a digital converter, then go for an XLR type of microphone. If you're looking for something less expensive, there are plenty of good USB mics, such as those from Samson or even the infamous Snowball mic.
Some good audio stores to find microphones include soundprofessionals.com and performanceaudio.com. I recommend that you visit your local music store and ask to try out a few different mics. Your voice may sound good in one mic and not so good in another. In that way, microphones are kind of like glasses. Some people look great with the thick Clark Kent frames. Others look like idiots.
The way I bought my Electro-Voice RE20 mic, I went to Performance Audio and asked to try out several of their microphones. I tried a Sennheiser against the Electro-Voice. The salesman hooked up each mic to an amplifier and let me play around with them for a while in the backroom. Although he was initially telling me the Sennheiser was a great mic (before my test), clearly my voice sounded terrible with it. The mic seemed to catch and amplify my voice in the wrong way. In contrast, the Electro-Voice sounded smooth and professional, which is just what I wanted.
Unfortunately (and this may be unethical, I know), the price of the Electro-Voice mic would have been $470 from the store. I found it on e-bay for $90 less (still new), so that's where I bought it. You can actually buy used mics on e-bay for about half the price as a new mic. However, the salesman convinced me that mics have a lifespan. They do wear out. And if I were to go into the physics of how a microphone operates (actually, if I could even understand how a microphone operates enough to explain it) you would reconsider whether a used microphone is worth the risk of "foam-rot" or some other corruption that compromises the sound.
But having upgraded to a fancy mic, I have to say that the difference is more subtle than I imagined. You can get by with a $150 setup easily. In a previous post on plosives, I posted a few recordings with different mics so you can compare.
About Tom Johnson

I'm an API technical writer based in the Seattle area. On this blog, I write about topics related to technical writing and communication — such as software documentation, API documentation, AI, information architecture, content strategy, writing processes, plain language, tech comm careers, and more. Check out my API documentation course if you're looking for more info about documenting APIs. Or see my posts on AI and AI course section for more on the latest in AI and tech comm.
If you're a technical writer and want to keep on top of the latest trends in the tech comm, be sure to subscribe to email updates below. You can also learn more about me or contact me. Finally, note that the opinions I express on my blog are my own points of view, not that of my employer.

