

How authorization works with APIs
- Authentication and authorization overview
- Defining terms
- Consequences if an API lacks security
- API keys
- Basic Auth
- HMAC (Hash-based message authorization code)
- OAuth 2.0
- What to document with authentication
- Where to list the API keys section in documentation
- Include information on rate limits
Lately I’ve been busy working on content for some API documentation workshops. One of the topics I wanted to cover in the workshop is how authentication and authorization work with APIs. This is probably one of the more complicated aspects of APIs, so I’d like to get as much feedback as possible about this section.
Authentication and authorization overview
Before users can make requests with your API, they’ll usually need to register for some kind of application key, or learn other ways to authenticate the requests.
APIs vary in the way they authenticate users. Some APIs just require you to include an API key in the request header, while other APIs require elaborate security due to the need to protect sensitive data, prove identity, and ensure the requests aren’t tampered with.
In this section, you’ll learn more about authentication and what you should focus on in documentation.
Defining terms
First, a brief definition of terms:
- Authentication: Proving correct identity
- Authorization: Allowing a certain action
An API might authenticate you but not authorize you to make a certain request.
Consequences if an API lacks security
There are many different ways to enforce authentication and authorization with the API requests. Enforcing this authentication and authorization is vital. Consider the following scenarios if you didn’t have any kind of security with your API:
- Users could make unlimited amounts of API calls without any kind of registration, making a revenue model associated with your API difficult.
- You couldn’t track who is using your API, or what endpoints are most used.
- Someone could possibly make malicious DELETE requests on another person’s data through API calls.
- The wrong person could intercept or access private information and steal it.
Clearly, API developers must think about ways to make APIs secure. There are quite a few different methods. I’ll explain a few of the most common ones here.
API keys
An API key is a usually a long string that you include either in the request URL or in the request header. The API key mainly functions as a way to identify the person making the API call (authenticating you to use the API). The API key is associated with a specific app that you register.
The company producing the API might use the API key for any of the following:
- Authenticate calls to the API to registered users only
- Track who is making the requests
- Track usage of the API
- Block or throttle requesters who exceed the rate limits
- Apply different permission levels to different users
Sometimes APIs will give you both a public and private key. The public key is usually included in the request, while the private key is treated more like a password and used only in server-to-server communication.
In some API documentation, when you’re logged into the site, your API key automatically gets populated into the sample code and API Explorer. (Flickr’s API does this, for example.)
Basic Auth
One type of authorization is called Basic Auth. With this method, the sender places a username:password into the request header. The username and password is encoded with Base64, which is an encoding technique that converts the username and password into a set of 64 characters to ensure safe transmission. Here’s an example of a Basic Auth in a header:
Authorization: Basic bG9sOnNlY3VyZQ==
APIs that use Basic Auth will also use HTTPS, which means the message content will be encrypted within the HTTP transport protocol. (Without HTTPS, it would be easy for people to decode the username and password.)
When the API server receives the message, it decrypts the message and examines the header. After decoding the string and analyzing the username and password, it then decides whether to accept or reject the request.
In Postman, you can configure Basic Authorization like this:
- Click the Authorization tab.
- Type the username and password on the right of the colon on each row.
- Click Update Request.
The Headers tab now contains a key-value pair that looks like this:
Authorization: Basic RnJlZDpteXBhc3N3b3Jk
Postman handles the Base64 encoding for you automatically when you enter a username and password with Basic Auth selected.
HMAC (Hash-based message authorization code)
HMAC stands for Hash-based message authorization code and is a stronger type of authentication.
With HMAC, both the sender and receiver know a secret key that no one else does. The sender creates a message based on some system properties (for example, the request timestamp plus account ID).
The message is then encoded by the secret key and passed through a secure hashing algorithm (SHA). (A hash is a scramble of a string based on an algorithm.) The resulting value, referred to as a signature, is placed in the request header.
When the receiver (the API server) receives the request, it takes the same system properties (the request timestamp plus account ID) and uses the secret key (which only the requester and API server know) and SHA to generate the same string.
If the string matches the signature in the request header, it accepts the request. If the strings don’t match, then the request is rejected.
Here’s a diagram depicting this workflow:

The important point is that the secret key (critical to reconstructing the hash) is known only to the sender and receiver. The secret key is not included in the request.
HMAC security is used when you want to ensure the request is both authentic and hasn’t been tampered with.
OAuth 2.0
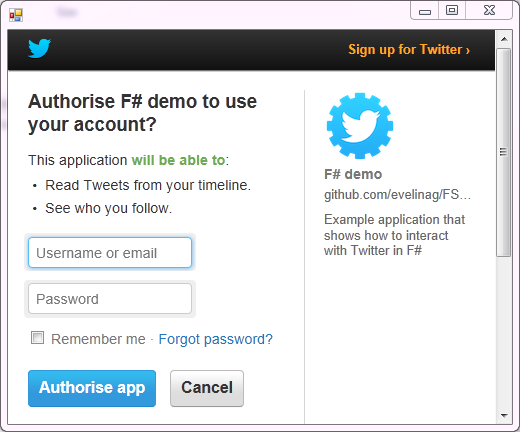
One popular method for authenticating and authorizing users is to use OAuth 2.0. This approach relies upon an authentication server to communicate with the API server in order to grant access. You often see OAuth 2.0 when you’re using a site and are prompted to log in using a service like Twitter, Google, or Facebook.
There are a few varieties of OAuth — namely, “one-legged OAuth” and “three-legged OAuth.” One-legged OAuth is used when you don’t have sensitive data to secure. This might be the case if you’re just retrieving general, read-only information (such as news articles).
In contrast, three-legged OAuth is used when you need to protect sensitive data. There are three groups interacting in this scenario:
- The authentication server
- The resource server (API server)
- The user or app
Here’s the basic workflow of OAuth 2.0:

First the consumer application sends over an application key and secret to a login page at the authentication server. If authenticated, the authentication server responds to the user with an access token.
The access token is packaged into a query parameter in a response redirect (302) to the request. The redirect points the user’s request back to the resource server (the API server).
The user then makes a request to the resource server (API server). The access token gets added to the header of the API request with the word Bearer followed by the token string. The API server checks the access token in the user’s request and decides whether to authenticate the user.
Access tokens not only provide authentication for the requester, they also define the permissions of how the user can use the API. Additionally, access tokens usually expire after a period of time and require the user to log in again.
For more information about OAuth 2.0, see these resources:
- Peter Udemy’s course API technical writing on Udemy
- OAuth simplified, by Aaron Parecki
What to document with authentication
In API documentation, you don’t need to explain how your authentication works in detail to outside users. In fact, not explaining the internal details of your authentication process is probably a best practice as it would make it harder for hackers to abuse the API.
However, you do need to explain some basic information such as:
- How to get API keys
- How to authenticate requests
- Error messages related to invalid authentication
- Rate limits with API requests
- Potential costs surrounding API request usage
- Token expiration times
If you have public and private keys, you should explain where each key should be used, and that private keys should not be shared.
If different license tiers provide different access to the API calls you can make, these licensing tiers should be explicit in your authorization section or elsewhere.
Where to list the API keys section in documentation
Since the API keys section is usually essential before developers can start using the API, this section needs to appear in the beginning of your help.
Here’s a screenshot from SendGrid’s documentation on API keys:

Include information on rate limits
Whether in the authorization keys or another section, you should list any applicable rate limits to the API calls. Rate limits determine how frequently you can call a particular endpoint. Different tiers and licenses may have different capabilities or rate limits.
If your site has hundreds of thousands of visitors a day, and each page reload calls an API endpoint, you want to be sure the API can support that kind of traffic.
Here’s a great example of the rate limits section from the Github API:

(By the way, if you’re interested in reviewing some of the content for my REST API course, let me know. I’m trying to get the material in top condition before publishing it in an online course and ebook, and I could use all the feedback I can get.)
About Tom Johnson

I'm an API technical writer based in the Seattle area. On this blog, I write about topics related to technical writing and communication — such as software documentation, API documentation, AI, information architecture, content strategy, writing processes, plain language, tech comm careers, and more. Check out my API documentation course if you're looking for more info about documenting APIs. Or see my posts on AI and AI course section for more on the latest in AI and tech comm.
If you're a technical writer and want to keep on top of the latest trends in the tech comm, be sure to subscribe to email updates below. You can also learn more about me or contact me. Finally, note that the opinions I express on my blog are my own points of view, not that of my employer.