

10 realizations as I was creating my Swagger spec and Swagger UI
- Using Swagger
- Background terms
- 1. There’s a Model Schema and Model view
- 2. You can format nested objects a couple of different ways
- 3. Swagger UI output could benefit from an accompanying tutorial
- 4. You can integrate Bootstrap modals into the Swagger UI
- 5. Security information doesn’t appear in the Swagger UI
- 6. Swagger UI has its own parameters
- 7. Interoperability between specs may not be so clear cut
- 8. You can use Markdown in descriptions
- 9. CORS not enabled by default on all APIs
- 10. Standards may not be so bad
- Conclusion
Using Swagger
Although I created a Swagger tutorial for my REST API course, the Swagger spec I created was for a simple API that just had a few basic endpoints with several query parameters.
This past week I’ve been creating a real Swagger spec and UI output for one of the APIs I document at work. The API requests and responses are much more complex. In this post, I want to share a few realizations I had in configuring the Swagger spec and UI display.
Note that I’m manually creating the spec, not generating it from programming code. Also, I’m just using the Swagger UI display as an interactive API console to complement my main documentation. (Swagger can be used for lots of other things, such as for generating client SDKs or unit testing.)
Background terms
First, some terms. The Swagger spec file describes your API following the official Swagger specification, which defines the names and elements used to describe a REST API. The syntax can be in either YAML or JSON.
The Swagger UI reads the Swagger spec file and displays it in the visual format that you see with examples such as the Swagger Petstore.
(Note that because my Swagger spec file is behind the firewall, I can’t link to it here. But I’ll use Petstore or generic examples that clarify my points.)
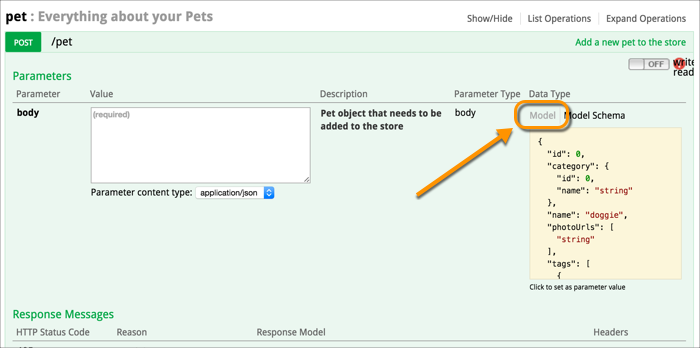
1. There’s a Model Schema and Model view
The Swagger UI lets you toggle between a “Model Schema” and a “Model” view for both responses and request body parameters.
Update: In the new version of the Swagger UI, these options are called “Example Value” and “Model,” which makes more sense.
The Model Schema shows a sample of the syntax along with examples. When you click the Model Schema (yellow box) in the /Pet (POST) endpoint, Swagger inserts the content in the body parameter box. Here’s the Pet POST endpoint Model Schema:
{
  "id": 0,
  "category": {
    "id": 0,
    "name": "string"
  },
  "name": "doggie",
  "photoUrls": [
    "string"
  ],
  "tags": [
    {
      "id": 0,
      "name": "string"
    }
  ],
  "status": "available"
}
Now click Model (the grayed out text) and look at the view.
This view describes the various parts of the request, noting the data types and any descriptions in your Swagger spec. Here’s the Model:
Pet {
  id (integer, optional),
  category (Category, optional),
  name (string),
  photoUrls (Array[string]),
  tags (Array[Tag], optional),
  status (string, optional): pet status in the store = ['available', 'pending', 'sold']
}
Category {
  id (integer, optional),
  name (string, optional)
}
Tag {
  id (integer, optional),
  name (string, optional)
}
The Petstore spec doesn’t actually include many parameter descriptions in the Model, but for any descriptions that are included, they appear here.
In this view, when there’s a nested object, like category, it has a reference to another part of the model. You have to look at “Category” for details about category and look at “Tag” for details about tags.
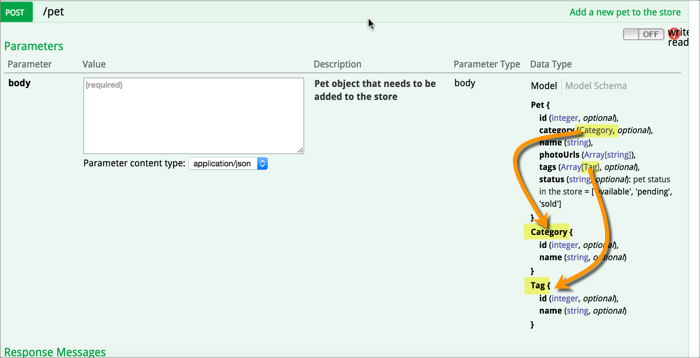
Update: The new version of the Swagger UI displays the model as expandable/collapsible sections, which fixes the usability issues described here.
Presumably the Model format appears like this because there’s not enough room to visually depict nested objects in one inch of space. But it could potentially mislead users into thinking that you have multiple objects listed one after another instead of nested inside each other.
Even so, it’s interesting to see the contrast between the Model and Model Schema views. This is something I originally overlooked when browsing the Petstore example. The grayed-out Model link is pretty subtle in the UI display. Ultimately I’m not sure how useful the Model view is beyond providing a place to describe the objects and properties.
2. You can format nested objects a couple of different ways
Modeling a response or request syntax that has nested objects and nested arrays multiple levels deep can be tricky. I didn’t realize that a common way to refer to nested objects is through JSON references ($ref).
Suppose you want to model something like this:
{
  "myInput": {
    "identifier code": "string"
  }
}
The body object (unnamed) contains an object called myInput, which just contains one key-value pair.
To model nested objects, you can use $ref to split out the additional objects. Here’s a sample of how this works. (Pay attention to the $ref parts.)
paths:
   "/myendpoint":
     post:
       description: My description
       parameters:
       - name: body
         in: body
         description: Description of this parameter...
         schema:
           "$ref": "#/definitions/sampleObject"

definitions:

  sampleObject:
    type: object
    properties:
      myInput:
        type: object
        description: The description ...
        "$ref": "#/definitions/myInputObject"

  myInputObject:
    type: object
    properties:
      someCode:
        type: string
        description: The description...
The endpoint myendpoint has a parameter called body. The model for the body parameter is defined in the definition section in the sampleObject.
sampleObject contains an object (myInput) as one of its properties, so there’s a reference to another object here, myInputObject, which defines the object.
Instead of breaking out the references like this (which enables re-use), you can also combine them, like this:
definitions:

  sampleObject:
    type: object
    properties:
      myInput:
        type: object
        description: The description ...
        title: My Input
        properties:
          someCode:
            type: string
            description: The description ...
            example: value
The Model view then looks like this:
sampleObject {
myInput (myInputObject): The description...,
}
myInputObject {
someCode (string, optional): The description ...
}
The only problem is that there seems to be some kind of Swagger UI bug when you do it the second way (avoiding the $ref approach). The “Model” view will show the words “Inline Model” and “Inline Model 1” (and so on for each level) for each of the nested objects instead of showing the title property.
sampleObject {
myInput (Inline Model): The description goes here ,
}
Inline Model {
someCode (string, optional): the description ..
}
In contrast, breaking the nested objects out with the $ref approach uses the name of the object you give it in the $ref reference.
If you use the title property to control this display, it doesn’t show anything in the referenced object (that’s the bug, I think).
I know this may seem confusing. But as you throw yourself headlong into describing the model of your requests and responses, you might find yourself struggling to sort all of this out in the UI display.
The Swagger spec definition itself doesn’t do a great job clarifying the syntax. The Swagger spec is mostly an official definition of all the tags and elements, and seems pretty much written by programmers for other programmers.
Even so, the Swagger spec is complete and accurate, and when you learn how it’s organized, it’s fairly readable. Additionally, there are tons of sample Spec files (such as the Petstore one), so you can simply find an API that has the syntax you want, see how it’s formatted in the spec file, and follow the same pattern.
3. Swagger UI output could benefit from an accompanying tutorial
At first I thought the Swagger UI output would simply stand on its own, but now I think that the Swagger UI would benefit from a getting started tutorial that walks a user through some simple tasks.
Even with the Petstore example, when you point out to someone how they’re supposed to click the yellow box (the Model Schema) to populate the body parameter, their reaction is often “Oh, is that how it works??!!”
In the API I’m documenting, some endpoints require certain information to be in the database to return responses. If you don’t have the right information in the database, the endpoints won’t return anything. As a result, I’m adding a quick start tutorial to accompany my Swagger UI display.
This helps me accomplish multiple goals at once — providing an interactive learning experience, quick reference guide, and getting started tutorial all in one.
4. You can integrate Bootstrap modals into the Swagger UI
Our authorization model relies on complex security algorithm. Because the process for generating the authorization signature usually confuses users, I made a simple JavaScript-based form in the documentation to generate the signature.
With some simple Bootstrap modal code, I was able to add the generator to the Swagger UI and call the modal from a button link in a YAML description for the header parameter. It works quite well.
However, integrating Bootstrap CSS without also interfering with the Swagger UI styles proved a bit more challenging. After playing around with the placement of the stylesheet reference in the Swagger UI, and removing everything but the modal CSS in my Bootstrap CSS, I worked around the interference.
My realization here isn’t so much with the CSS, but that you can integrate Bootstrap components like modals into the Swagger UI. These modals might be helpful for integrating tips on how to use the Swagger UI effectively in getting started tutorials.
5. Security information doesn’t appear in the Swagger UI
Interestingly, although you can add a security object to your Swagger spec and see it in the Swagger editor’s real-time display, the same security information doesn’t actually appear in the Swagger UI display.
The Swagger spec, Swagger UI, and Swagger editor projects are apparently independent. The right-pane display that the Swagger editor shows is entirely unique. I’m not sure if there is any UI platform that actually shows that display.

I wish there were a UI that resembled the editor’s display, because the editor’s display uses expandable sections in the Model view.
6. Swagger UI has its own parameters
The Swagger UI has various parameters in the index file that you can configure.
For example, you can opt to show the request headers submitted in the response. You can control the order of the endpoints, whether the initial view shows the endpoints collapsed or expanded, and so on. You can read about the Swagger UI parameters here.
When I realized this, I did a few mental backflips for joy. Being able to expose the request headers and expand the endpoints was a tremendously easy win.
7. Interoperability between specs may not be so clear cut
I know that sites like API transformer allow you to convert from one spec to another. I converted my Swagger spec file to RAML so I could see how it looked in the RAML API Console, but the generated RAML wasn’t valid. The Transformer interpreted all of my descriptions as separate properties in the JSON objects.
This experience made me wonder if it’s really so easy to move from one spec to another in a kind of a = b = c logic.
It could be that my Swagger spec file isn’t actually valid. Although it validates in the Swagger editor and gets a green light with the Swagger Validator Badge, sites like Restlet Studio or API Spark tell me the Swagger file is invalid.
Perhaps “valid” is be a relative term (despite the standards-based specification) and depends on platform nuances? I need to explore ways to see what is being flagged as invalid by Restlet / API Spark.
8. You can use Markdown in descriptions
If you want more space to expand in the description property, just type a right angle bracket (>), hit Return, indent a couple of spaces, and now you can freely type in Markdown and HTML. Here’s an example:
  description: >

    Lorem ipsum dolor sit amet, consectetur adipiscing elit. Proin porta ex orci, non elementum augue aliquet sed. Quisque rhoncus tincidunt tortor eu dapibus. Cras aliquam augue imperdiet nibh sagittis molestie. Proin risus tortor, sodales sit amet blandit ac, vehicula vitae justo.

    <div class="alert alert-info" role="alert"><i class="fa fa-info-circle"></i> <b>Note: </b>Cras aliquam augue imperdiet nibh sagittis molestie. Proin risus tortor, sodales sit amet blandit ac, vehicula vitae justo.</div>

    ## Proin risus tortor

    Lorem ipsum dolor sit amet, consectetur adipiscing elit.

      |Sit amet | Lorem dolor | Cosectetur elit|
      |-------|------|
      |`ipsum` | augue | SAGGITTIS |
      |`dolor` | augue | SAGGITTIS |
      |`amet+adipiscing`| augue | SAGGITTIS |
      |`imperdiet` | augue | SAGGITTIS  |
      |`dapibus` | augue | SAGGITTIS |
      |`aliquam` | augue | SAGGITTIS |
      |`nibh` | augue | SAGGITTIS |
      |`risus` | augue | SAGGITTIS |
      |`blandit` | augue | — |
      |`nibh` | tortor | — |
The key is to remember the two-space indent following the new line after the angle bracket. This gives you plenty of room to expand about any necessary setup information users need to know to start using the endpoints.
9. CORS not enabled by default on all APIs
I would have implemented Swagger earlier in my API doc project, but CORS (cross origin resource sharing) wasn’t enabled by default with my API. As a result, a web-based application like Swagger that uses JavaScript to call a remote API on another server was getting blocked by CORS restrictions with the browser.
The API I’m documenting was designed to facilitate server-to-server communication, so our devs had to make a CORS adjustment to the code to allow JS on web pages to make requests. I didn’t realize that this was a requirement for implementing Swagger.
10. Standards may not be so bad
Standards like the Swagger specification may seem kind of meticulous at times — the description language tries to accommodate all REST APIs and sometimes makes it more cumbersome to describe your specific API (in contrast to a tool built specifically for your API). But there are also great benefits that come about from standardization.
Describing my API based on this standard made me think of DITA, and how DITA provides a similar standards-based approach. If you can describe your content based on an official specification, tool vendors and other organizations can take and process that content in powerful ways (like the Swagger UI). Standards can be both restrictive and liberating at the same time.
Conclusion
Describing your API with an official specification provides huge benefits and should be a priority on any REST API documentation plan. It can take a while to describe your API with the Swagger spec, but the output is simply awesome.
By the way, Swagger was recently adopted by the Open API Initiative (which is part of the Linux Foundation) to accelerate Swagger’s growth as a vendor-neutral, open standard format for APIs. You can read about the announcement here.
This makes me glad that I decided to go with the Swagger spec instead of RAML. But either way, it’s also great to see momentum for these specifications in general.
About Tom Johnson

I'm an API technical writer based in the Seattle area. On this blog, I write about topics related to technical writing and communication — such as software documentation, API documentation, AI, information architecture, content strategy, writing processes, plain language, tech comm careers, and more. Check out my API documentation course if you're looking for more info about documenting APIs. Or see my posts on AI and AI course section for more on the latest in AI and tech comm.
If you're a technical writer and want to keep on top of the latest trends in the tech comm, be sure to subscribe to email updates below. You can also learn more about me or contact me. Finally, note that the opinions I express on my blog are my own points of view, not that of my employer.