

Swagger UI tutorial
- Overview
- Overview of REST API specification formats
- Introduction to the OpenAPI specification
- Stoplight: Visual modeling tools for creating your spec
- Getting started tutorial: Using Stoplight to create an OpenAPI specification document
- Swagger UI tutorial
- SwaggerHub introduction and tutorial
- Swagger UI Demo
- Integrating Swagger UI with the rest of your docs
- Redocly tutorial -- authoring and publishing API docs with Redocly's command-line tools
- Redoc Community Edition Basic Demo
- Document360 for API docs
Topic 6 of 12
Swagger UI provides a display framework that reads an OpenAPI specification document and generates an interactive documentation website. The following tutorial shows you how to integrate an OpenAPI specification document into Swagger UI.
For a more conceptual overview of OpenAPI and Swagger, see Introduction to the OpenAPI specification, or see this article I wrote for ISTC a few years ago: Implementing Swagger with API docs (PDF). For a step-by-step tutorial on creating an OpenAPI specification document, see the OpenAPI tutorial. Or for an easier approach using a visual editor to create the OpenAPI spec, see Getting started tutorial: Using Stoplight to create an OpenAPI specification document.
- Swagger UI overview
- Get familiar with Swagger UI through the Petstore demo
- Some sample Swagger UI doc sites
- Activity: Create a Swagger UI display with an OpenAPI spec document
- Activity: View local OpenAPI file in Swagger UI
- Configuring Swagger UI parameters
- Challenges with Swagger UI
- Troubleshooting issues with Swagger UI
- Embedding Swagger UI within an existing site
- Key terms
Swagger UI overview
Swagger UI is one of the most popular tools for generating interactive documentation from your OpenAPI document. Swagger UI generates an interactive API console for users to quickly learn about your API and experiment with requests. Additionally, Swagger UI (which is an actively managed project with an Apache 2.0 license) supports the latest version of the OpenAPI spec (3.x) and integrates with other Swagger tooling.
For definitions of common terms, see Key terms at the end of this article.
Get familiar with Swagger UI through the Petstore demo
To get a better understanding of Swagger UI, let’s explore the Swagger Petstore example. In the Petstore example, the site is generated using Swagger UI.
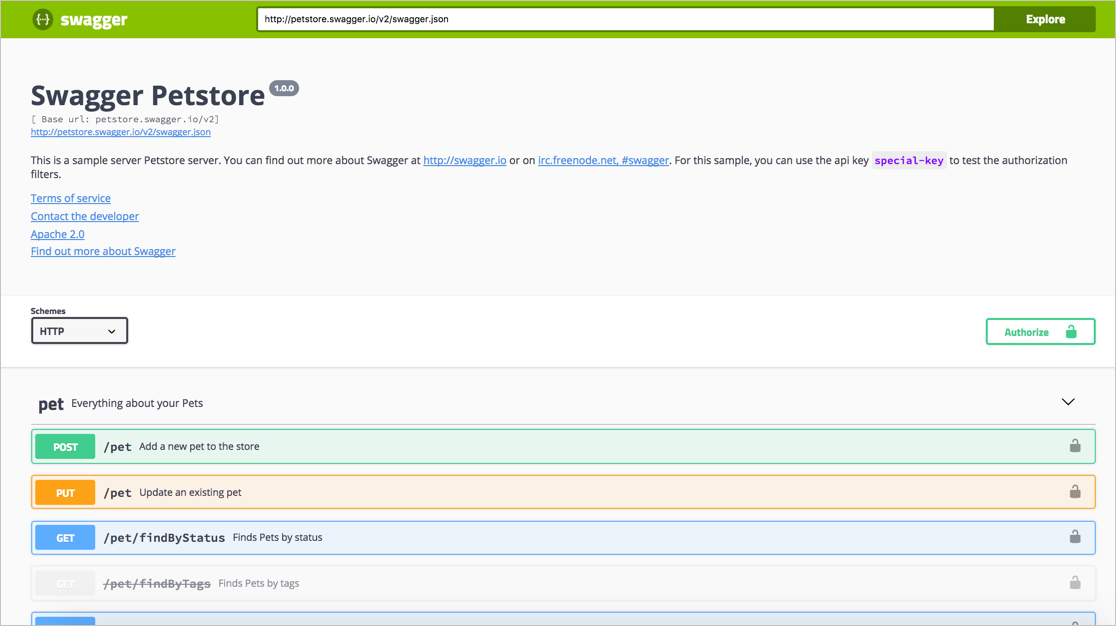
The endpoints are grouped as follows:
Authorize your requests
Before making any requests, you would normally authorize your session by clicking the Authorize button and completing the information required in the Authorization modal pictured below:

The Petstore example has an OAuth 2.0 security model. However, the authorization code is just for demonstration purposes. There isn’t any real logic authorizing those requests, so you can simply close the Authorization modal.
Make a request
Now let’s make a request:
- Expand the POST Pet endpoint.
-
Click Try it out.
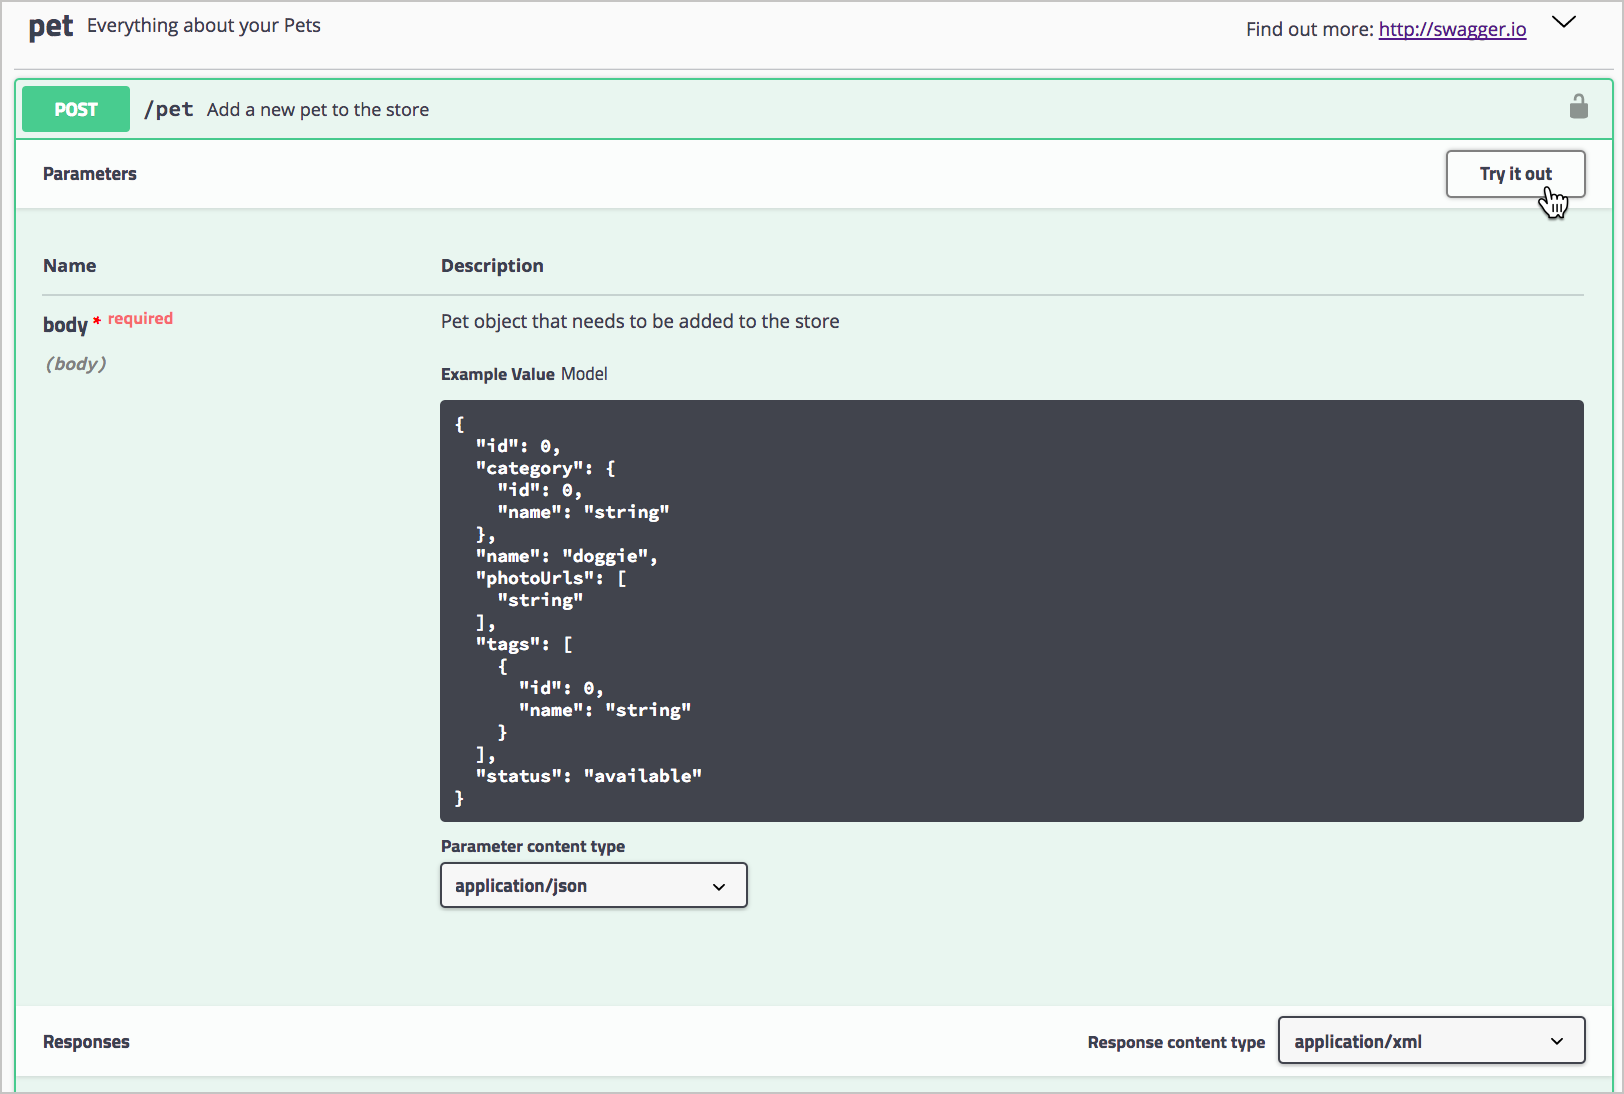
After you click Try it out, the example value in the Request Body field becomes editable.
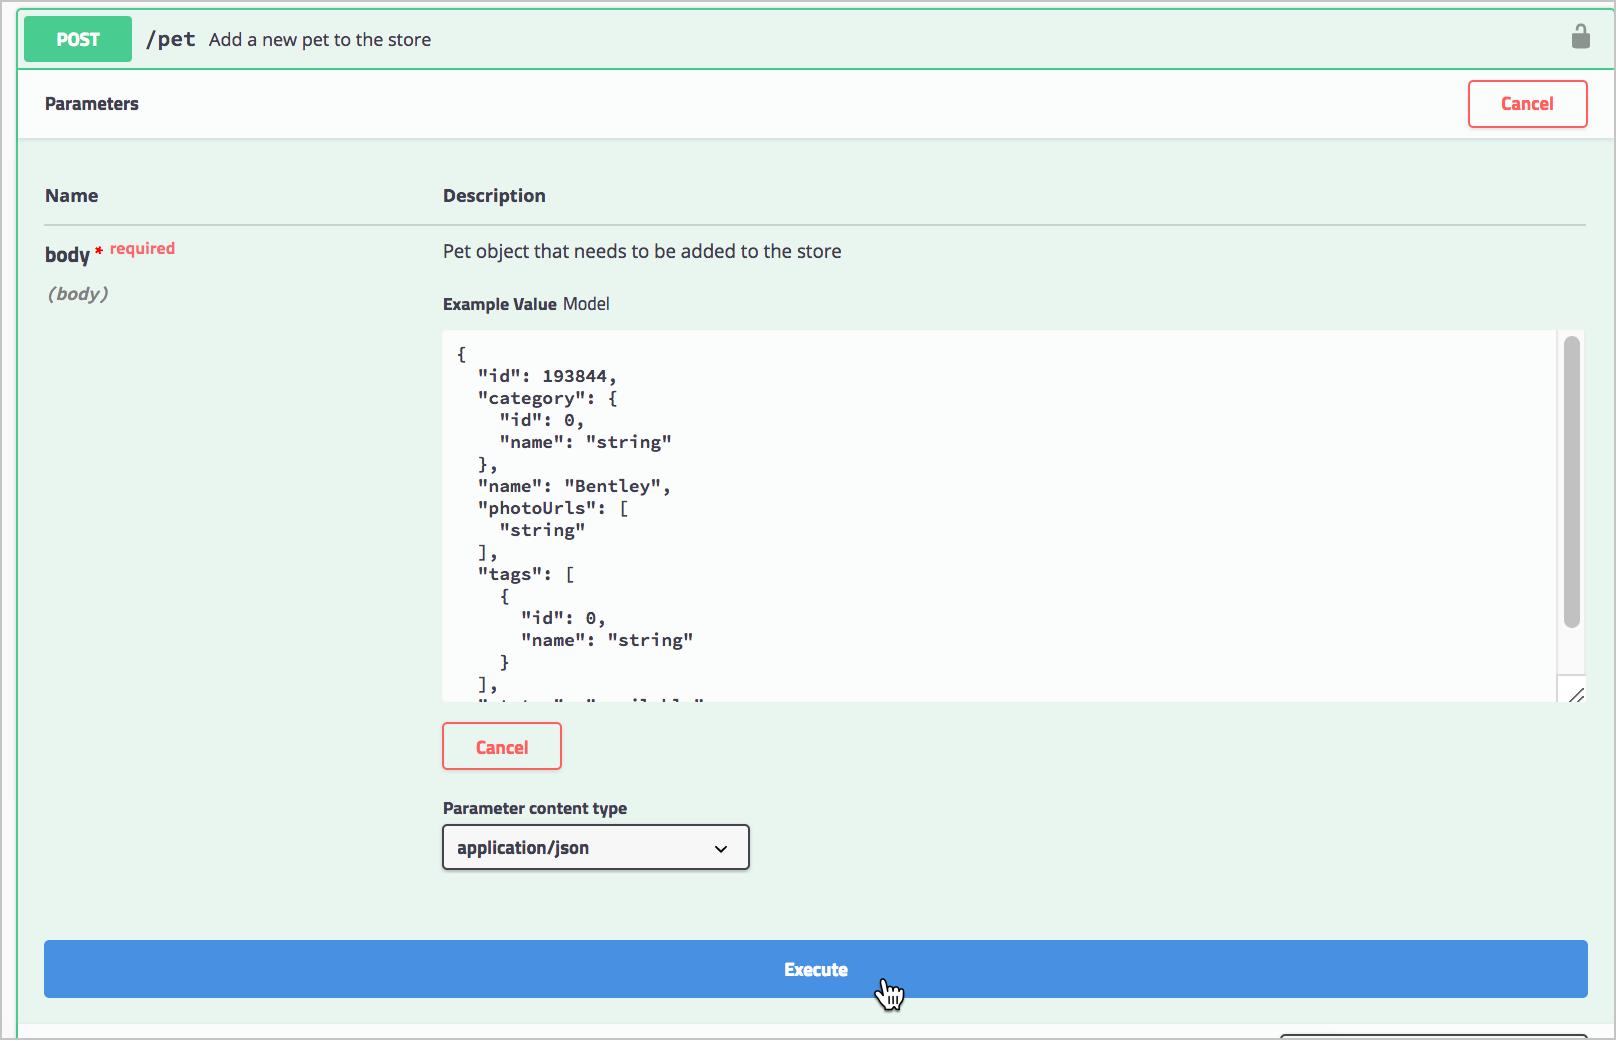
- In the Example Value field, change the first
idvalue to a random integer, such as193844. Change the secondnamevalue to something you’d recognize (your pet’s name). -
Click Execute.
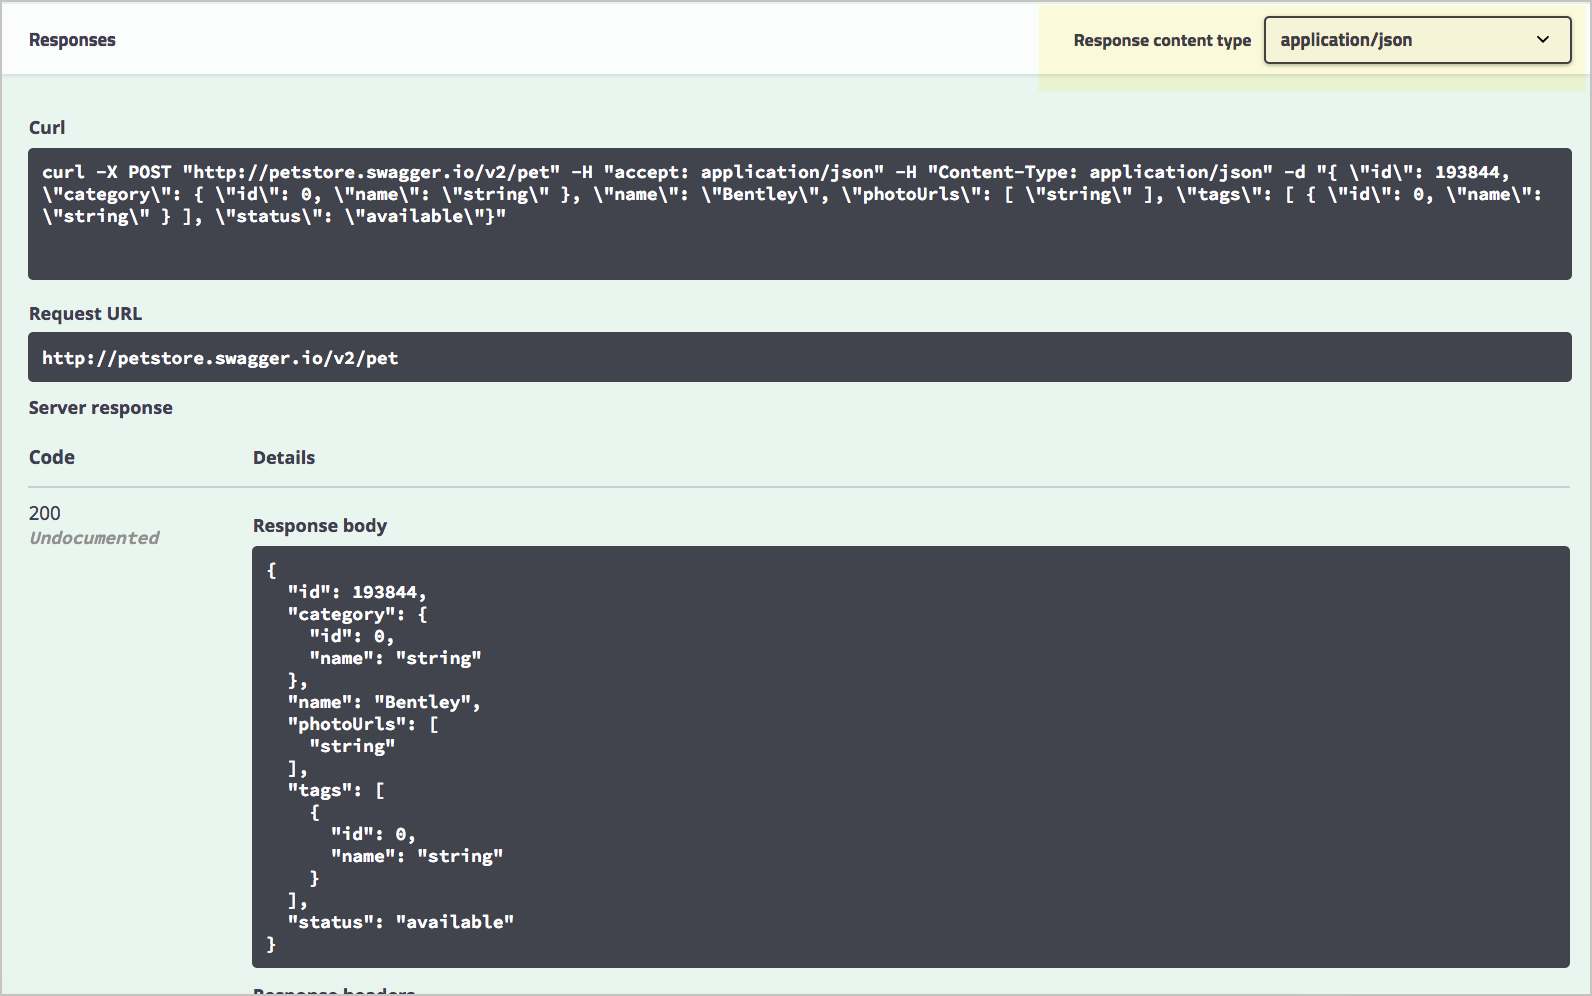
Executing a sample Petstore request Swagger UI submits the request and shows the curl that was submitted. The Responses section shows the response. (If you select JSON rather than XML in the “Response content type” drop-down box, the response’s format will be shown in JSON.)
 Important: The Petstore is a functioning API, and you have actually created a pet. You now need to take responsibility for your pet and begin feeding and caring for it! All joking aside, most users don’t realize they’re playing with real data when they execute responses in an API (especially when using their own API key). This test data may be something you have to wipe clean when you transition from exploring and learning about the API to eventually using the API for production use.
Verify that your pet was created
- Expand the GET /pet/{petId} endpoint.
- Click Try it out.
- Enter the pet ID you used in the previous operation. (If you forgot it, look back in the POST Pet endpoint to check the value.)
- Click Execute. You should see your pet’s name returned in the Response section.
Some sample Swagger UI doc sites
Before we get into this Swagger tutorial with another API (other than the Petstore demo), check out a few Swagger implementations:
Some of these sites look the same, but others, such as The Movie Database API and Zomato, have been integrated seamlessly into the rest of their documentation website.
Looking at the examples, you’ll notice the documentation is short and sweet in a Swagger implementation. This brevity is because the Swagger display is meant to be an interactive experience where you can try out calls and see responses — using your own API key to see your own data. It’s the learn-by-doing-and-seeing-it approach. Also, Swagger UI only covers the reference topics of your documentation. The conceptual topics are usually covered in a separate guide.
Activity: Create a Swagger UI display with an OpenAPI spec document
In this activity, you’ll create a Swagger UI display for an OpenAPI specification document. If you’re using one of the pre-built OpenAPI files, you can see a demo of what we’ll build here: OpenWeatherMap Swagger UI.
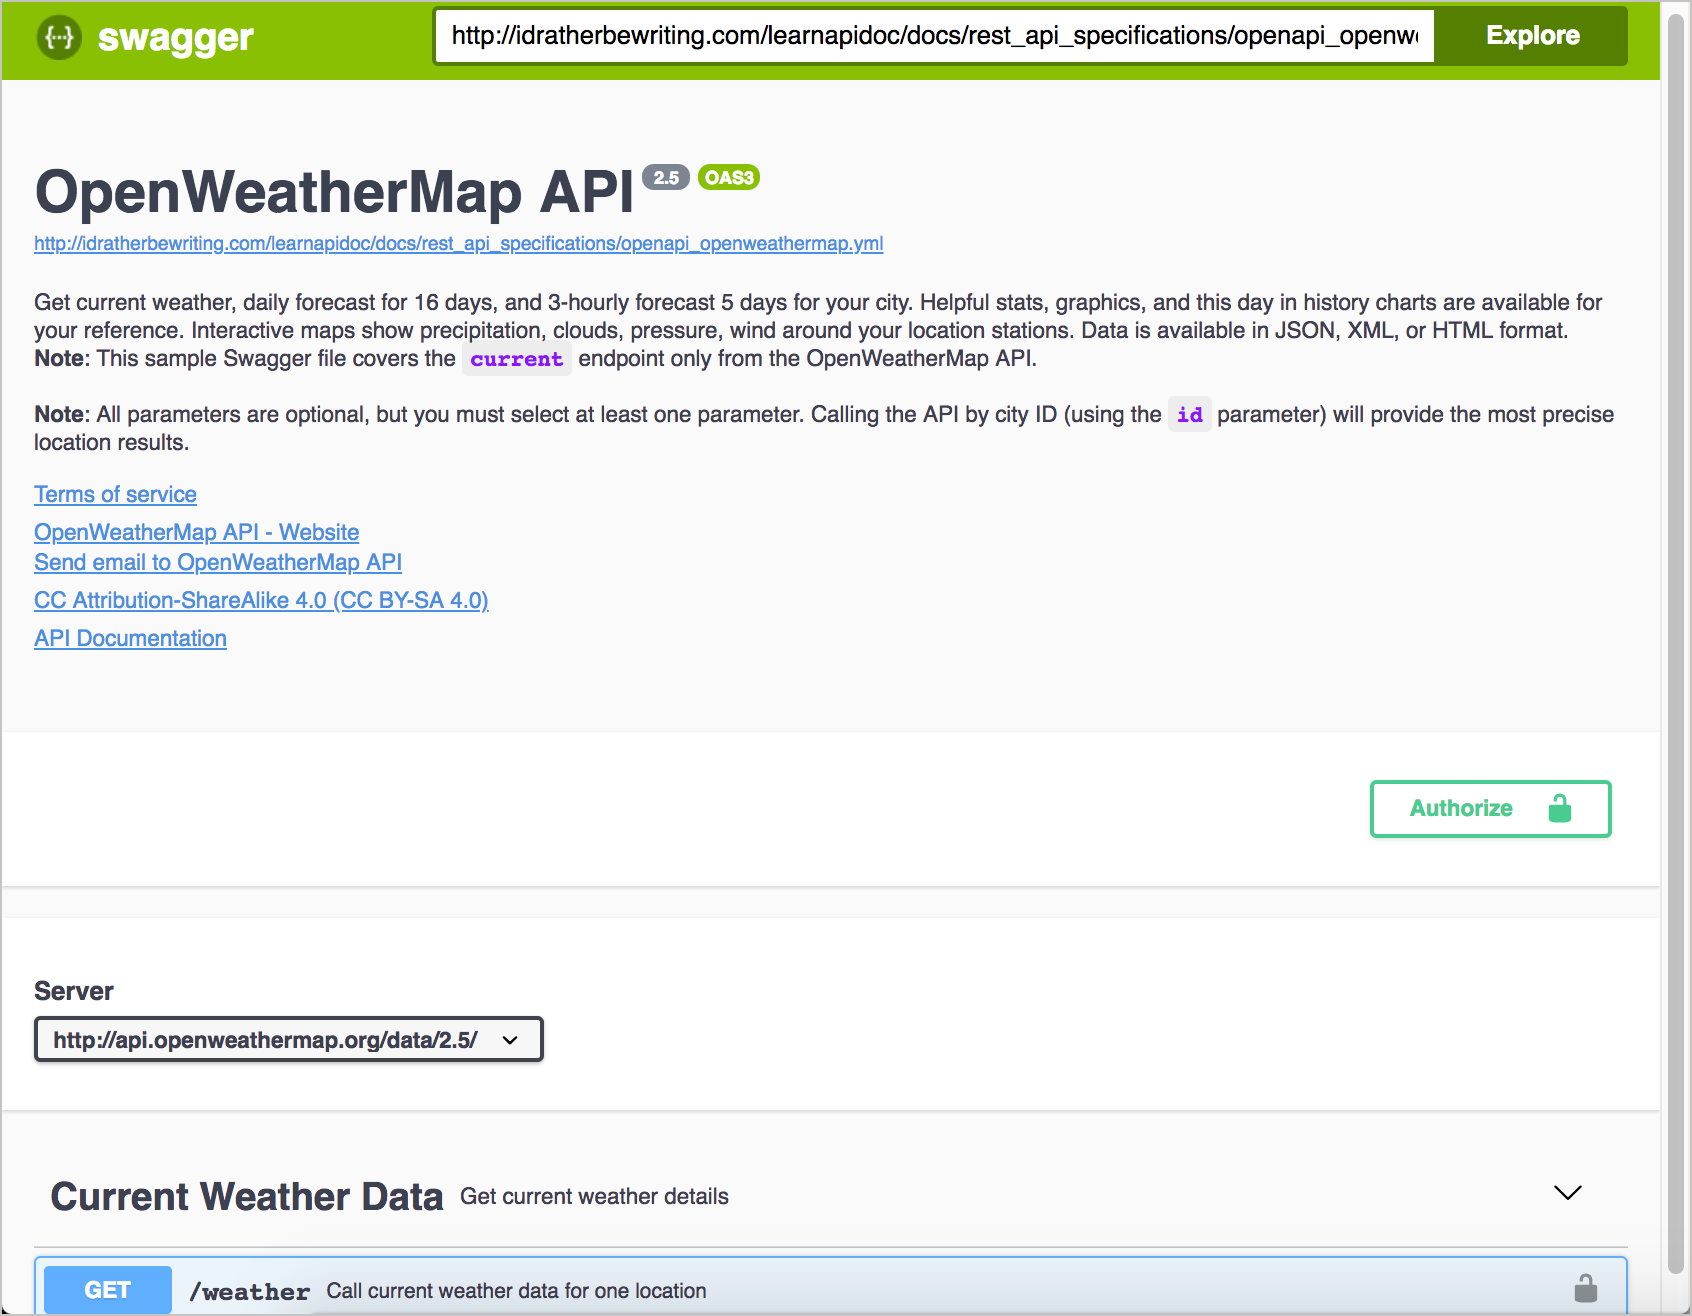
First, you’ll make sure you can view Swagger locally. Then you’ll switch the Petstore OpenAPI document URL with an OpenWeatherMap OpenAPI document URL.
- Go to the Swagger UI GitHub project.
-
Click Code, and then click Download ZIP. Download the files to a convenient location on your computer and extract the files.
The only folder you’ll be working with in the downloaded zip is the
distfolder (short for distribution). Everything else is used only if you’re recompiling the Swagger files, which is beyond the scope of this tutorial. (If desired, you can drag thedistfolder out of theswagger-ui-masterfolder so that it stands alone.) -
In your Chrome browser, press Cmd+O (Mac) or Ctrl+O (Windows), browse to the
distfolder, and select theindex.htmlfile,You should see the Petstore Swagger content. Now you’ll customize the OpenAPI spec file with another file.
- Inside your
distfolder, openswagger-initializer.jsin a text editor such as Sublime Text. -
Look for the following code:
url: "https://petstore.swagger.io/v2/swagger.json", -
Change the
urlvalue to an online web URL to your Swagger file. For example:https://idratherbewriting.com/docs/openapi_spec_and_generated_ref_docs/openapi_openweathermap.yml. Then save the file.If the
urlreference isn’t to an online URL (but rather to a local file), Swagger UI will create an CORS (cross-origin resource sharing) error. To view Swagger UI with a local OpenAPI file, you can run a simple Python server locally to simulate a web server (this requires you to install Python). -
Refresh the
index.htmlfile in your Chrome browser. The content should show the OpenWeatherMap API content instead of Swagger Petstore content.When you’re ready to publish your Swagger UI file, you just upload the
distfolder (or whatever you want to call it) to a web server and go to theindex.htmlfile. For example, if you called your directorydist(leaving it unchanged), you would go tohttp://myserver.com/dist/.For more instructions in working with Swagger UI, see the Swagger documentation.
Activity: View local OpenAPI file in Swagger UI
In order to view a local OpenAPI file (rather than an OpenAPI file hosted on a web server), you’ll need to run an HTTP server on your computer. This is because CORS (cross-origin resource sharing) security restrictions in Chrome will block Swagger UI from running. Swagger UI needs to load on a web server to fulfill the security requirements.
You can create a local web server running on your computer through Python’s SimpleHTTPServer module. Mac has a system version of Python installed by default, but Windows computers will need to install Python.
Windows: Run the Python simple HTTP server
-
Download and install Python 3x.
When you install Python, be sure to select the check box that says “Add Python to PATH.” This check box isn’t selected by default. If you don’t select it, your command prompt won’t recognize the word “python”.
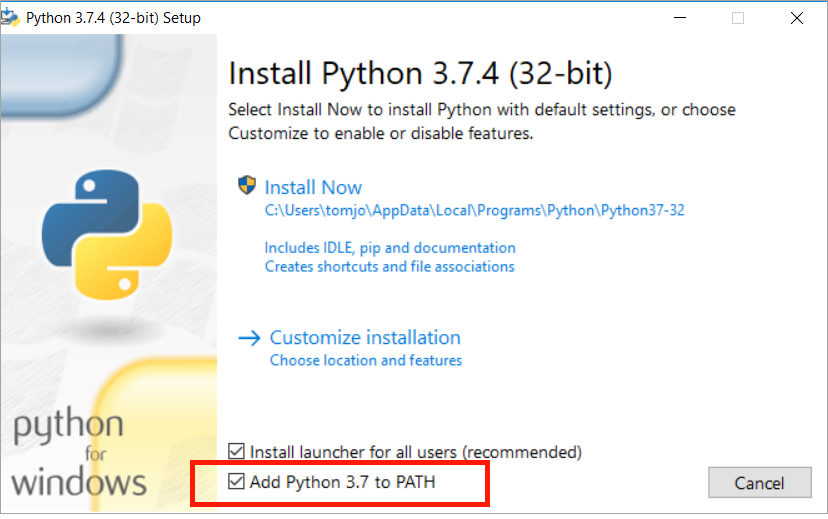
Add Python to PATH - After installing Python, close your command prompt and reopen it.
-
In your command prompt, browse to the Swagger UI
distdirectory.To browse in the Windows command prompt, type
cd <folder name>to move into the folder. Typecd ..to move up a directory. Typedirto see a list of the current directory’s contents.If you’re having trouble locating the
distdirectory in the command prompt, try this trick: typecd, press the spacebar, and then drag thedistfolder directly into the command prompt. The path will be printed automatically. -
After you’ve navigated into the
distfolder, launch the server:python3 -m http.serverIf this command doesn’t work, try it without the 3:
python -m http.serverThe server starts:
Serving HTTP on 0.0.0.0 port 8000 (http://0.0.0.0:8000/) ...(If your Command Prompt doesn’t recognize
python, then you probably need to add Python to your PATH. Instructions for doing that are outside the scope of this tutorial.) -
Go to
http://localhost:8000/in your address bar. This address lets you view the local web server.By default, web servers default to the
index.htmlfile in the directory, so it will show the Swagger UI file automatically. If the browser doesn’t direct toindex.html, add it manually:http://localhost:8000/index.html.To stop the server, press Ctrl+C in your command prompt. If you closed your Command Prompt before stopping the service, type
ps, find the process ID, then typekill -9 <process ID>.
Mac: Run the Python simple HTTP server
-
In your terminal, browse to the Swagger UI
distdirectory.To browse in your terminal, type
cd <folder name>to move into the folder. Typecd ..to move up a directory. Typelsto see a list of the current directory’s contents.If you’re having trouble locating the
distdirectory in the command prompt, try this trick: typecd, press the spacebar, and then drag thedistfolder directly into the command prompt. The path will be printed automatically. -
Since Mac already has Python, you can just run the following in your terminal to launch simple server:
python -m http.serverIf this command doesn’t work, try it with the 3 in case you already have Python3 installed:
python3 -m http.serverThe server starts:
Serving HTTP on 0.0.0.0 port 8000 (http://0.0.0.0:8000/) ... -
Go to
http://localhost:8000/in your address bar. This address lets you view the local web server.By default, web servers default to the
index.htmlfile in the directory, so it will show the Swagger UI file automatically. If the browser doesn’t direct toindex.html, add it manually:http://localhost:8000/index.html.To stop the server, press Ctrl+C in your command prompt. If you closed your Command Prompt before stopping the service, type
ps, find the process ID, then typekill -9 <process ID>.
For more details on using the Python simple server, see How do you set up a local testing server? for more details.
Customize the OpenAPI file
By default, SwaggerUI has the Petstore OpenAPI document configured in the url parameter in the index.html file. You need to swap in your local file instead.
-
Download the this OpenAPI document (right-click the link and save the YAML file to your desktop.).
-
Drag your OpenAPI specification file,
openapi_openweathermap.yml, into thedistfolder. Your file structure should look as follows:├── dist │ ├── favicon-16x16.png │ ├── favicon-32x32.png │ ├── index.html │ ├── oauth2-redirect.html │ ├── swagger-ui-bundle.js │ ├── swagger-ui-bundle.js.map │ ├── swagger-ui-standalone-preset.js │ ├── swagger-ui-standalone-preset.js.map │ ├── swagger-ui.css │ ├── swagger-ui.css.map │ ├── swagger-ui.js │ ├── swagger-ui.js.map │ ├── swagger30.yml │ └── openapi_openweathermap.yml - Inside your
distfolder, openswagger-initializer.jsin a text editor such as Sublime Text. -
Look for the following code:
url: "https://petstore.swagger.io/v2/swagger.json", -
Change the
urlvalue fromhttps://petstore.swagger.io/v2/swagger.jsonto a relative path to your YAML file, and then save the file. For example:url: "openapi_openweathermap.yml", -
View the
index.htmlfile locally in your browser using the Python simple server. For example, go tohttp://0.0.0.0:8000/orhttp://0.0.0.0:8000/index.html.If you go to the file path, such as
file:///Users/tomjohnson/Downloads/dist/index.html, you might see a message that says “Failed to load API definition” note in the JavaScript Console that says “URL scheme must be “http” or “https” for CORS request.” The SimpleServer simulates this http or https. - To stop the Python simpler server, press Ctrl+C in your terminal or command prompt.
Configuring Swagger UI parameters
Swagger UI provides various configuration parameters (unrelated to the OpenAPI parameters) that you can use to customize the interactive display. For example, you can set whether each endpoint is expanded or collapsed, how tags and operations are sorted, whether to show request headers in the response, whether to include the Models section after the list of endpoints, and more.
We won’t get too much into the details of these configuration parameters in the tutorial. I just want to call attention to these parameters here for awareness.
If you look at the source of my Swagger UI demo (go to View > Source), you’ll see the parameters listed in the // Build a system section:
  // Build a system
const ui = SwaggerUIBundle({
  url: "openapi_openweathermap.yml",
  dom_id: '#swagger-ui',
  defaultModelsExpandDepth: -1,
  deepLinking: true,
  presets: [
    SwaggerUIBundle.presets.apis,
    SwaggerUIStandalonePreset
  ],
  plugins: [
    SwaggerUIBundle.plugins.DownloadUrl
  ],
  layout: "StandaloneLayout"
})
The parameters there (e.g., deepLinking, dom_id, etc.) are defaults. However, I’ve added defaultModelsExpandDepth: -1 to hide the “Models” section at the bottom of the Swagger UI display (because I think that section is unnecessary).
You can also learn about the Swagger UI configuration parameters in the Swagger documentation.
Challenges with Swagger UI
As you explore Swagger UI, you may notice a few limitations:
- There’s not much room to describe in detail the workings of the endpoints. If you have several paragraphs of details and gotchas about a parameter, it’s best to link out from the description to another page in your docs. The OpenAPI spec provides a way to link to external documentation in both the paths object, the info object, and the externalDocs object
- The Swagger UI looks mostly the same for each API. You can customize Swagger UI with your own branding, but it will require some more in-depth UX skills. It is, however, relatively easy to change the color and image in the top navigation bar.
- The Swagger UI might be a separate site from your other documentation. This separate output means that in your regular docs, you’ll probably need to link to Swagger as the reference for your endpoints. You don’t want to duplicate your parameter descriptions and other details in two different sites. See Integrating Swagger UI with the rest of your docs for strategies on unifying your reference docs and user guide.
Troubleshooting issues with Swagger UI
When you’re setting up Swagger UI, you might run into some issues. The following issues are the most common:
CORS issues:
If you have security correctly configured, but the requests are rejected, it could be due to a CORS (cross-origin resource sharing) issue. CORS is a security measure that websites implement to make sure other scripts and processes cannot take their content through requests from remote servers. See CORS Support in Swagger UI’s documentation for details.
If the requests aren’t working, open your browser’s JavaScript console when you make the request and see if the error relates to cross-origin requests. If this is the error, ask your developers to enable CORS on the endpoints. (To open the JavaScript Console, on Chrome on a Mac, go to View > Developer > Javascript Console; on Windows, click the menu button (vertical ellipses) and go to More tools > Developer tools. Then click the Console tab.)
Host URL issues:
The host for your test server might be another reason that requests are rejected. Some APIs (like Xweather) require you to create an App ID that is based on the host URL where you’ll be executing requests. If the host URL you registered is http://mysite.com, but you’re submitting the test from https://editor.swagger.io/, the API server will reject the requests.
If you need help, the Swagger Google Group is a helpful resource for troubleshooting.
Embedding Swagger UI within an existing site
In addition to publishing your Swagger UI output as a standalone site, you can also embed the Swagger file within an existing site. See the following:
Since the Swagger UI site is responsive, it resizes well to fit into most any space. Even so, embedding Swagger into an existing site still looks like a website within a website.
Key terms
- Swagger
- A framework for the OpenAPI specification that includes a suite of tools for auto-generating documentation, client SDK generation, and more. In contrast to the term OpenAPI, Swagger now refers to API tooling related to the OpenAPI spec. Some of these tools include Swagger Editor, Swagger UI, Swagger Codegen, SwaggerHub, and others. These tools are managed by Smartbear. Note: Although ‘Swagger’ was the original name of the OpenAPI spec, the name was later changed to OpenAPI to reinforce the open, non-proprietary nature of the standard. OpenAPI is still often referred to as Swagger.
- Swagger Editor
- An online editor that validates your OpenAPI document against the rules of the OpenAPI specification. The Swagger Editor will flag errors and give you formatting tips.
- Swagger UI
- An open-source web framework (on GitHub) that parses an OpenAPI specification document and generates an interactive documentation website. Swagger UI is the tool that transforms your spec into the Petstore-like site.
- Swagger Codegen
- Generates client SDK code for a lot of different platforms (such as Java, JavaScript, Scala, Python, PHP, Ruby, Scala, and more). The client SDK code helps developers integrate your API on a specific platform and provides for more robust implementations that might include more scaling, threading, and other necessary code. In general, SDKs are toolkits for implementing the requests made with an API. Swagger Codegen generates the client SDKs in nearly every programming language.
For more terms, see the Glossary.
About Tom Johnson

I'm an API technical writer based in the Seattle area. On this blog, I write about topics related to technical writing and communication — such as software documentation, API documentation, AI, information architecture, content strategy, writing processes, plain language, tech comm careers, and more. Check out my API documentation course if you're looking for more info about documenting APIs. Or see my posts on AI and AI course section for more on the latest in AI and tech comm.
If you're a technical writer and want to keep on top of the latest trends in the tech comm, be sure to subscribe to email updates below. You can also learn more about me or contact me. Finally, note that the opinions I express on my blog are my own points of view, not that of my employer.