


Activity: Use the GitHub Desktop client
- Overview
- Activity: Manage content in a GitHub wiki
- Activity: Use the GitHub Desktop Client
- Activity: Pull request workflows through GitHub
- Jekyll and CloudCannon continuous deployment tutorial
- Using Oxygen XML with docs-as-code workflows
- Case study: Switching tools to docs-as-code
- Tools FAQ
Topic 3 of 8
Although most developers use the command line when working with version control systems, there are many GUI clients available that can potentially simplify the process. GUI clients might be especially helpful when you’re trying to see what has changed in a file since the GUI can quickly highlight and indicate the changes taking place.
- Follow a typical workflow with a GitHub project using GitHub Desktop
- Create a branch
- Merge the development branch into main
- Merge the branch through a pull request
- Managing merge conflicts
- Conclusion
Follow a typical workflow with a GitHub project using GitHub Desktop
In this tutorial, you’ll use GitHub Desktop to manage the Git workflow.
Rather than working in a GitHub wiki (as you did in the previous GitHub tutorial), you’ll work in a regular Git repository. This is because GitHub wikis have some limitations when it comes to making pull requests.
To set up your Git repo using the GitHub Desktop client:
- First, download and install GitHub Desktop. Launch the app and sign in. (You should already have a GitHub account from previous tutorials, but if not, create one.)
- Go to GitHub.com and browse to the repository you created in the GitHub tutorial, but not the wiki. Just go to the main repo. (If you didn’t do the previous activity, just create a new repository.)
-
While viewing your GitHub repo in the browser, click the green Code button and select Open with GitHub Desktop.
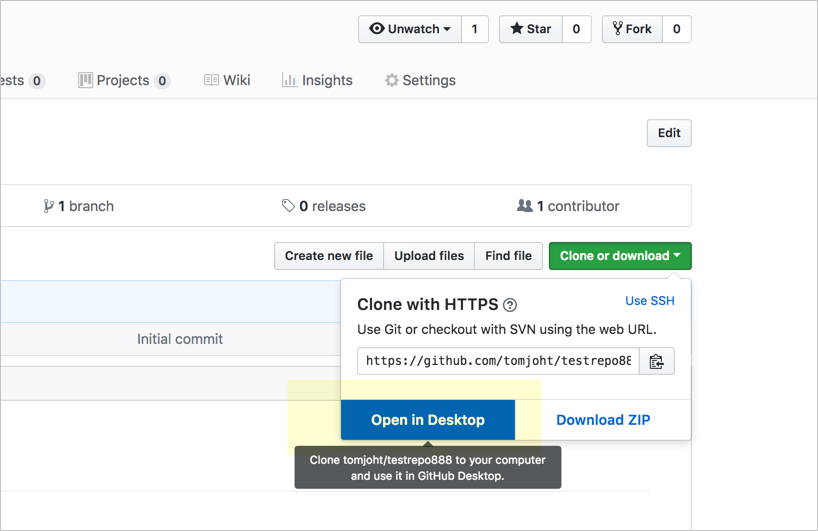
Open in GitHub Desktop (older version of the GitHub interface) - If your browser asks for confirmation, allow it to open GitHub Desktop. GitHub Desktop launches with a “Clone a Repository” dialog box that already has the repository URL filled in. (Alternatively, in GitHub Desktop, go to File > Clone Repository, click the URL tab, and paste in the repository URL.)
-
In the Local Path field, select where you want the repo cloned. For example:
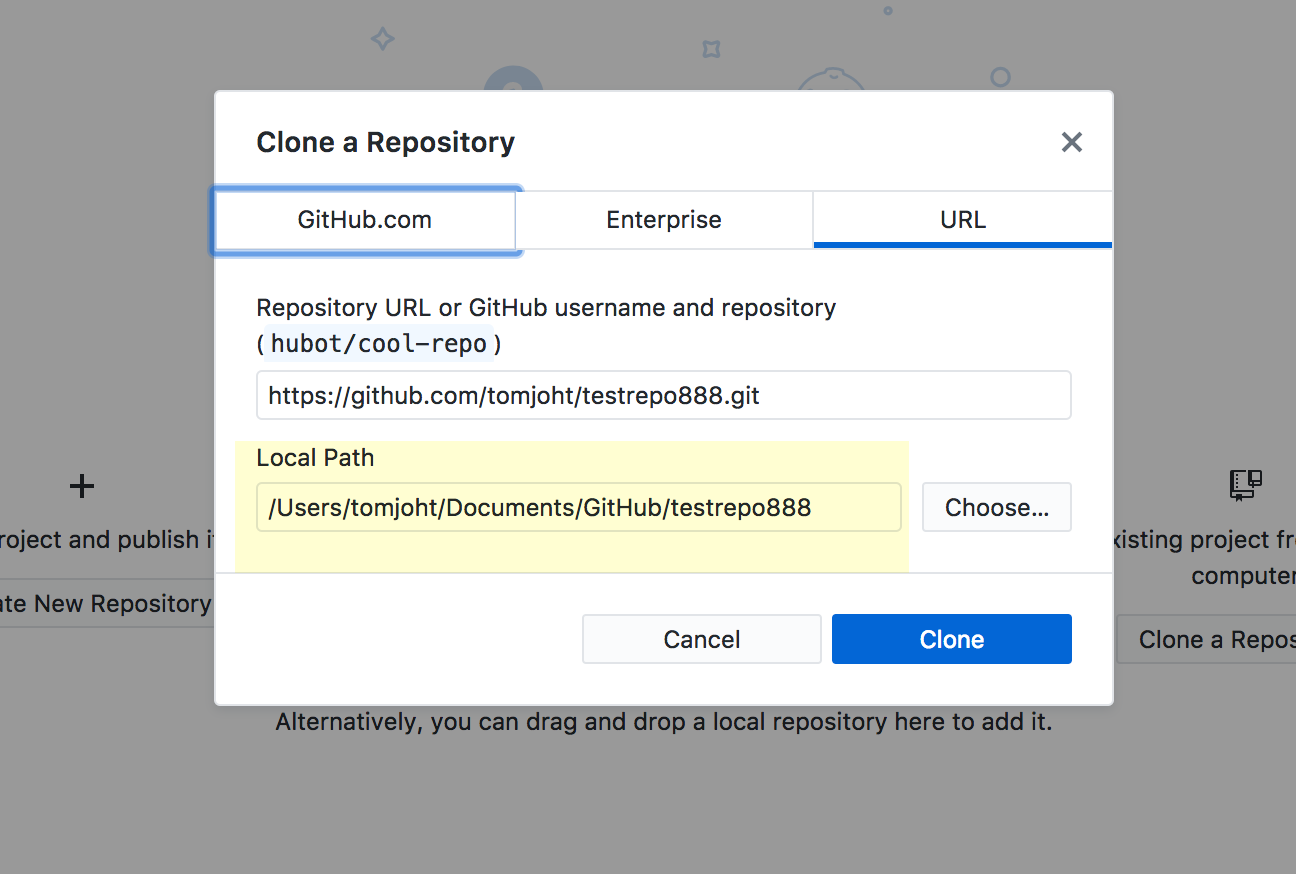
Selecting paths for the repo in GitHub Desktop - Click Clone.
- Go into the repository where GitHub Desktop cloned the repo (browse the folders with Finder or File Explorer) and either add a simple text file with some content or make a change to an existing file.
-
Go back to GitHub Desktop. You’ll see the new file you added in the list of uncommitted changes on the left.
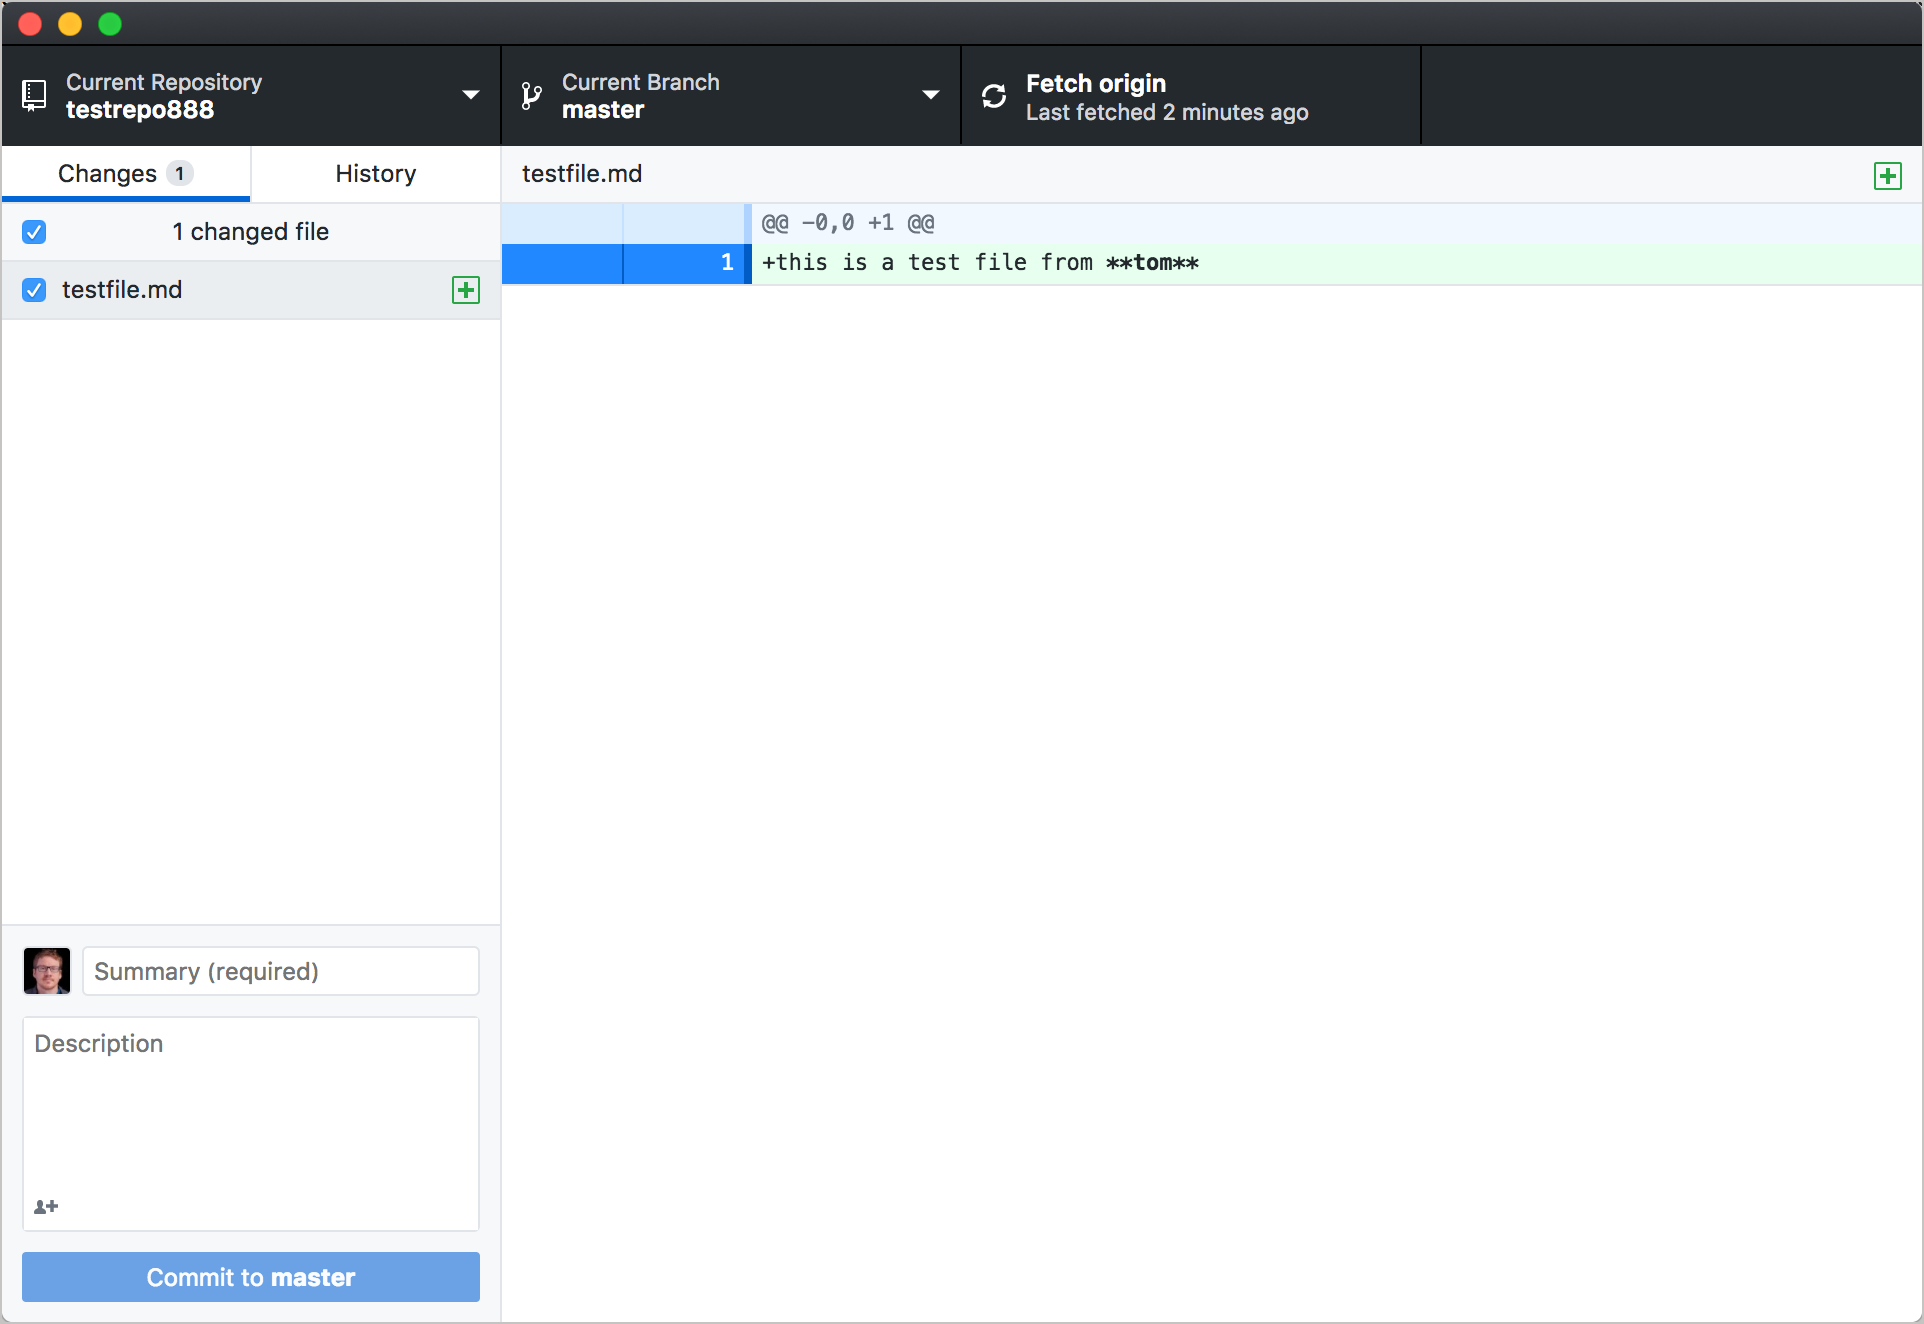
Uncommitted changes shown In the list of changed files, the green + means you’ve added a new file. A yellow circle means you’ve modified an existing file.
-
In the lower-left corner of the GitHub Desktop client (where it says “Summary” and “Description”), type a commit message, and then click the commit button. The button shows the branch name, such as Commit to main.
When you commit the changes, the left pane no longer shows the list of uncommitted changes. However, you’ve committed the changes only locally. You still have to push the commit to the remote (origin) repository. (“origin” is the alias name that refers to the remote repository.)
-
Click Push origin at the top.
You’ll see GitHub Desktop show that it’s “Pushing to origin.”

If you view your repository online, you’ll see that the change you made has been pushed to the main branch on origin. You can also click the History tab in the GitHub Desktop client (instead of the Changes tab), or go to View > Show History to see the changes you previously committed.
Although I prefer to use the terminal instead of the GitHub Desktop GUI, the GUI gives you an easier visual experience to see the changes made to a repository. You can use both the command line and Desktop client in combination, if you want.
Create a branch
Now let’s create a branch, make some changes, and see how the changes are specific to that branch.
-
In the GitHub Desktop client, go to Branch > New Branch and create a new branch. Call it “development” branch, and click Create Branch.
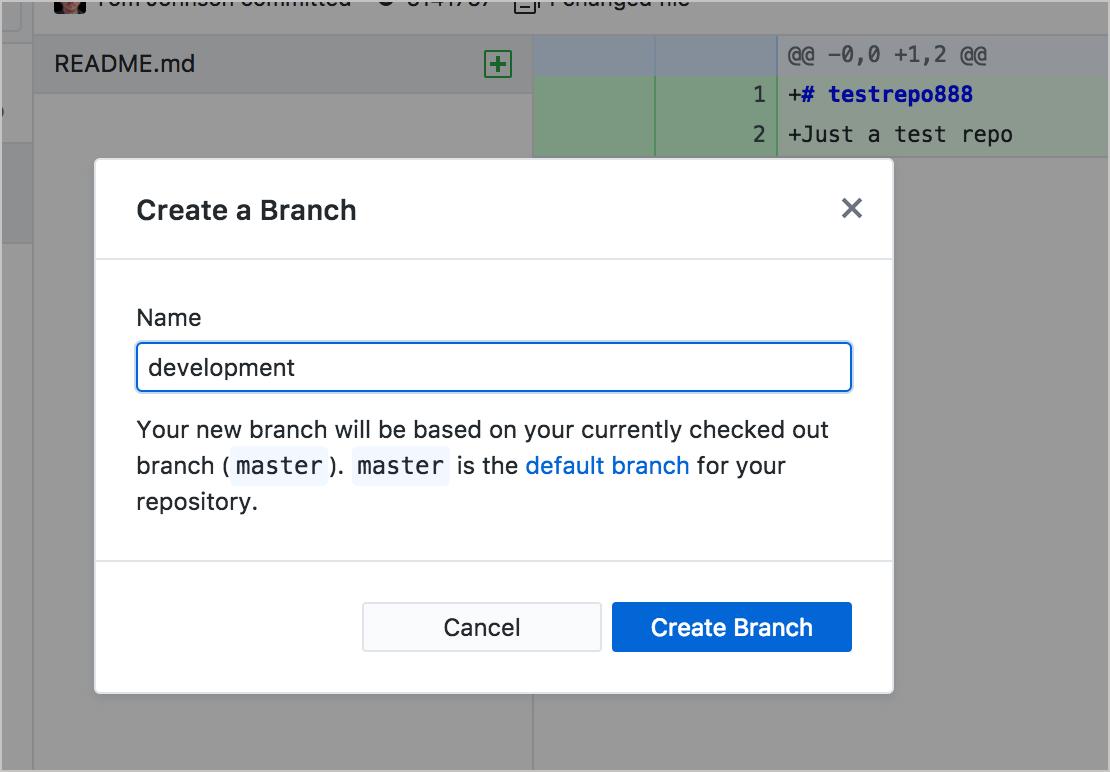
Creating a new branch When you create the branch, you’ll see the Current branch drop-down menu indicate that you’re working in that branch. Creating a branch copies the existing content (from the branch you’re currently in, main) into the new branch (development).
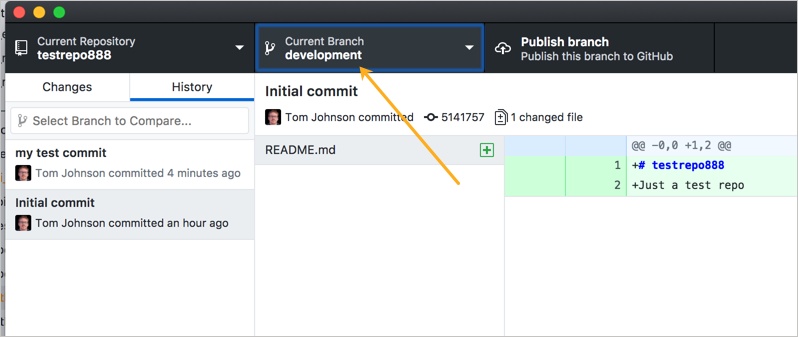
Working in a branch - Using Finder or Explorer, browse to the file you created earlier and make a change to it, such as adding a new line with some text. Save the changes.
-
Return to GitHub Desktop and notice that on the Changes tab, you have new modified files.
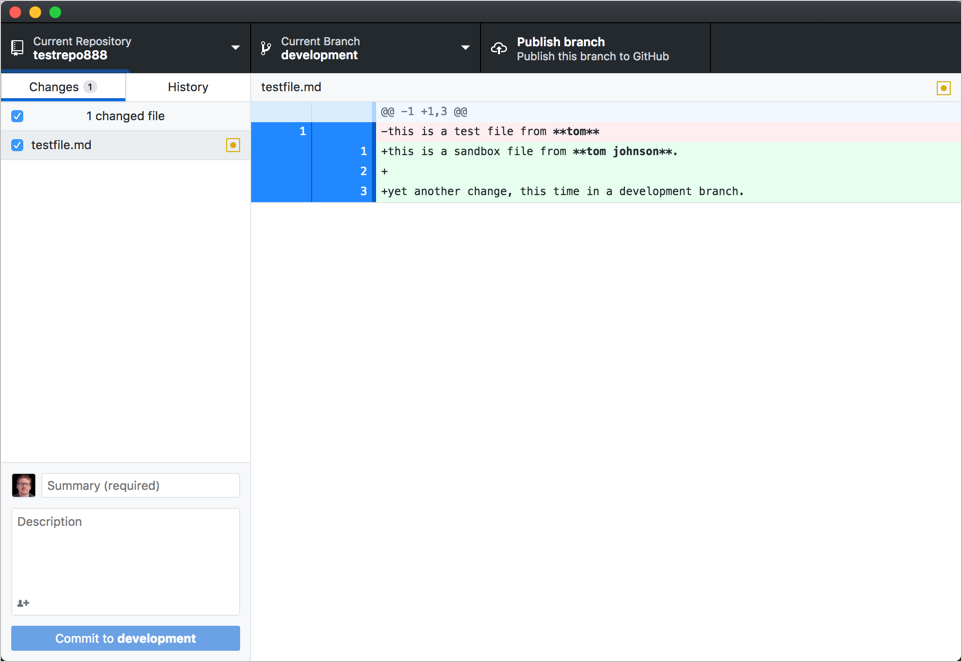
New files modified The file changes show deleted lines in red and new lines in green. The colors help you see what changed.
-
Commit the changes using the options in the lower-left corner, and click Commit to development.
-
Click Publish branch (on the top of the GitHub Desktop window) to make the local branch also available on origin (GitHub). (Remember, there are usually two versions of a branch — the local version and the remote version.)
- Switch back to your
mainbranch (using the Current Branch drop-down at the top of the GitHub Desktop client). Then look at your file in your text editor, such as VS Code. Note how the file changes you made while editing in the development branch don’t appear in yourmainbranch.
You usually create a new branch when you’re making extensive changes to your content. For example, suppose you want to revamp a section (“Section X”) in your docs. However, you might want to publish other updates before publishing the extensive changes in Section X. If you were working in the same branch, it would be difficult to selectively push updates on a few files outside of Section X without pushing updates you’ve made to files in Section X as well.
Through branching, you can confine your changes to a specific version that you don’t push live until you’re ready to merge the changes into your main branch.
Merge the development branch into main
Now let’s merge the development branch into the main branch.
- In the GitHub Desktop client, switch to the branch you want to merge the development branch into. From the branch selector, select the main branch.
- Go to Branch > Merge into Current Branch.
-
In the merge window, select the development branch, and then click Merge development into main.
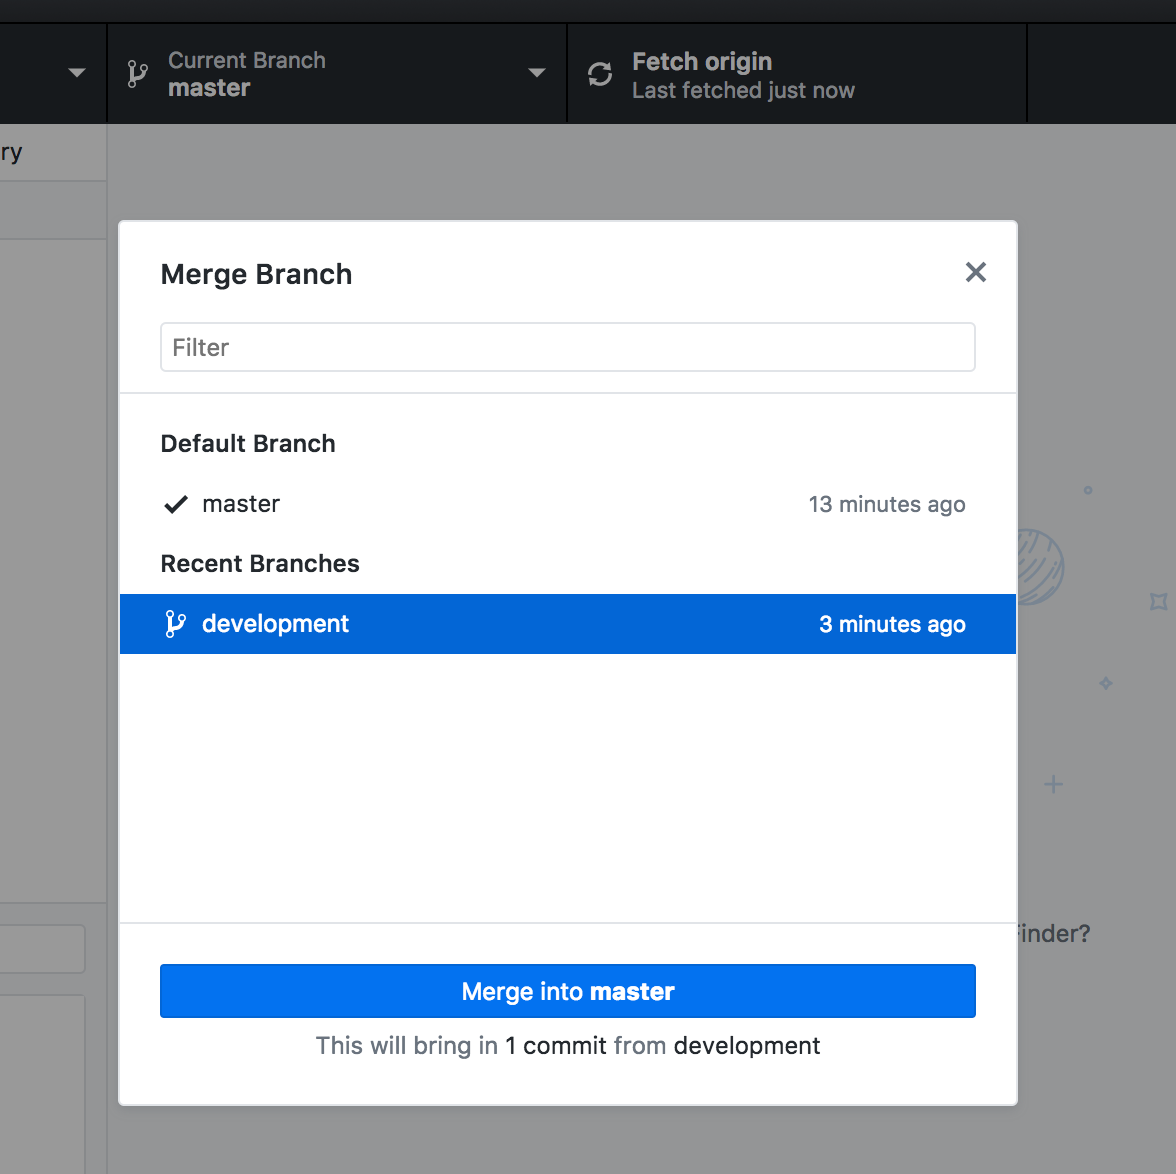
Merging into the default branch (this older screenshot uses the name master) If you look at your changed file, you should see the changes in the
mainbranch. -
Then click Push origin to push the changes to origin.
You will now see the changes reflected on the file on GitHub.
Sponsored
Sponsored

Want to level up your API documentation skills? Mark Wentowski is teaching a live API documentation course this fall at docsgeek.io. The fall cohort starts October 19 and includes seven 90-minute classes, Mondays 8:00–9:30am PT, running through November 23. Code TOMAPIS takes $250 off.
Merge the branch through a pull request
Now let’s merge the development branch into main using a pull request workflow. We’ll pretend that we’ve cloned a repo managed by engineers, and we want to have the engineers merge in the development branch. (In other words, we might not have rights to merge branches into main.) To do this, we’ll create a pull request.
- Just as you did in the previous section, switch to the development branch, make some updates to the content in a file, and then save and commit the changes. After committing the changes, click Push origin to push your changes to the remote version of the development branch on GitHub.
-
In the GitHub Desktop client, while you have development branch selected, go to Branch > Create Pull Request.
GitHub opens in the browser with the Pull Request form opened.
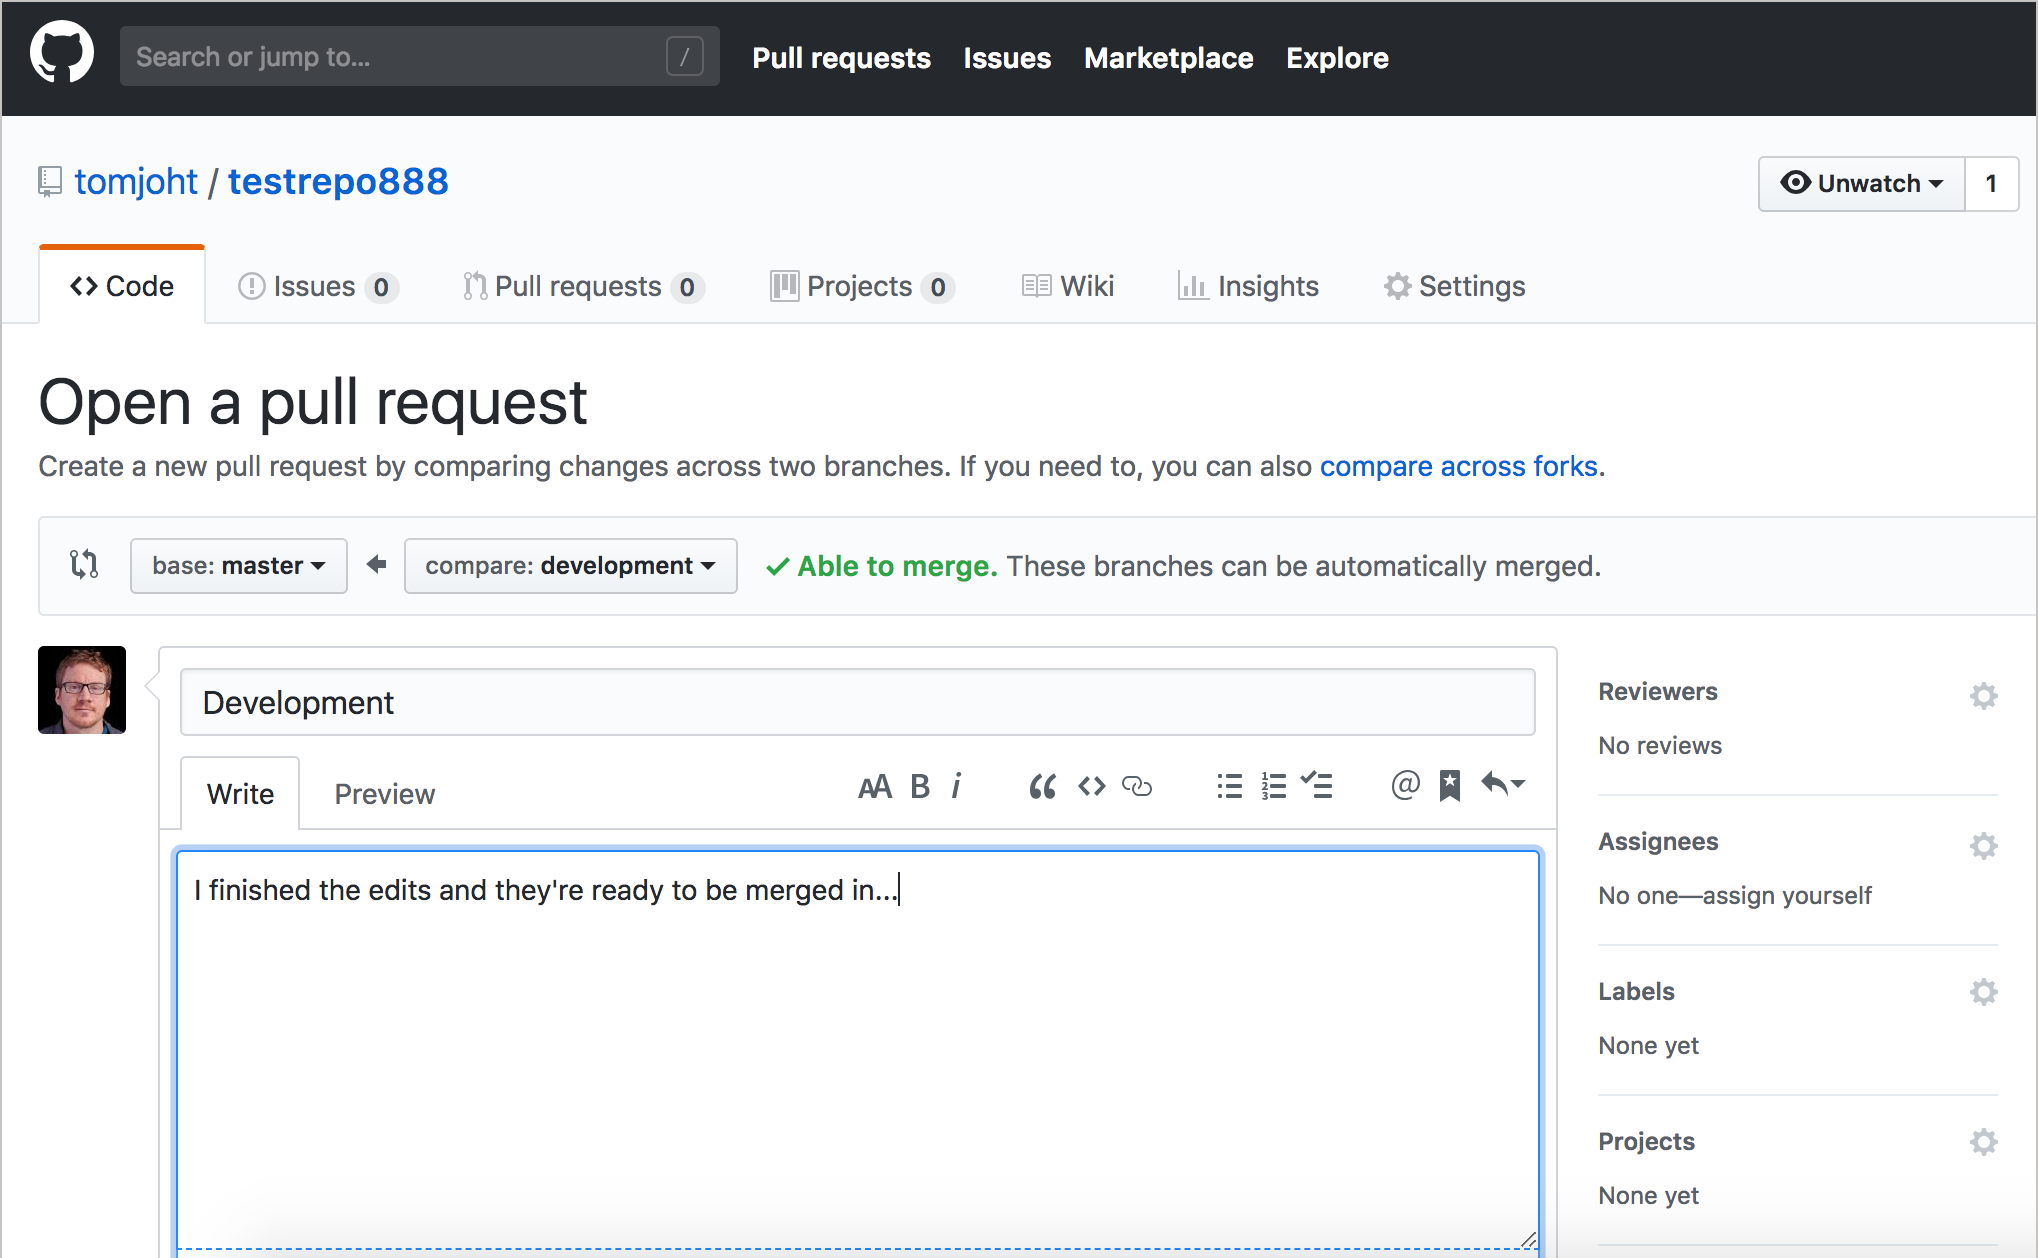
Pull request The left-facing arrow (pointing from the development branch towards
main) indicates that the pull request (“PR”) wants to merge the development branch into themainbranch. -
Describe the pull request, and then click Create pull request.
-
At this point, engineers would get an email request asking for them to merge in the edits. Play the part of the engineer by going to the Pull requests tab (on GitHub) to examine and confirm the merge request. As long as the merge request doesn’t pose any conflicts, you’ll see a Merge pull request button.
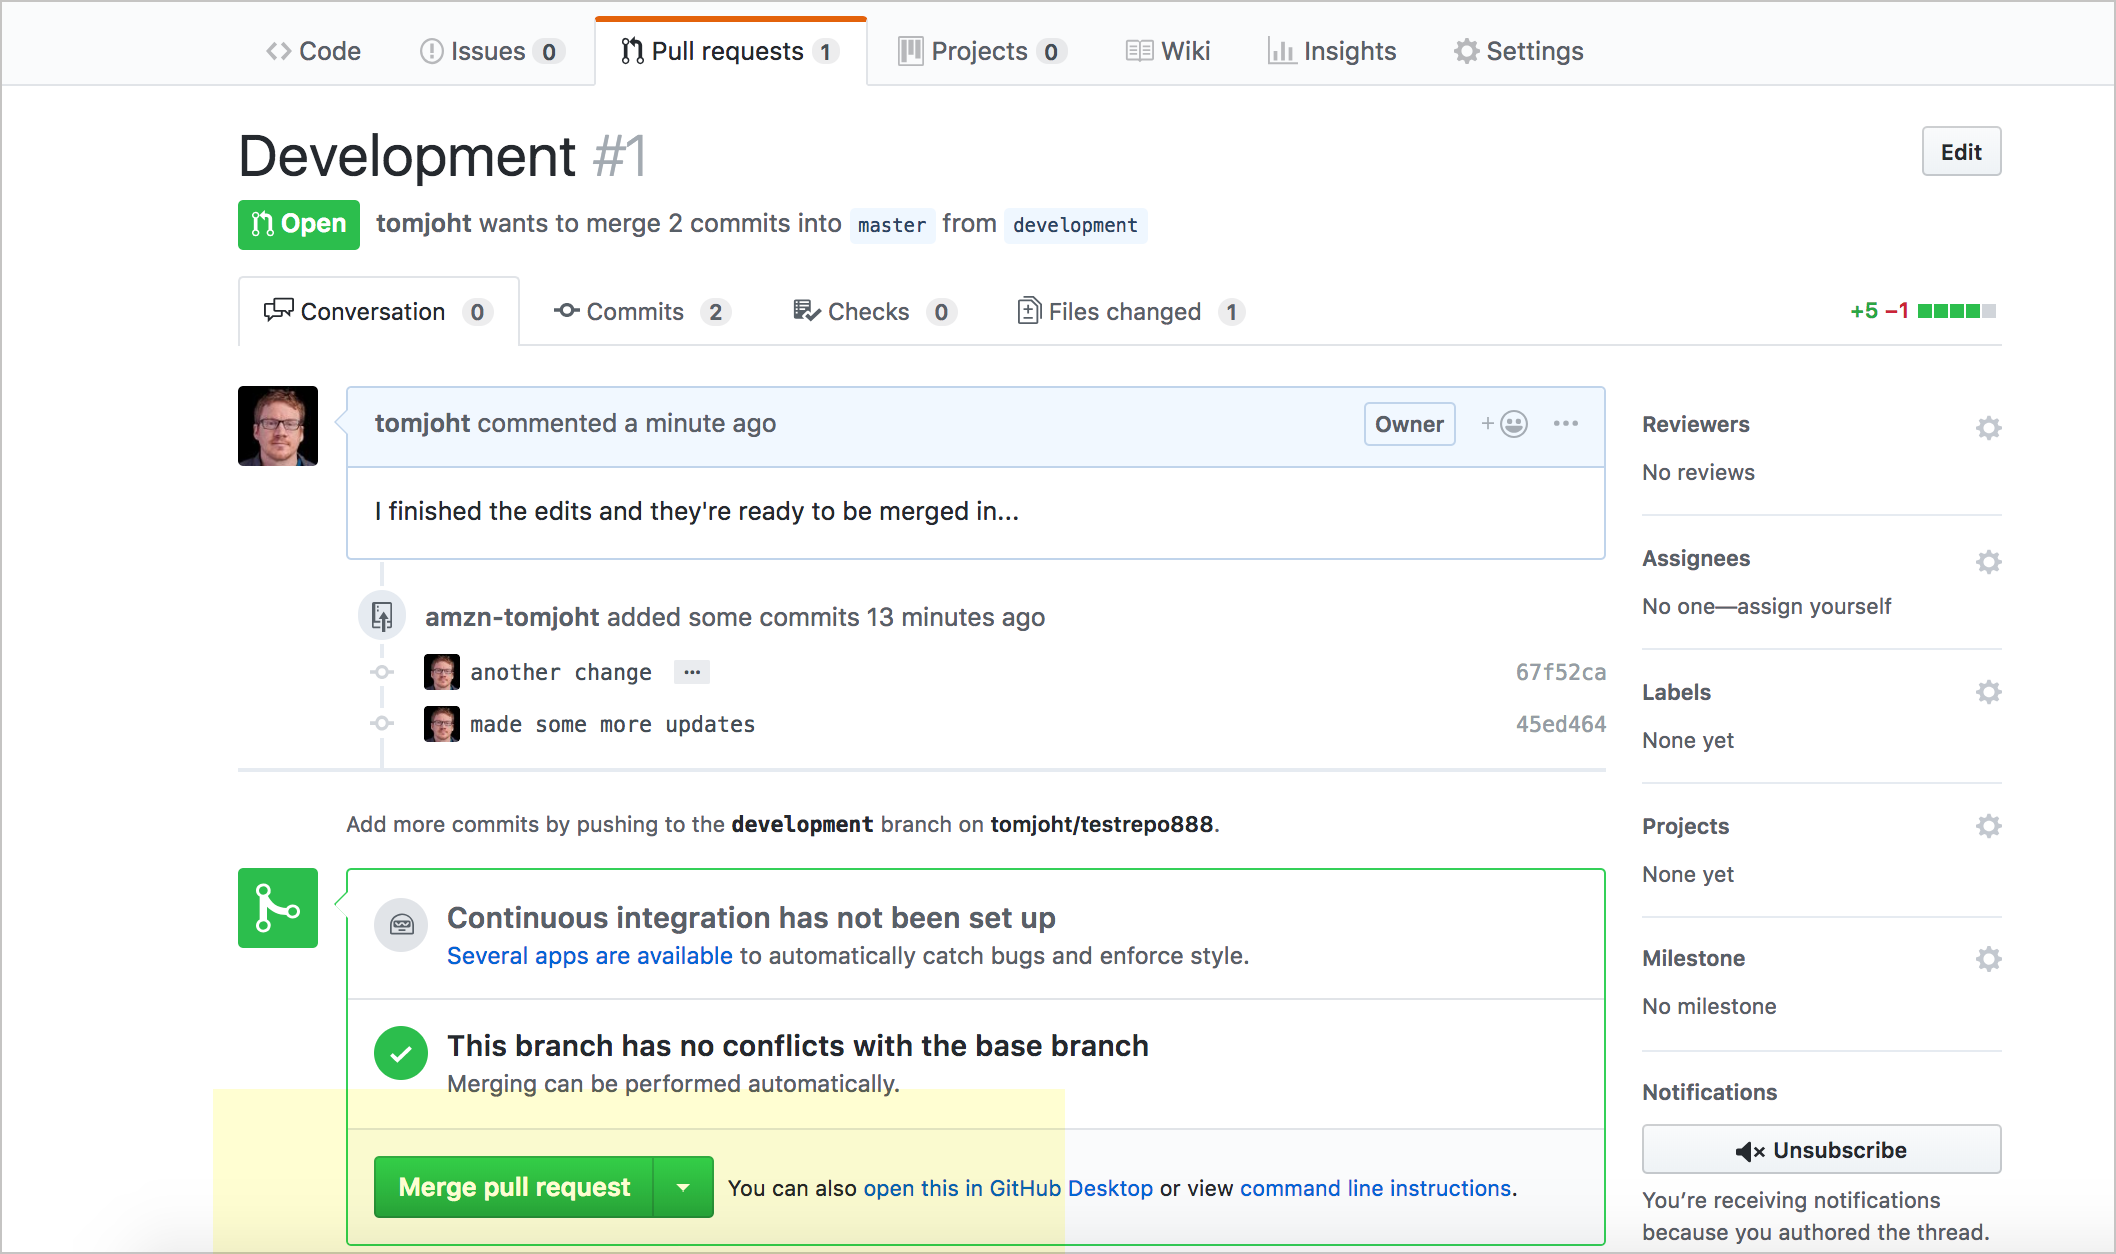
Confirm merge request -
To see what changes you’re merging into
main, you can click the Files changed tab (which appears on the secondary navigation bar near the top). Then click Merge pull request to merge in the branch, and click Confirm merge to complete the merge. -
Now let’s get the updates you merged into the
mainbranch online into your local copy. In your GitHub Desktop GUI client, select the main branch, and then click the Fetch origin button. Fetch gets the latest updates from origin but doesn’t update your local working copy with the changes.After you click Fetch origin, the button changes to Pull origin.
-
Click Pull origin to update your local working copy with the fetched updates.
Now check your files and notice that the updates that were originally in the development branch now appear in
main.
For a more detailed tutorial in making pull requests using the GitHub interface, see Pull request workflows through GitHub. I include an extensive tutorial with pull requests because it will likely be a common workflow if you are contributing to an open-source project.
Managing merge conflicts
Suppose you make a change on your local copy of a file in the repository, and someone else changes the same file using the online GitHub.com browser interface. The changes conflict with each other. What happens?
When you try to push from the GitHub Desktop client, GitHub Desktop tells you that the remote has newer commits and that you need to fetch and pull them before you can push. Click Pull origin. Because your local commit and the browser commit changed the same lines, Git can’t merge them automatically, and GitHub Desktop shows a dialog listing the files with conflicts. You can’t finish the merge until you resolve all of them.
The GitHub Desktop client marks the files with merge conflicts and offers to open them in your editor. Open a conflicted file and look for the conflict markers (<<<<<<< and >>>>>>>). For example, you might see this:
<<<<<<< HEAD
This is an edit I made locally.
=======
This is an edit I made from the browser.
>>>>>>> c163ead57f6793678dd41b5efeef372d9bd81035
(From the command line, you can also run git status to see which files have conflicts.) The content in HEAD shows your local changes. The content below the ======= shows changes made elsewhere (in this case, in the browser).
Fix all the conflicts by adjusting the content between the content markers and then deleting the content markers. For example, update the content to this:
This is an edit I made locally.
Now you need to re-add the file to Git. In the GitHub Desktop client, after you’ve resolved all the conflicts, click the button to continue the merge and commit it. Then click Push origin. The updates on your local get pushed to the remote without any more conflicts.
Conclusion
The more you use GitHub, the more familiar you’ll become with the workflows you need. Git is a robust, powerful collaboration platform, and there are many commands and workflows and features that you could adopt for a variety of scenarios. Despite Git’s variety of commands and workflows, most likely the scenarios you’ll actually use are somewhat limited in scope and learnable without too much effort. Pretty soon, these workflows will become automatic.
Although we’ve been using the GitHub Desktop client for this exercise, you can do all of this through the command line, and you’ll probably find it preferable that way. However, the GitHub Desktop client can be a good starting point as you transition into becoming more of a Git power user.
About Tom Johnson

I'm an API technical writer based in the Seattle area. On this blog, I write about topics related to technical writing and communication — such as software documentation, API documentation, AI, information architecture, content strategy, writing processes, plain language, tech comm careers, and more. Check out my API documentation course if you're looking for more info about documenting APIs. Or see my posts on AI and AI course section for more on the latest in AI and tech comm.
If you're a technical writer and want to keep on top of the latest trends in the tech comm, be sure to subscribe to email updates below. You can also learn more about me or contact me. Finally, note that the opinions I express on my blog are my own points of view, not that of my employer.