

Using Oxygen XML with docs-as-code workflows
Oxygen XML is a robust authoring and publishing tool for technical content that allows you to author in multiple formats (Markdown, HTML, or XML) as well as publish to multiple outputs (HTML-based webhelp, PDF, and more). Although traditionally used for XML authoring and publishing, Oxygen XML has expanded its support with Markdown files, especially with the DITA’s recent support for Lightweight Markdown. In this tutorial, you’ll learn more about Oxygen XML, different workflows you can use to publish in a docs-as-code model, Git integration with Oxygen XML, supported Markdown formats, how to get started, and more.
Note: Oxygen XML is one of the sponsors of my site.
- Publishing workflows with DITA and Markdown in Oxygen XML
- Markdown support
- Git client integration
- More docs-as-code features with Oxygen XML
- Other reasons to explore Oxygen XML
- First steps with Oxygen XML
- Conclusion
- Additional resources
Publishing workflows with DITA and Markdown in Oxygen XML
Although Oxygen XML is most well-known for XML authoring and publishing, Oxygen XML also supports Markdown authoring and publishing. Some of the Markdown support in Oxygen XML is entirely unique among Markdown tools. You can use at least three distinct authoring and publishing workflows with Oxygen XML:
- Workflow #1: Combine DITA and Markdown in the same project
- Workflow #2: Convert Markdown to DITA and publish
- Workflow #3: Convert DITA to Markdown and publish with a static site generator
Workflow #1: Combine DITA and Markdown in the same project
With Oxygen XML, you can reference Markdown files alongside DITA files in your DITA maps. (A DITA map lists the files included in your output and defines the sidebar navigation.) This means you can use Markdown for some content, and DITA for other content, all within the same project. For example, the DITA map might include these references to topics:
      <topicref href="files/topic1.dita"/>
      <topicref href="files/topic2.md" format="markdown"/>
Why would you want to mix and match format types within the same project? You might have engineers write in Markdown and technical writers write in DITA. Technical writers often have to handle more complex publishing challenges (for which DITA might be more suitable), while external contributors might want simpler needs that can be handled with Markdown alone.
Workflow #2: Convert Markdown to DITA and publish
Another workflow would be to convert Markdown files to DITA syntax. With this workflow, contributors could submit content in Markdown, and tech writers could convert the content into DITA as they pull the content into their projects and then use more advanced reuse features.
This workflow would require tech writers to convert the Markdown files to DITA each time. If the contributor has a later edit and wants to work in Markdown, tech writers could convert the DITA file back to Markdown for the contributor.
Workflow #3: Convert DITA to Markdown and publish with a static site generator
Another workflow could be to publish DITA to Markdown using the DITA Open Toolkit. After obtaining Markdown, you would publish the files using a static site generator (e.g., Hugo, Jekyll, Elevanty, Docusaurus, Gatsby) as the publishing engine.
This publishing engine might be preferable if you have a UX team who wants an extremely customized doc website to match other branding, or perhaps if you have customized templates and Swagger integration for your API reference documentation. Some static site generators like Gatsby offer a robust React-based framework that some UX front-end engineers might prefer to work in, rather than customizing the Oxygen XML webhelp output. Then again, if you don’t have UX and engineering support, creating your own custom doc-themed website might not be appealing to you.
Even within XML projects, many teams use OxygenXML as their editor only (not to also publish). They use the editor to author and edit content, but then connect with another system to handle the publishing.
Markdown support
Because Markdown is the most common format for docs-as-code tools, let’s look in depth at the Markdown authoring experience with Oxygen XML.
Markdown formats supported in Oxygen XML
Oxygen XML provides support for CommonMark Markdown (the same Markdown standard used by the OpenAPI spec) as well MDITA files (Markdown DITA) from the Lightweight DITA (LwDITA) spec. The MDITA format follows GitHub-Flavored Markdown (for example, fenced code blocks with a language identifier) and also incorporates some re-use features from DITA (primarily keyrefs and conrefs) — see the supported MDITA syntax here. The keyref element allows you to use variables in your content, and conref allows for content re-use (also called transcludes, where you can insert the content from one file into another).
Markdown preview in Oxygen XML’s editor
As you’re writing Markdown in Oxygen XML, a preview pane appears to the right of the code showing how the content will appear in HTML, including image rendering. The preview allows you to view the content you’re working on without rebuilding your entire project to check format rendering. This preview also provides real-time validation checking to make sure your Markdown syntax is correct. Here’s what the Oxygen XML editor looks like:
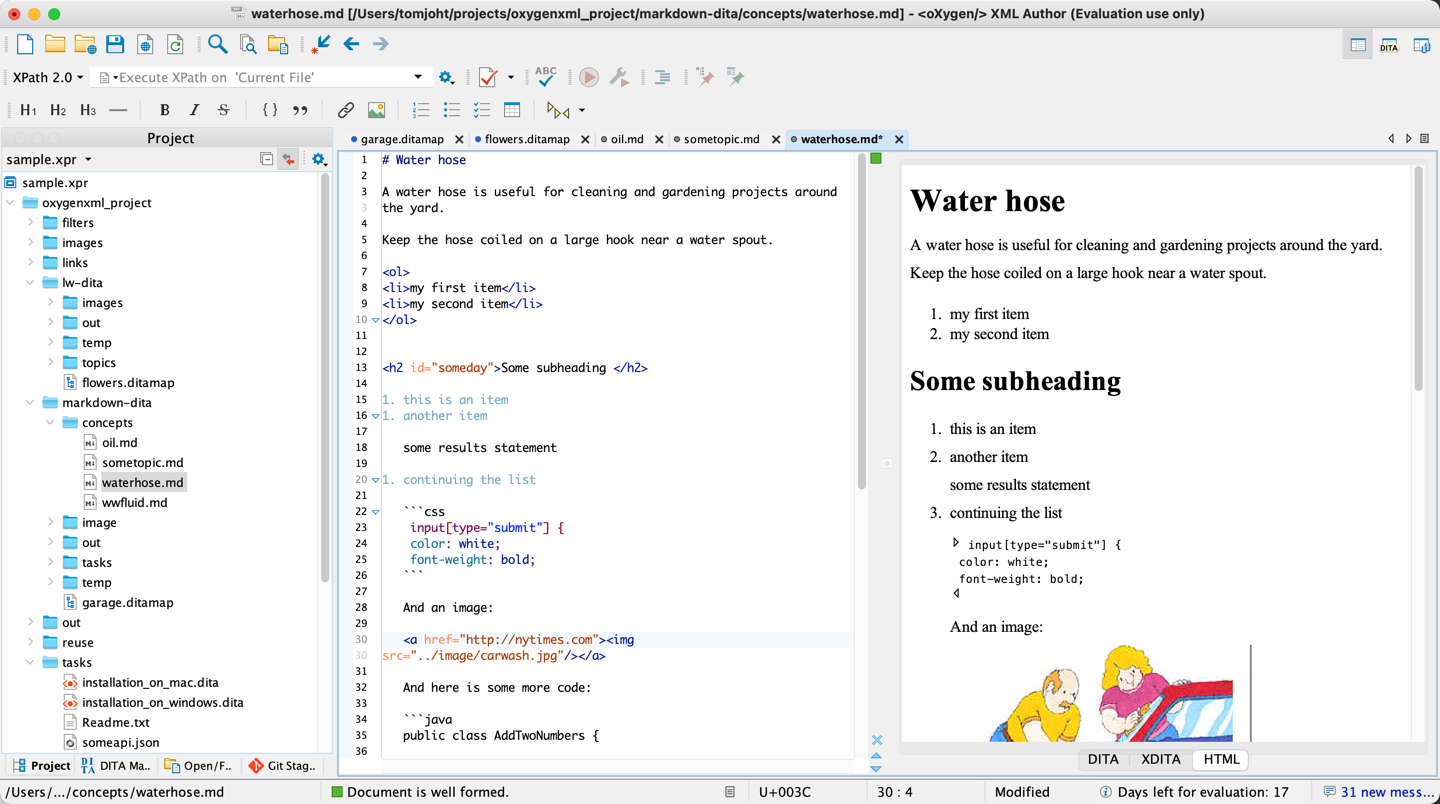
If you want, you can turn off the HTML preview by right-clicking the preview pane and choosing Hide preview. (You toggle it back on by right-clicking the main window and choosing Show Preview.) You might disable the preview to give you more space to work in the editor, and also to speed up file loading times. Oxygen XML’s editor has a lot of panels that you can undock and rearrange as desired.
In the code view, syntax highlighting colors different parts of the Markdown text to make it more readable. Even some code languages have syntax highlighting directly in the Markdown editor. (The output has full syntax highlighting across code languages.)
In the Project pane on the left, you can also switch to the DITA Map Manager to visually arrange your DITA map, which determines your sidebar navigation. The following screenshot shows how you can either work directly with the DITA map using XML tags or by dragging and dropping the topics in the hierarchical arrangement using the DITA Maps Manager. The Manager gives you a more visual tool to see how topics are nested.
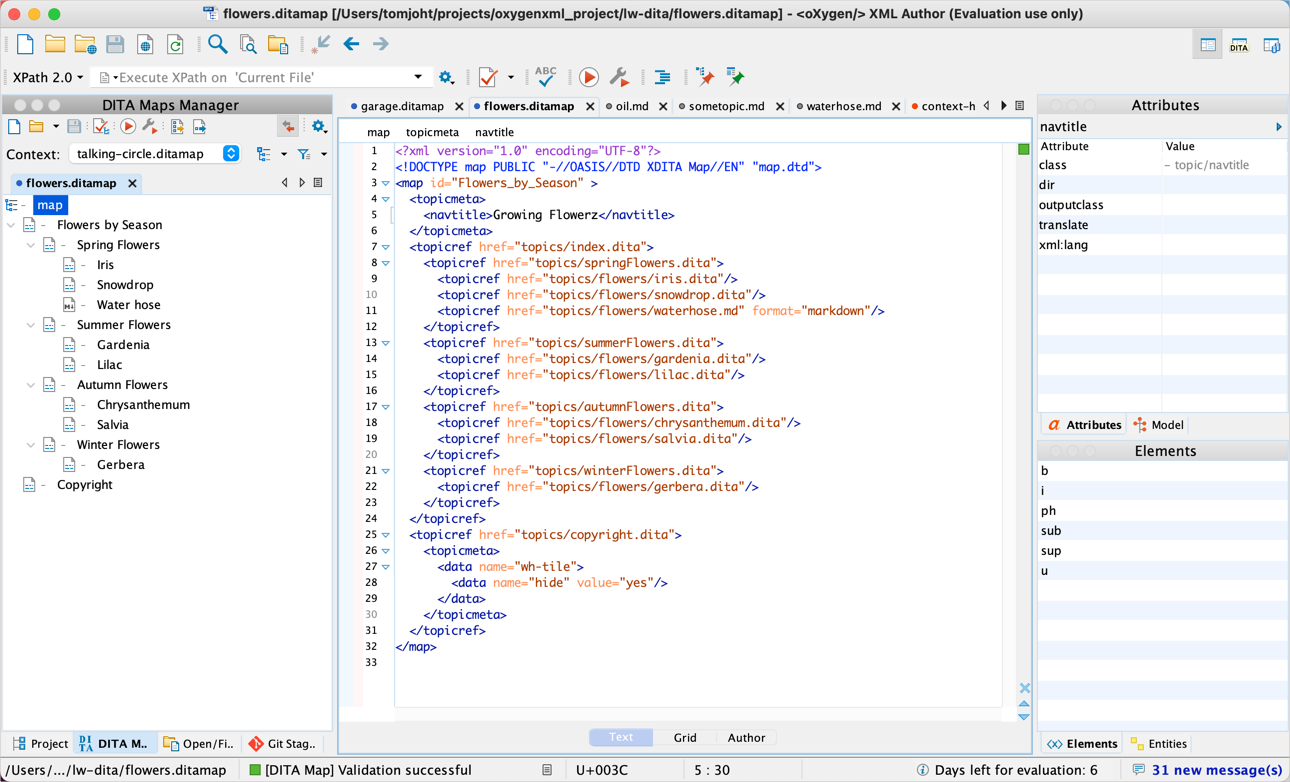
The ability to visually arrange the topics in the DITA Maps Manager is a huge convenience because you can see at a glance how the sidebar navigation will appear, without building your output. Some other docs-as-code tools rely on YAML frontmatter tags or a YAML file itself to manage sidebar navigation, which can be prone to error and extremely fussy with syntax, especially when you have hundreds of topics in your project. (For example, one extra space in a YAML file can cause the required indentation to be malformed.)
Overall, Oxygen XML lets you choose either a direct text editing experience (working in the code) or a visual editor experience, depending on your preference. You can switch back and forth between modes seamlessly, saving a file to see the updates populate into the other view.
Git client integration
Because the Oxygen XML files are all text files, you can manage the content in Git. (In contrast, binary files that are machine-readable can’t be managed in Git.) Although you could manage your Oxygen XML files with Git using your external terminal, Oxygen XML also provides integration with Git directly in the Oxygen XML editor through the Git Client Add-on.
Staging and committing files
When you add the Git Client Add-on, a new Git Staging panel appears in the left pane:
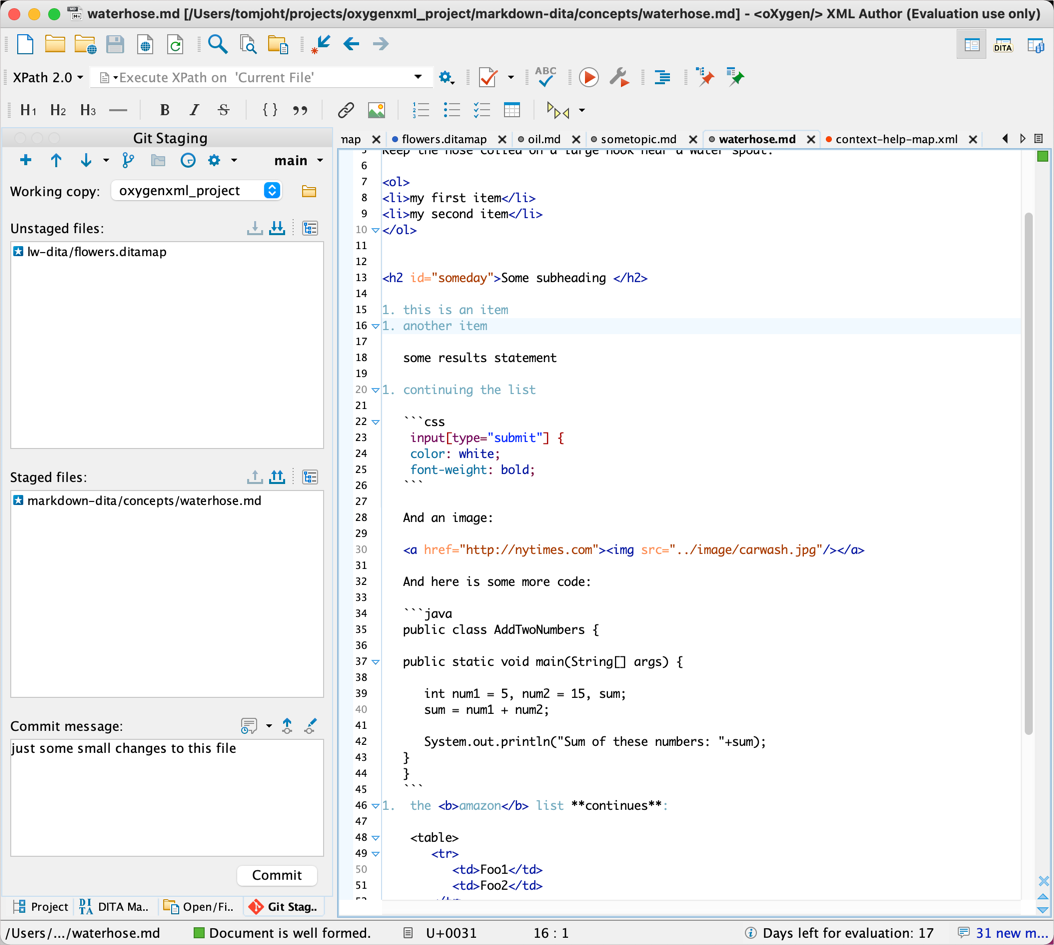
The “Unstaged files” section shows changes you’ve made to files that haven’t been added to the staging area in Git. After selecting the files to stage, click the Stage selected arrow ![]() to move it into your staging directory. (Moving these files into the staging area is the equivalent of running
to move it into your staging directory. (Moving these files into the staging area is the equivalent of running git add <filename> in the terminal.) The file then appears under Staged files and will be pushed to your Git repository on the next commit.
To commit the files, type a commit message and click Commit. (This is the equivalent of typing git commit -m 'some message' in the terminal.)
Viewing Git history
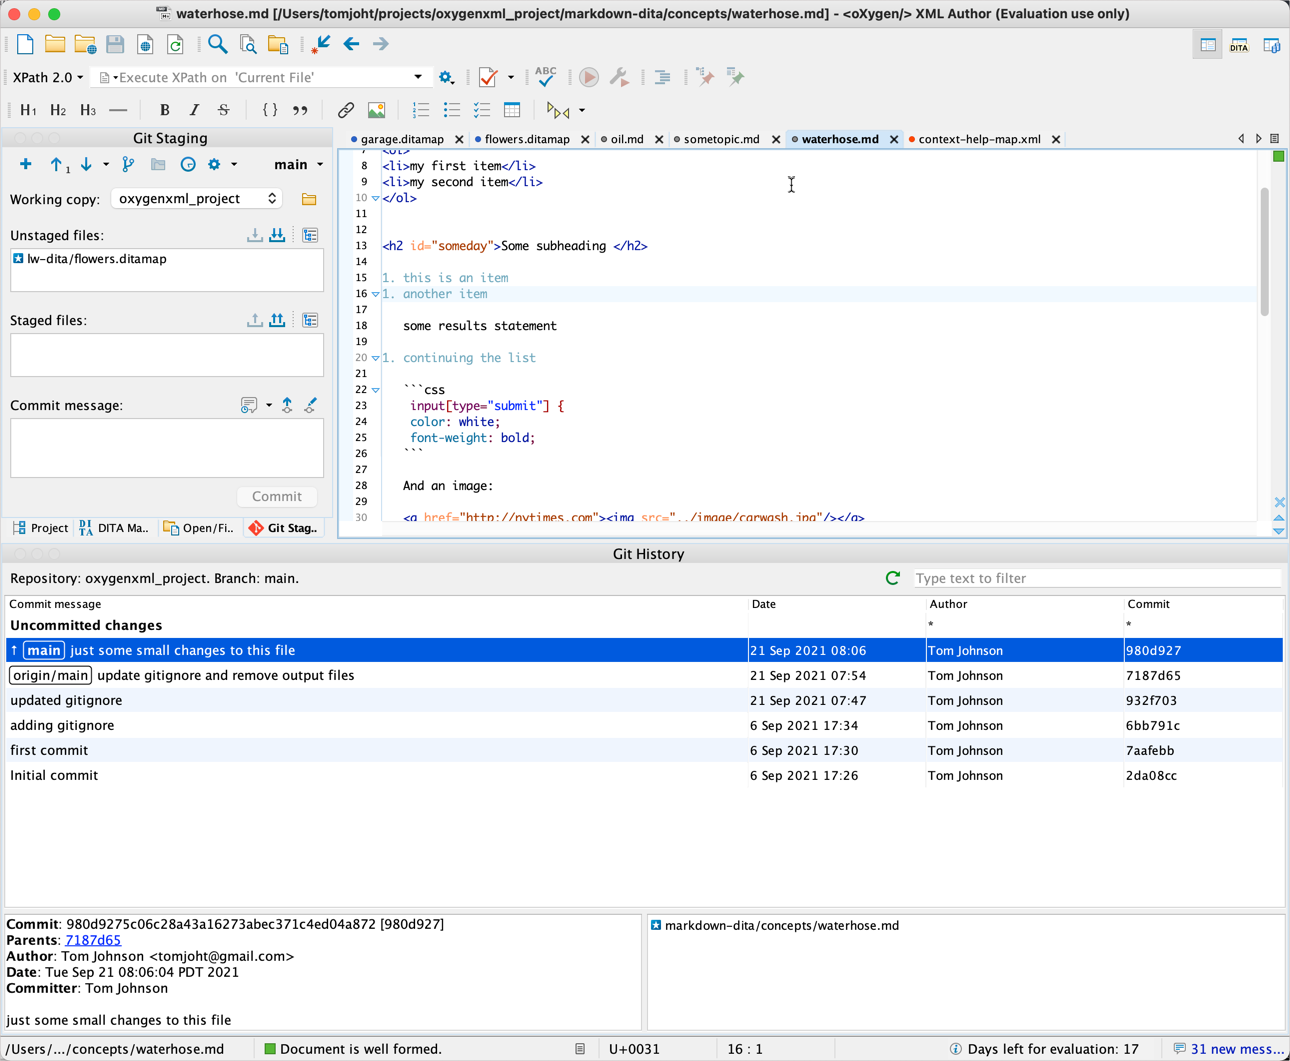
Oxygen XML also has additional views for seeing Git history, managing Git branches, and more. For example, to look at the history of commits, go to Window > Show View > Git History. A list of commits then appears in a commit log in the bottom panel:
Managing Git branches
There’s also a Git Branch Manager view that lets you see all the branches and check out a specific branch. Note that the Git functionality within the Git add-on client in Oxygen XML isn’t comprehensive, especially with branch management. For example, while you can create and delete branches, to push these local branches upstream to your remote repository, you’d need to run a command from a terminal (for example, git push --set-upstream origin branchname). Also, Oxygen XML doesn’t open a terminal directly in the editor. But for the most common Git tasks, the integration is convenient and easy to understand.
Overall, the Git functionality within Oxygen XML brings the most common Git workflows right into your editor, making the authoring experience more seamless and integrated.
More docs-as-code features with Oxygen XML
We’ve covered only a few aspects of docs-as-code tools, namely, Markdown format with text files, and content management with Git. For more details about using Oxygen XML as a docs-as-code tool, see this webinar: Docs as Code - Documentation Management Inspired by Software Development” presented by Alex Jitianu.
The webinar covers ways to store and manage issues with GitHub, how to automate quality checks, how to set up continuous delivery and publishing with Travis CI, ways to collaborate with editing and reviews, and more.
If you’ve never heard the phrase “docs as code,” see Doc-as-code tools for a full description of what this entails. In short, you use the same general tools and workflows to author, manage, and publish documentation as developers use to write code.
Other reasons to explore Oxygen XML
Beyond the docs-as-code features described above, there are other reasons to explore Oxygen XML. Some of these reasons I selected because of my experience in implementing Jekyll while at Amazon. Some features didn’t seem like a big deal at the time (I told myself, we’ll figure it out later) but they proved to be extremely challenging. These features include customizing the theme, generating PDFs, round-tripping translation workflows, and avoiding the temptation to script everything.
Responsive HTML5 webhelp
One advantage in using Oxygen XML is the many readily available outputs for your content, especially the webhelp output and PDF. If you select a ditamap file in your project and then click the Apply Transformation Scenario(s) button  , you can see the available outputs:
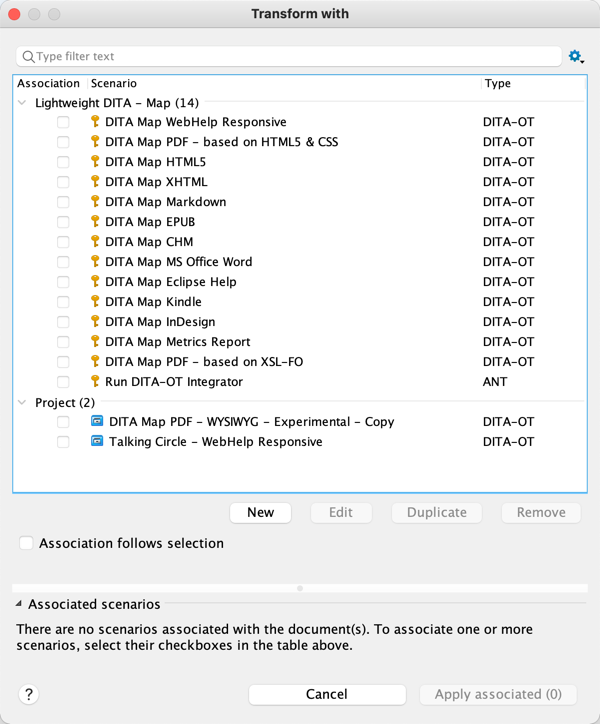
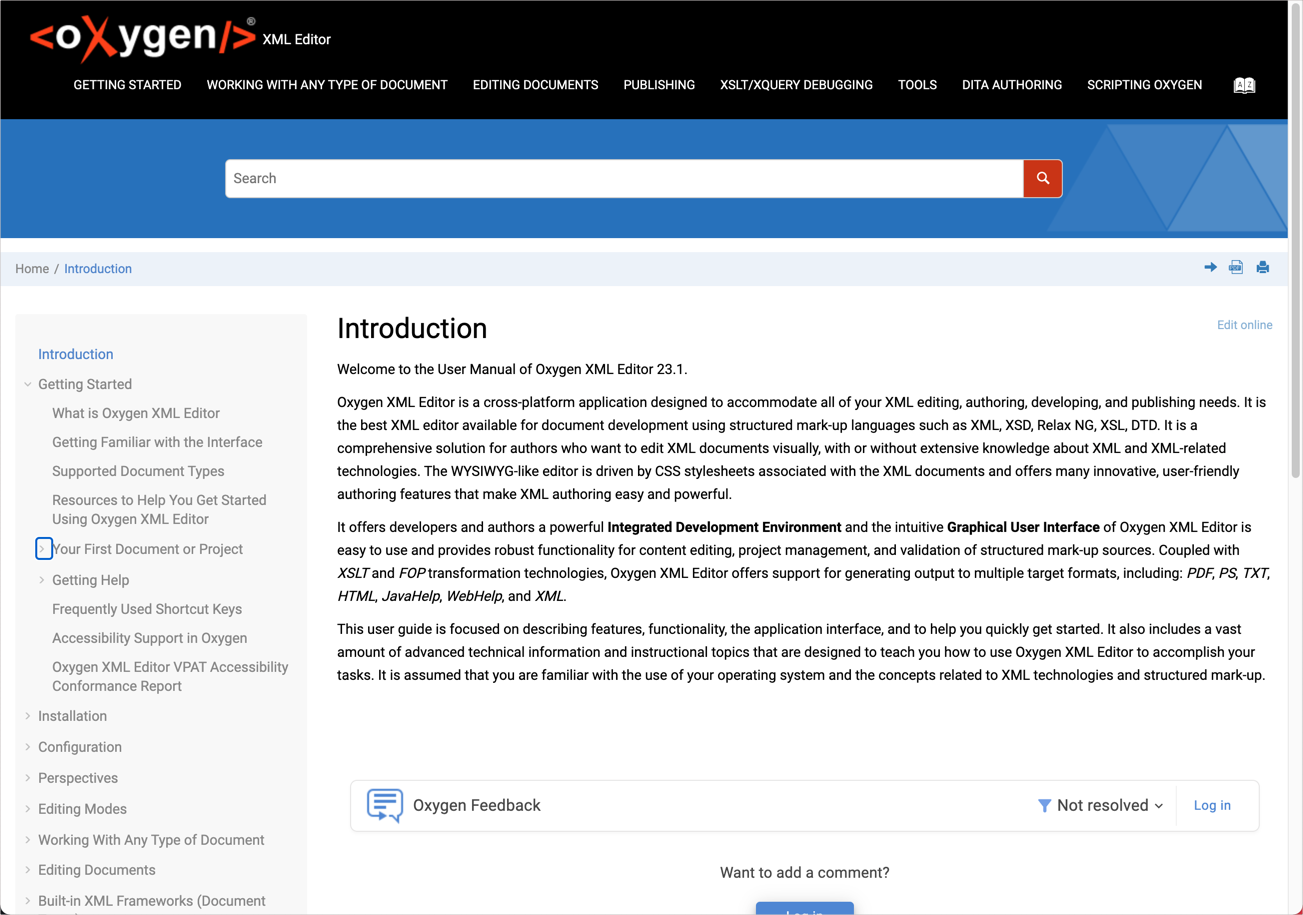
The default webhelp output for Oxygen looks pretty good, and you can see an example with Oxygen XML’s own documentation.
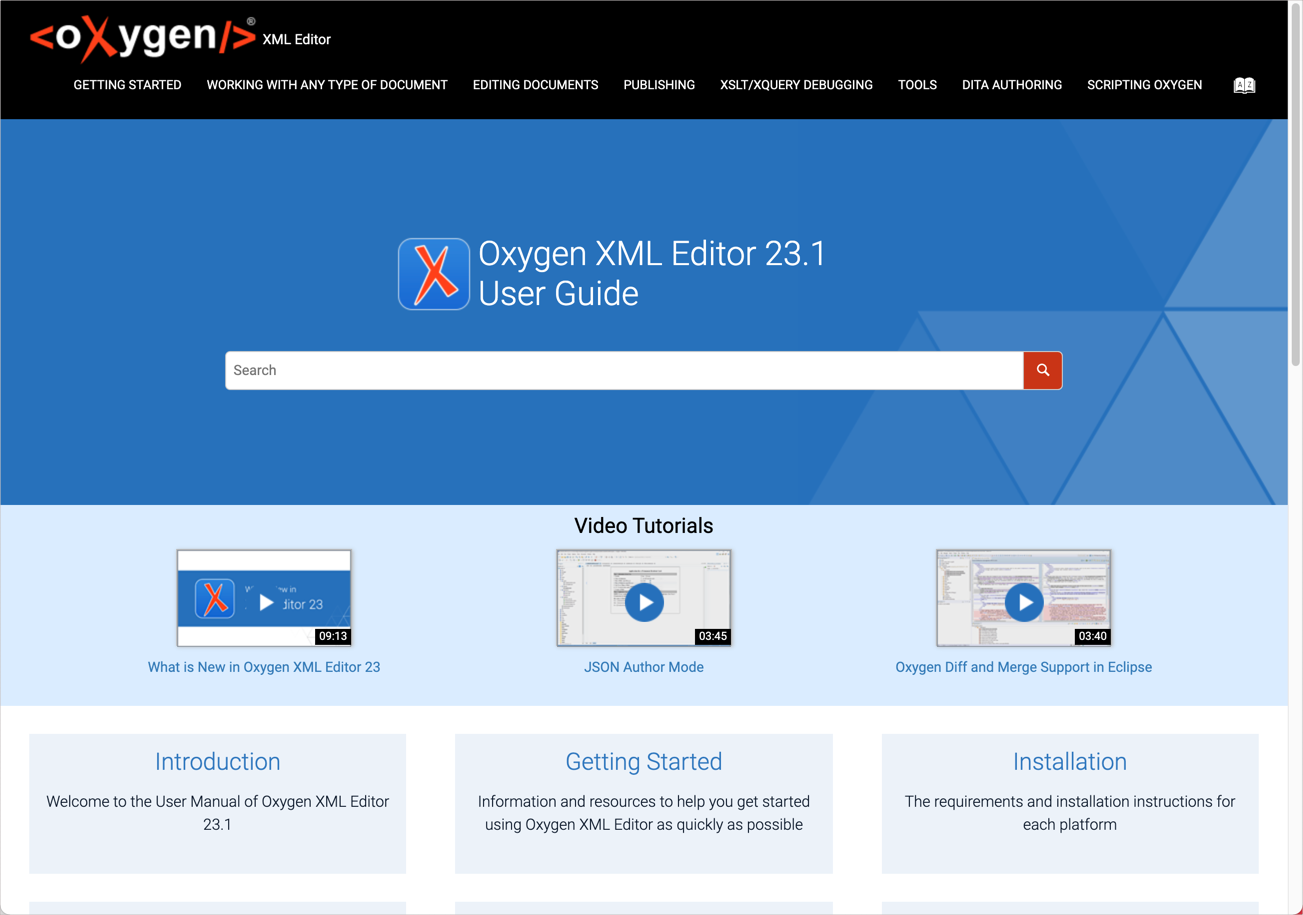
You can click into a topic area to see its own navigation. Breadcrumbs are included, and if you resize the browser smaller, you can see the responsive elements kick in.
In contrast, if you go with another static site generator, you’ll likely have to do a lot of custom UX theming on your own to make the output more documentation-oriented rather than a general website. This customization will require you to be familiar not only with front-end technologies like JavaScript, CSS, and HTML, but the specific templating language of the static site generator. Usually, for companies that decide to create a custom theme, an engineering team and UX designer create this output. (If tech writers do it, their productivity with writing docs tends to plummet.)
Search
Search can also be a huge challenge with docs-as-code tools. Most static site generators don’t include search by default but rather require you to integrate Algolia, Swiftype, or another third-party search service. Some free search engines like Lunr are available, but they are often problematic and don’t scale.
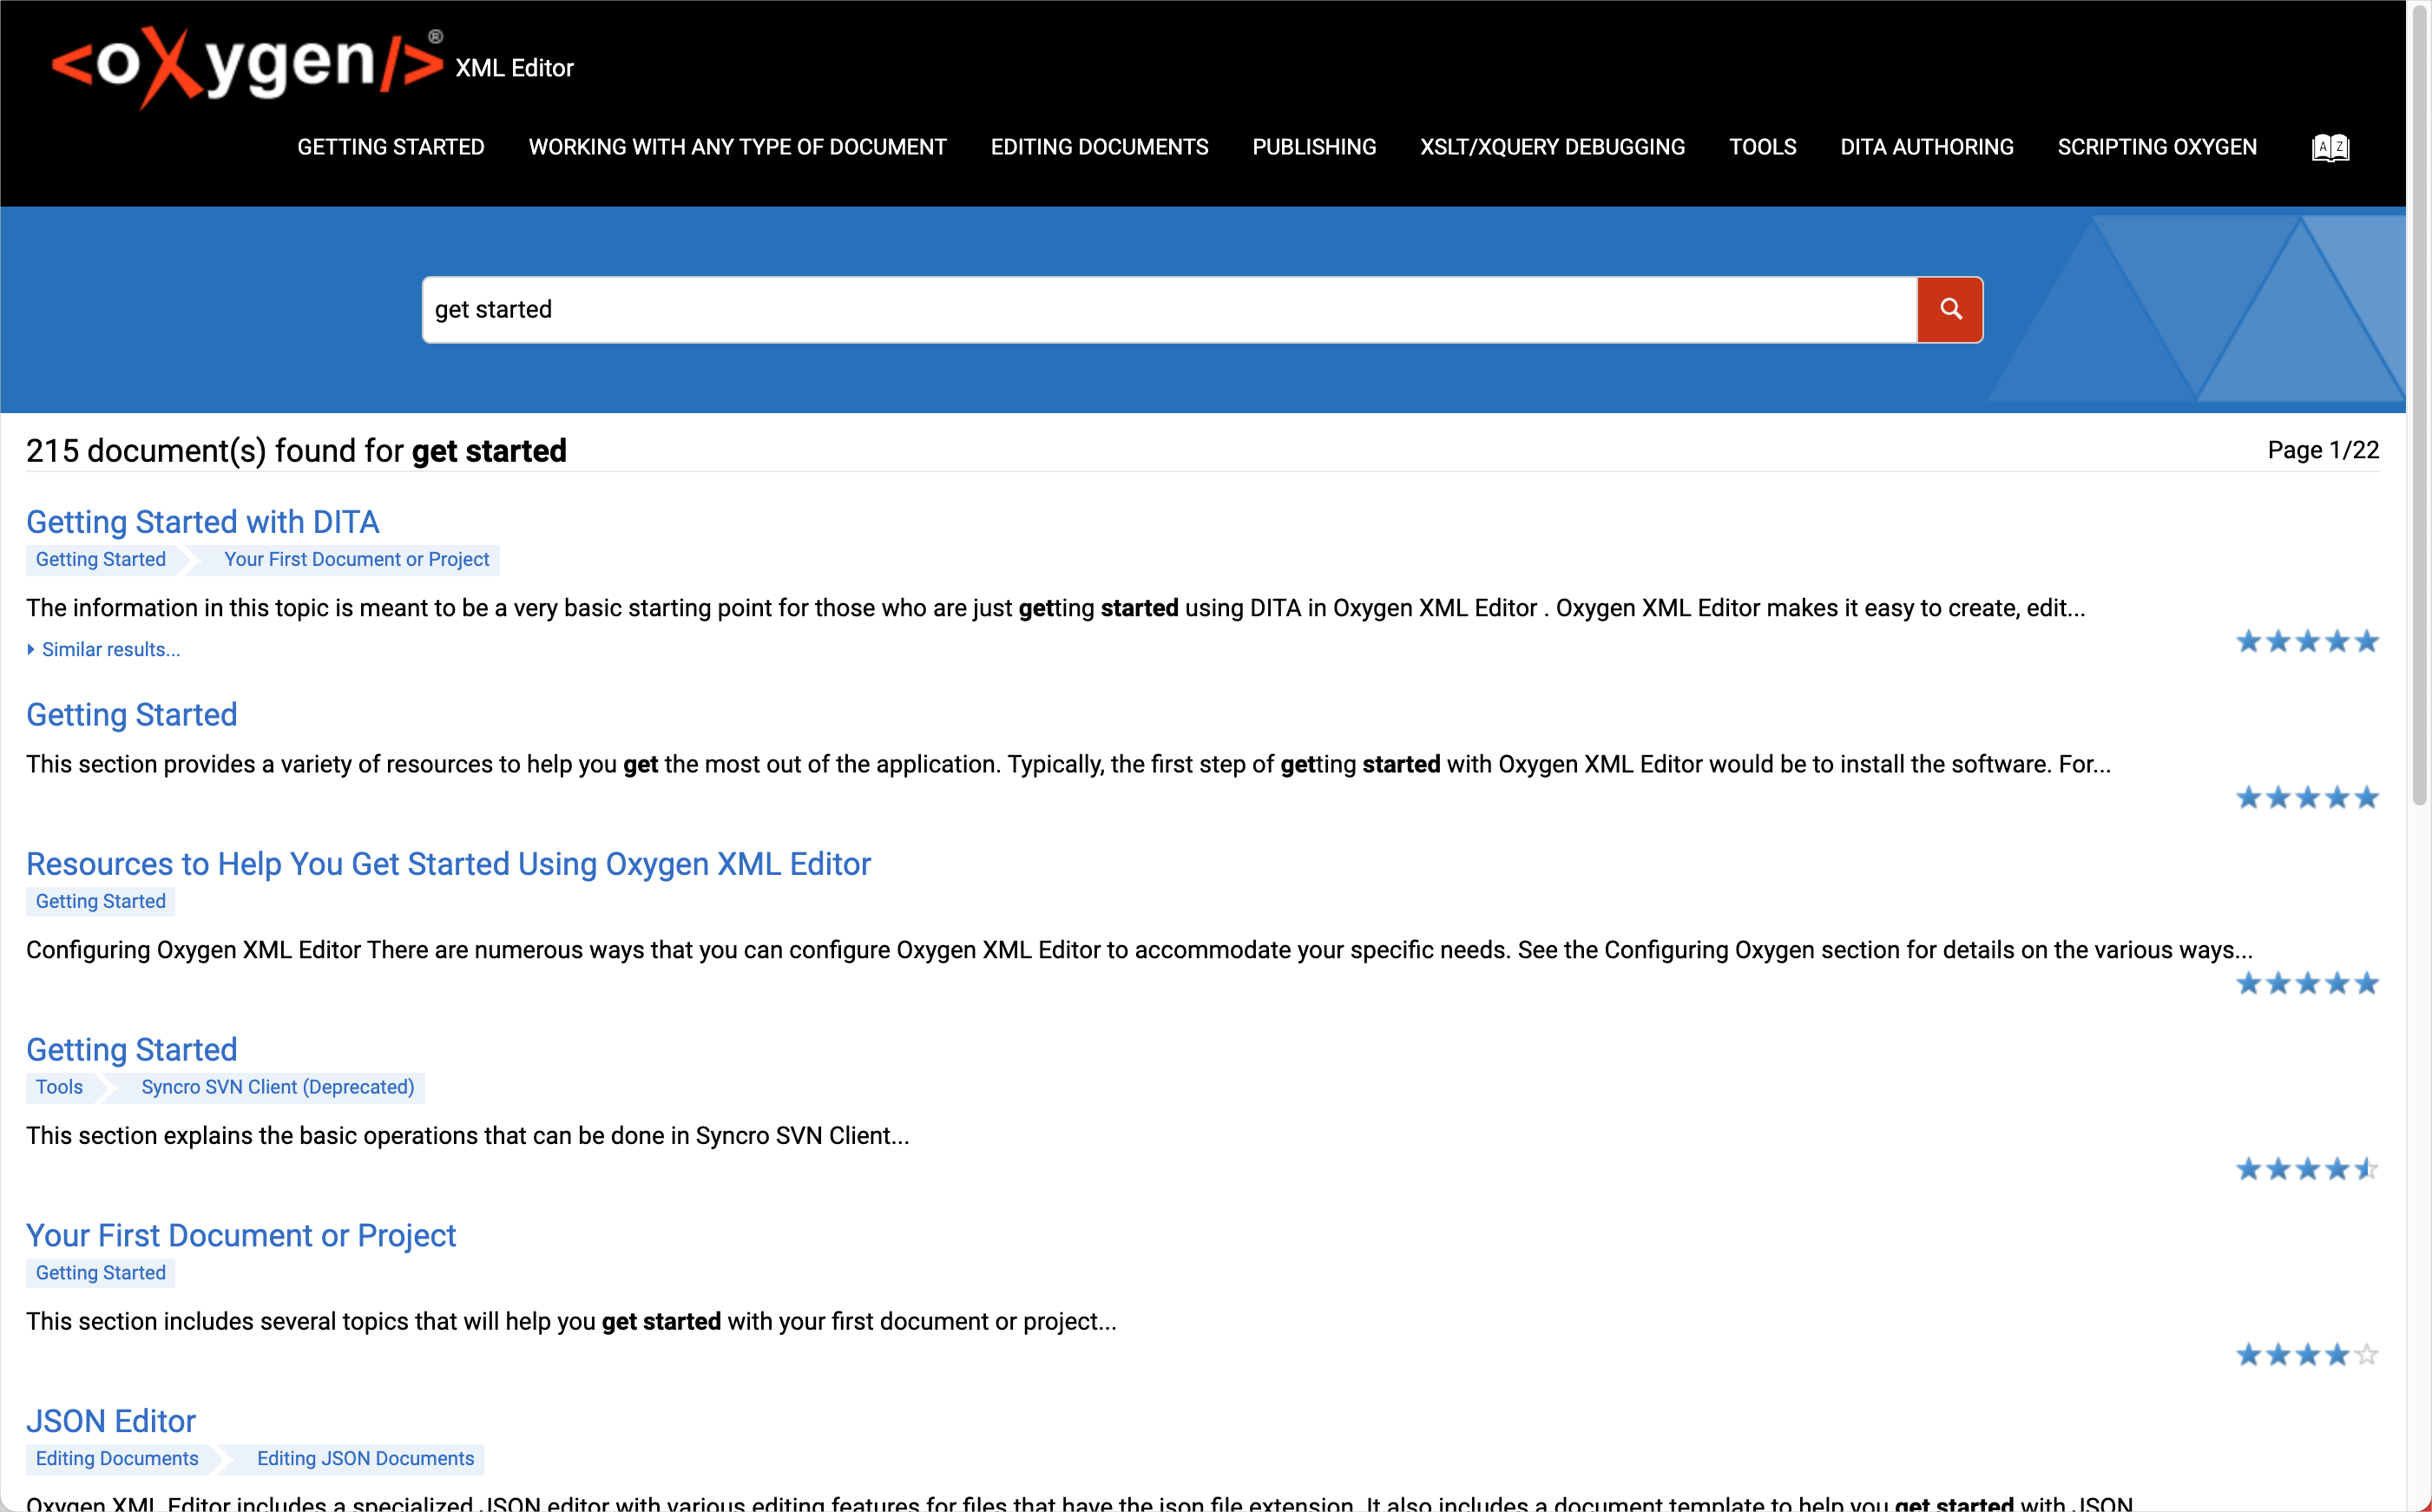
With Oxygen XML, you get robust search right out of the box. The search results even include breadcrumbs below topic titles so you can see the context. For example, suppose you search for “get started,” and the results show half a dozen getting started tutorials in your dev portal. In this case, you’d want to see more context about the getting started topics so you can select the right tutorial.
If you want to swap in your own search engine, you can replace the default search with a custom search engine.
PDF output
Although it might seem like PDF is an outdated mode for delivering docs, PDF is still needed in many documentation scenarios, especially for providing docs to early access partners. Many times when you’re writing docs, you need to send the topic to an early access partner, excluding the topic from the rest of your docs until the feature is ready. Other times, PDFs are needed to send to partners who haven’t signed contracts yet (and hence can’t get access to your developer portal) but who want to preview the docs to gauge the level of integration complexity.
Integrating PDF output in other docs-as-code tools typically involves using external tools such as Prince or open-source PDF generators (which require their own styling and configuration). This can be a huge headache and hassle to deal with. With Oxygen XML, the PDF is included already and attractively styled.
If you want to customize the PDF, you can do so using CSS, which is more accessible and familiar, rather than XSLT. The Oxygen Styles Basket allows you to build your own CSS skin used for both PDF and webhelp output.
Translation support
Finally, one often overlooked but significant feature is translation. If you anticipate the need to translate your content, consider how you will handle this workflow long before you decide on your authoring tool. A cumbersome translation workflow can be a huge time drain, especially if you have goals to keep your translated content in sync with your primary language. Translation is usually where static site generators hit their first major stumbling block.
Translation processes and requirements vary depending on the content and vendor, but the general process for translating content involves bundling up the files you want translated (either XML, HTML, or Markdown format), sending them off to the vendor, and then getting these same files back, but with translated content. You then need to reimport the translated content back into your project. With Oxygen XML, you can manage translation tasks using the DITA Translation Package Builder Add-on.
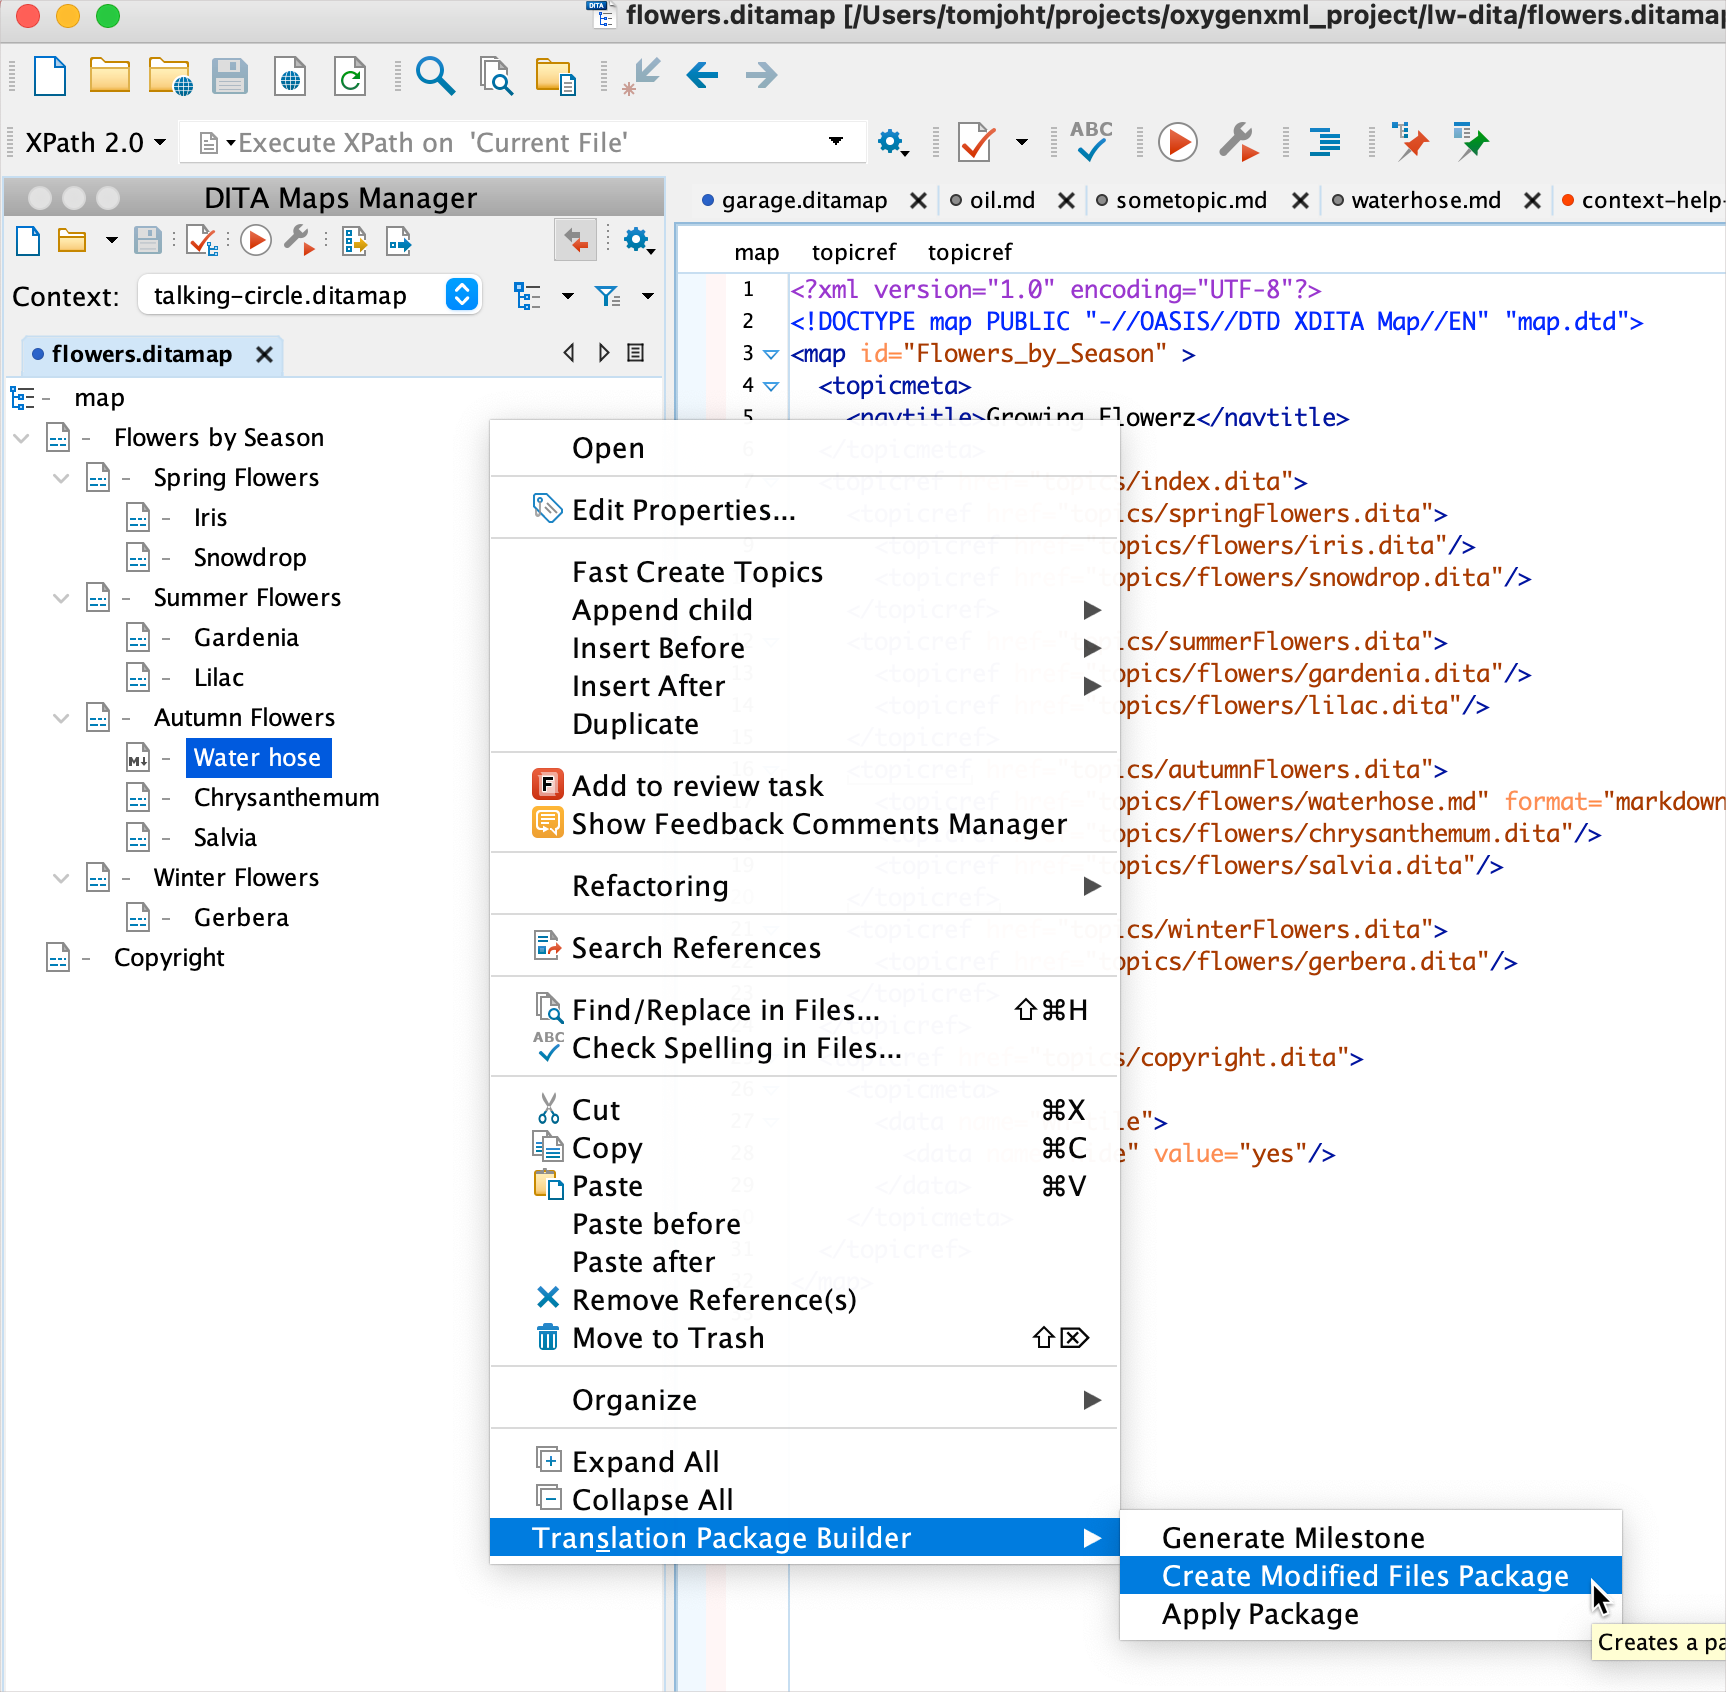
When you install the add-on in Oxygen XML, you can create “milestones” that are snapshots in time for your project that future changes are compared against. After creating a milestone, you can package up only the files changed after that milestone, or you can package up all files. Most translation vendors have translation memory in their databases that will only detect changes. (However, practices and support for translation memory vary, and you might want to just send the changed files.)
If you make use of the conref (content reuse) and keyref (naming variables) in your content, you might reduce translation costs. But also, because Oxygen XML enforces the language standards, when you submit the content to the vendor, they won’t require handholding with custom code. The ability to quickly package up all content files can streamline your translation workflows.
Standard Markdown and HTML formats
Many static site generators (Jekyll, Hugo, Vuepress, Eleventy, Gatsby, Docusaurus, and more) use a scripting language (for example, Liquid, Jinja) that you can also use in your Markdown or HTML pages to create custom functions or templates. For example, with Jekyll, you can store data in YAML files and then build Liquid functions to parse through the data.
Using custom functions in your docs might seem attractive at first, as this gives you more flexibility to build custom solutions around your content. However, with time, these projects become filled with custom code by many different writers, with convoluted logic that becomes forgotten, and pretty soon you’re locked into that tool and theme. For example, when I left Amazon after 5 years, I had to make more than a dozen videos where I attempted to explain what this or that script was doing, why I created it, how to use it, etc.
In contrast, Oxygen XML is more standards-based. (This is part of the whole selling point of XML, in fact.) You write in Markdown, DITA, HTML, or some other standard. And then Oxygen XML validates your content before publishing.
With Oxygen XML, you can do some additional validation on the Markdown formatting through Schematron. Schematron allows you to check your docs against a list of formatting patterns and rules. Oxygen XML includes some basic Schematron rules out of the box (see /samples/markdown/schematron-validation/ in the sample project), and you can add more as well.
But the larger point here is that your Oxygen XML projects will stick more closely to the standards of the language you’re writing in. This can keep your content more consistent and structured, and if you ever decide to use another tool or theme, your standards-based content can easily migrate.
First steps with Oxygen XML
To get started with Oxygen XML, download a 30-day trial. When you open Oxygen XML for the first time, a sample project will load. Explore the files in the Markdown folders. Click the .ditamap file and then click the Apply Transformation Scenarios button and build the output. Explore editing topics within the text editor and previewing the Markdown. If you need help, there are Oxygen XML forums that are actively monitored.
Conclusion
Oxygen XML provides robust support for nearly every documentation scenario and is built from the ground up for technical writers and others creating documentation. Because of that design, you’ll feel at home with many of the features and functionality.
The ability to scale and connect into larger systems for managing content is one of the reasons tech pubs groups choose Oxygen XML. Now with the support for Markdown, integration with Git, and other docs-as-code features, Oxygen XML can be a great choice for writing developer docs as well.
Additional resources
Here are some additional resources that might be useful, especially if you’re new to content re-use with Oxygen XML and DITA:
- Getting Started with Oxygen and DITA
- Basic DITA Profiling and Reuse
- Advanced DITA Profiling and Reuse
See also the Oxygen Content Fusion add-on, which allows writers using Oxygen XML Author to create review tasks. The content can be reviewed by subject matter experts directly from a web browser (see a video here).
About Tom Johnson

I'm an API technical writer based in the Seattle area. On this blog, I write about topics related to technical writing and communication — such as software documentation, API documentation, AI, information architecture, content strategy, writing processes, plain language, tech comm careers, and more. Check out my API documentation course if you're looking for more info about documenting APIs. Or see my posts on AI and AI course section for more on the latest in AI and tech comm.
If you're a technical writer and want to keep on top of the latest trends in the tech comm, be sure to subscribe to email updates below. You can also learn more about me or contact me. Finally, note that the opinions I express on my blog are my own points of view, not that of my employer.
113/168 pages complete. Only 55 more pages to go.