

Get event information using the Eventbrite API
Use the Eventbrite API to get the event title and description of an event.
- About Eventbrite
- 1. Get an OAuth token
- 2. Determine the resource and endpoint you need
- 3. Construct the request
- 4. Get the jQuery AJAX code for the request
- 5. Customize the response on the page
- Code explanation
About Eventbrite
Eventbrite is an event management tool, and you can interact with it through an API to pull out the event information you want. In this example, you’ll use the Eventbrite API to print a description of an event to your page.
1. Get an OAuth token
Eventbrite uses the OAuth method for authorization. To make any kind of requests, you’ll need an OAuth token, which you can learn about in Eventbrite’s Authentication docs.
If you want to sign up for your own token, first sign in to Eventbrite, and then create and register your app here. After you create your app, click Show Client Secret and OAuth Token and copy the “Anonymous access OAuth token.”
2. Determine the resource and endpoint you need
The Eventbrite API documentation is available at https://www.eventbrite.com/platform/api/. Look through the endpoints available (listed under “Reference” in the sidebar). Which endpoint should we use?
To get event information, we’ll use the event object, which “represents an Eventbrite Event.” (The Eventbrite API uses the term “objects” instead of resources.”) Specifically, we’ll use Retrieve. The only parameter we need to pass is the event ID.
3. Construct the request
Although Eventbrite explains how to pass the authorization into requests, it’s easier to use the prebuilt curl from the documentation code samples, and then use Postman to convert it to JavaScript jQuery AJAX.
Eventbrite’s documentation uses Apiary, which provides a try-it-out feature (or API explorer) in the right pane. This pane opens up when you click Retrieve an Event:
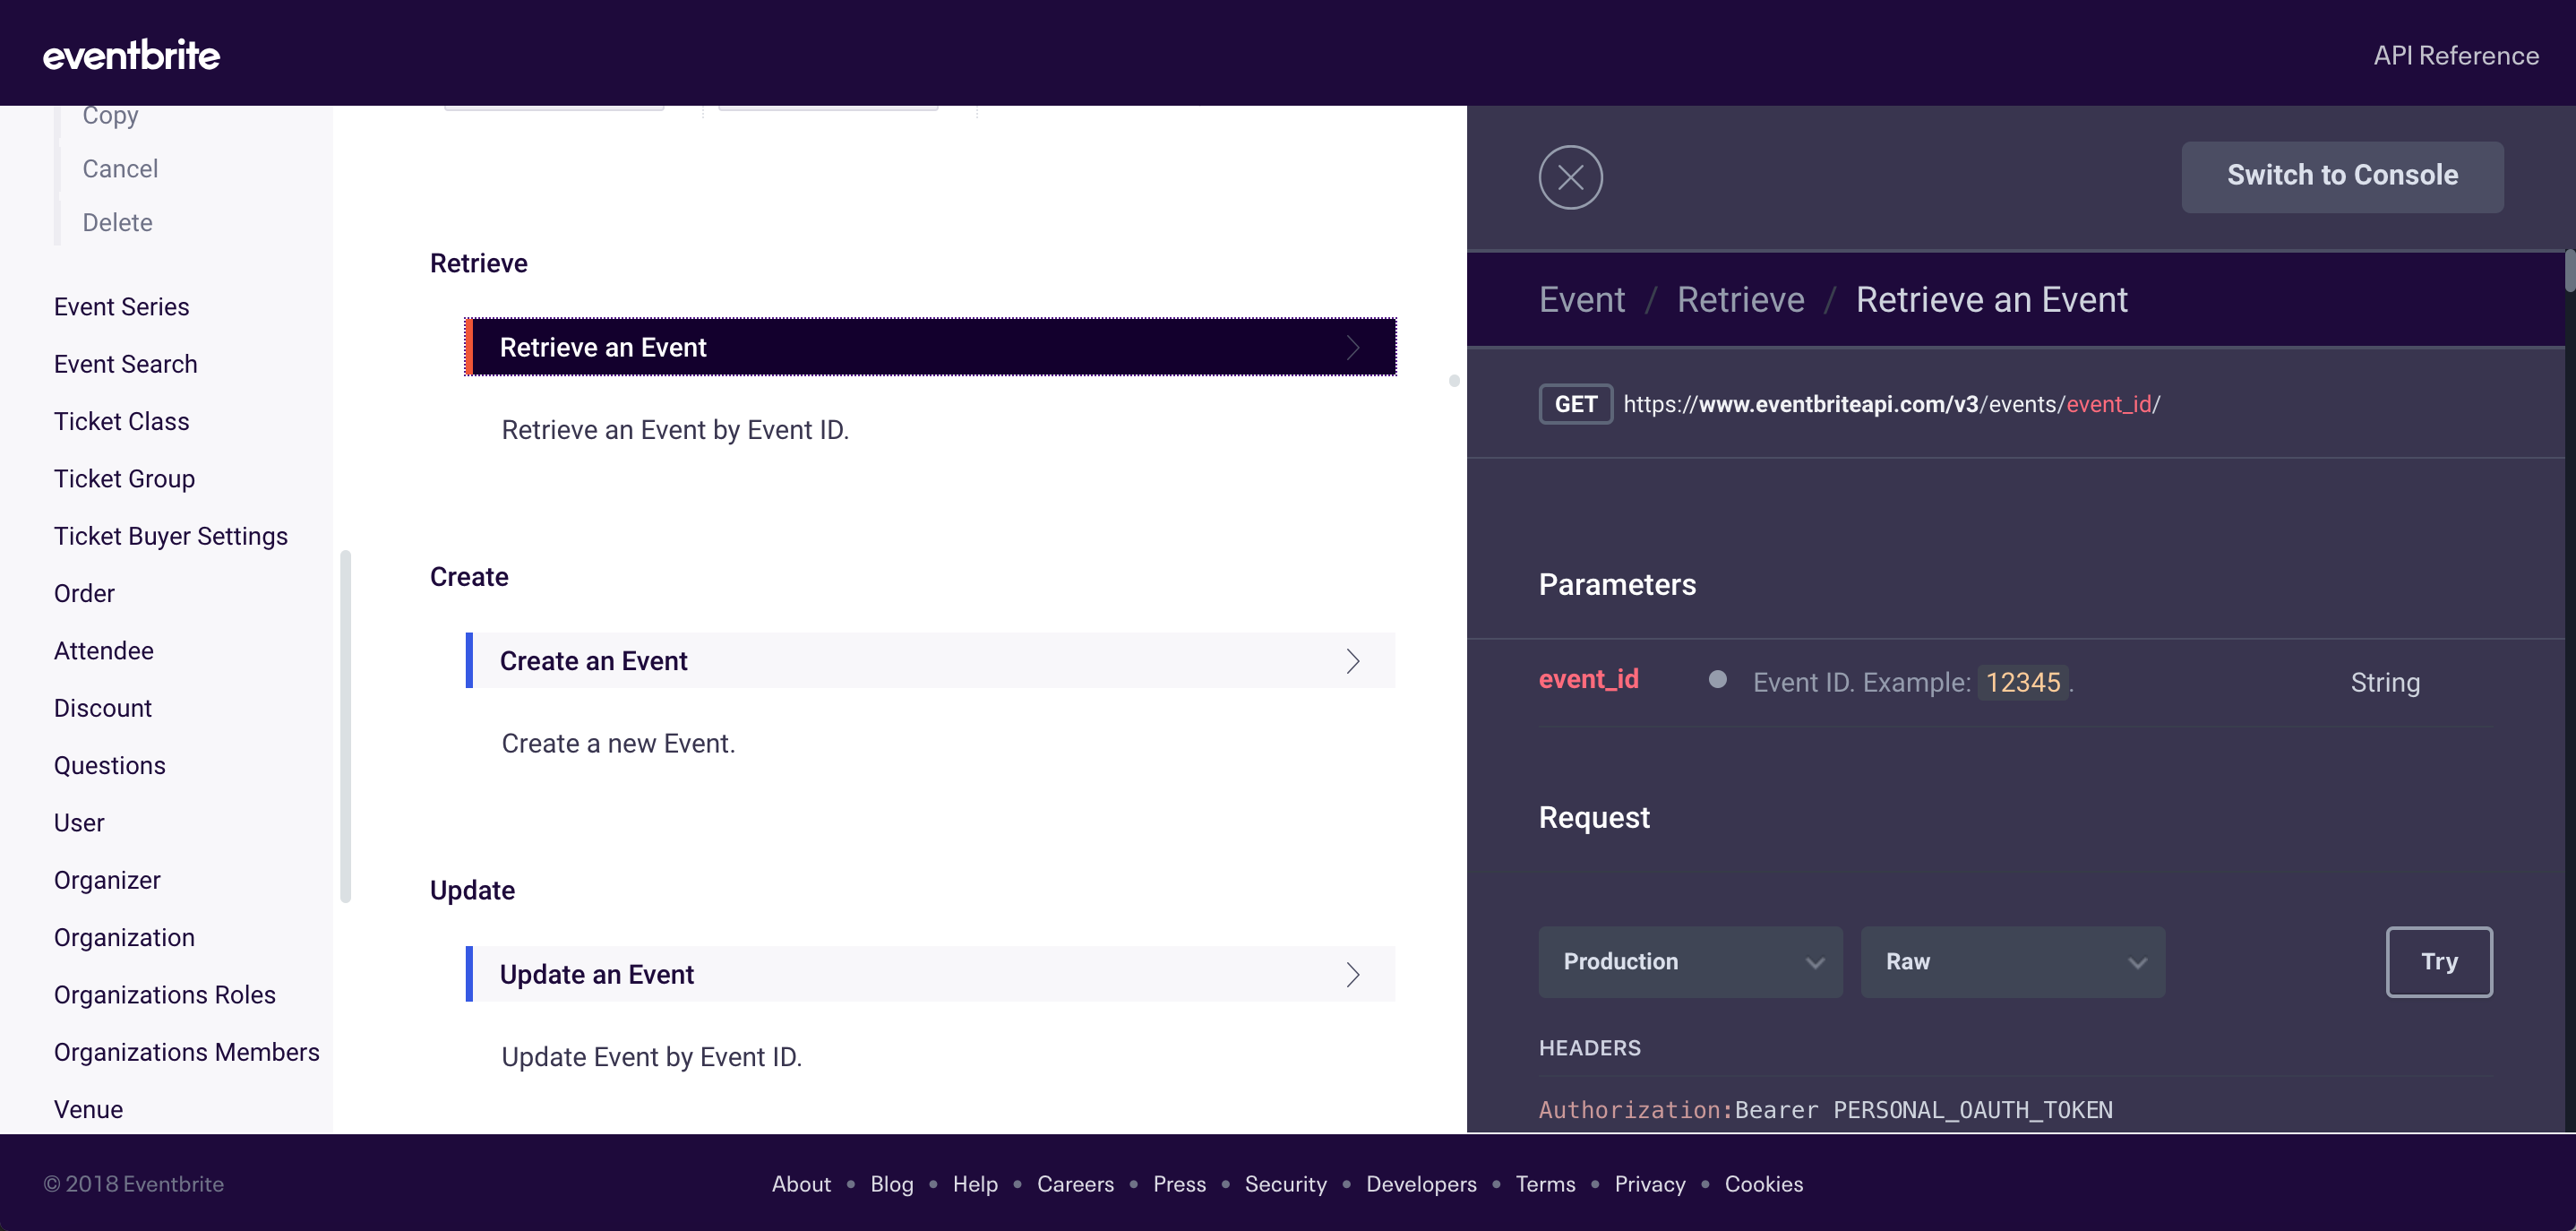
In the Console pane on the right, click the Try button to enable the ability to call the resource (if the Call Resource button isn’t already shown).
Before you can call the resource successfully, do the following:
- Click the URI Parameters tab and customize the value for the event ID to
49216045517. This ID corresponds to a workshop I recently gave called Documenting REST APIs, which you can view here. The event ID appears in the URL. - Click the Headers tab and add your own OAuth token in place of
PERSONAL_OAUTH_TOKEN.
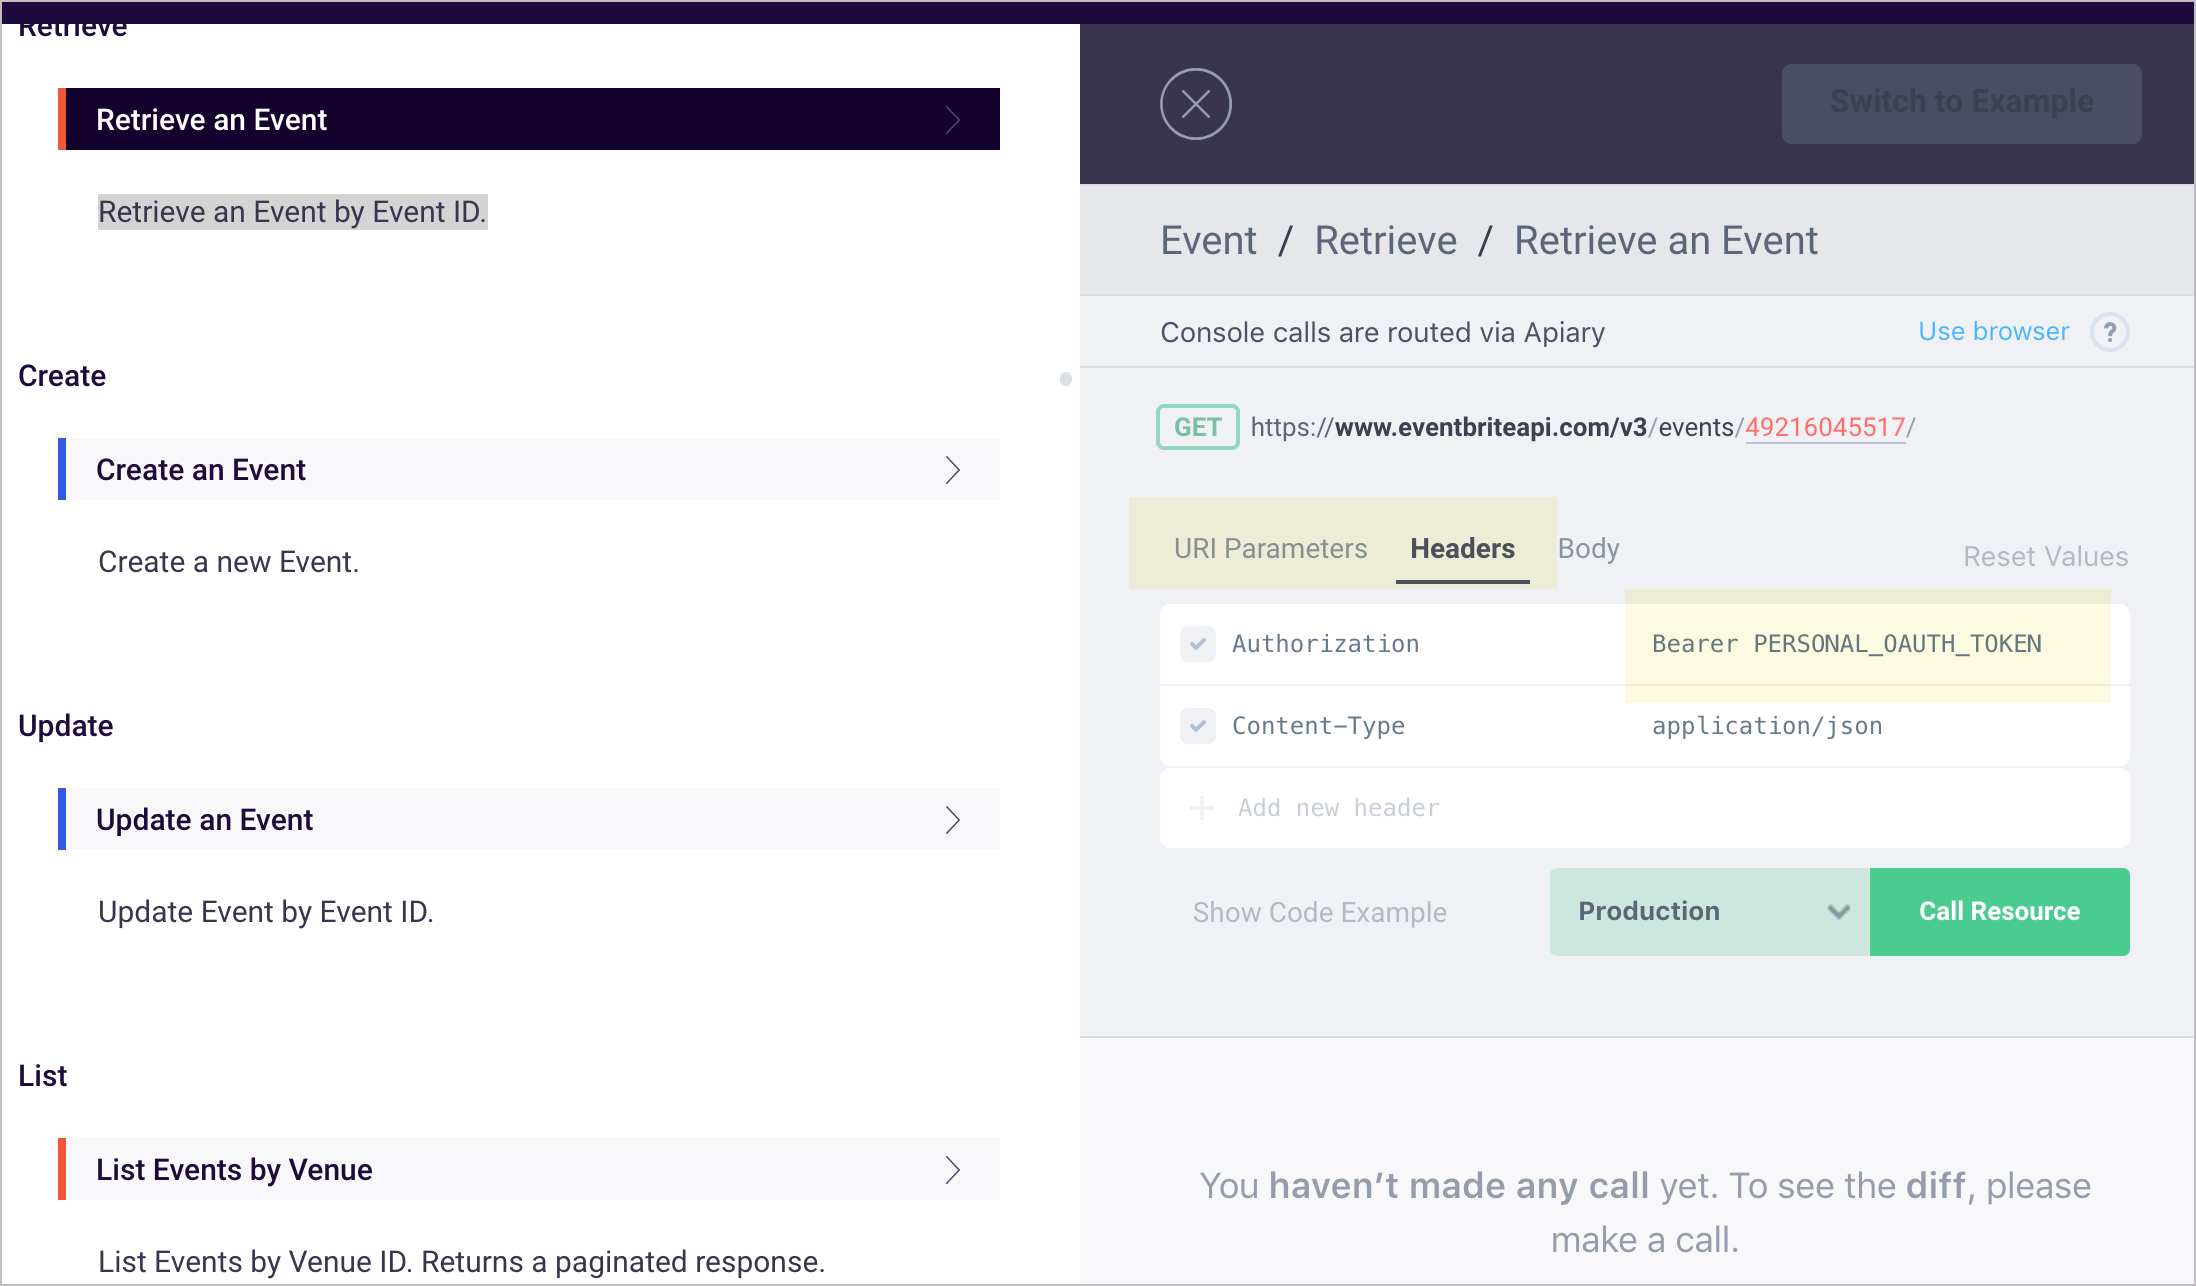
Click the Call Resource button and then scroll down to the Response Body section to observe the response. It should contain the body text for the Eventbrite page. (If there’s an error with the OAuth token or event ID, you’ll see an error response instead.)
4. Get the jQuery AJAX code for the request
We retrieved the response. Now for fun let’s print the response to the page (as if we were promoting the event on our own site).
In the Console pane, below the parameters section, click Show Code Example:
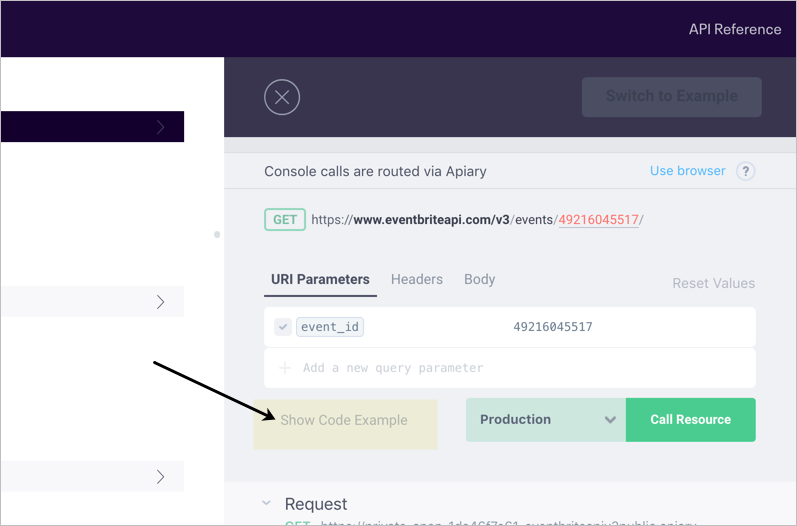
In the language drop-down that appears, select the cURL option and copy the value. It should look something like this:
curl --include \
     --header "Authorization: Bearer IO6EB7MM6TSCIL2TIOHC" \
     --header "Content-Type: application/json" \
  'https://www.eventbriteapi.com/v3/events/49216045517/'
Open up Postman. In Postman, go to File > Import and then select the Paste Raw Text tab. Paste in the cURL code you copied.
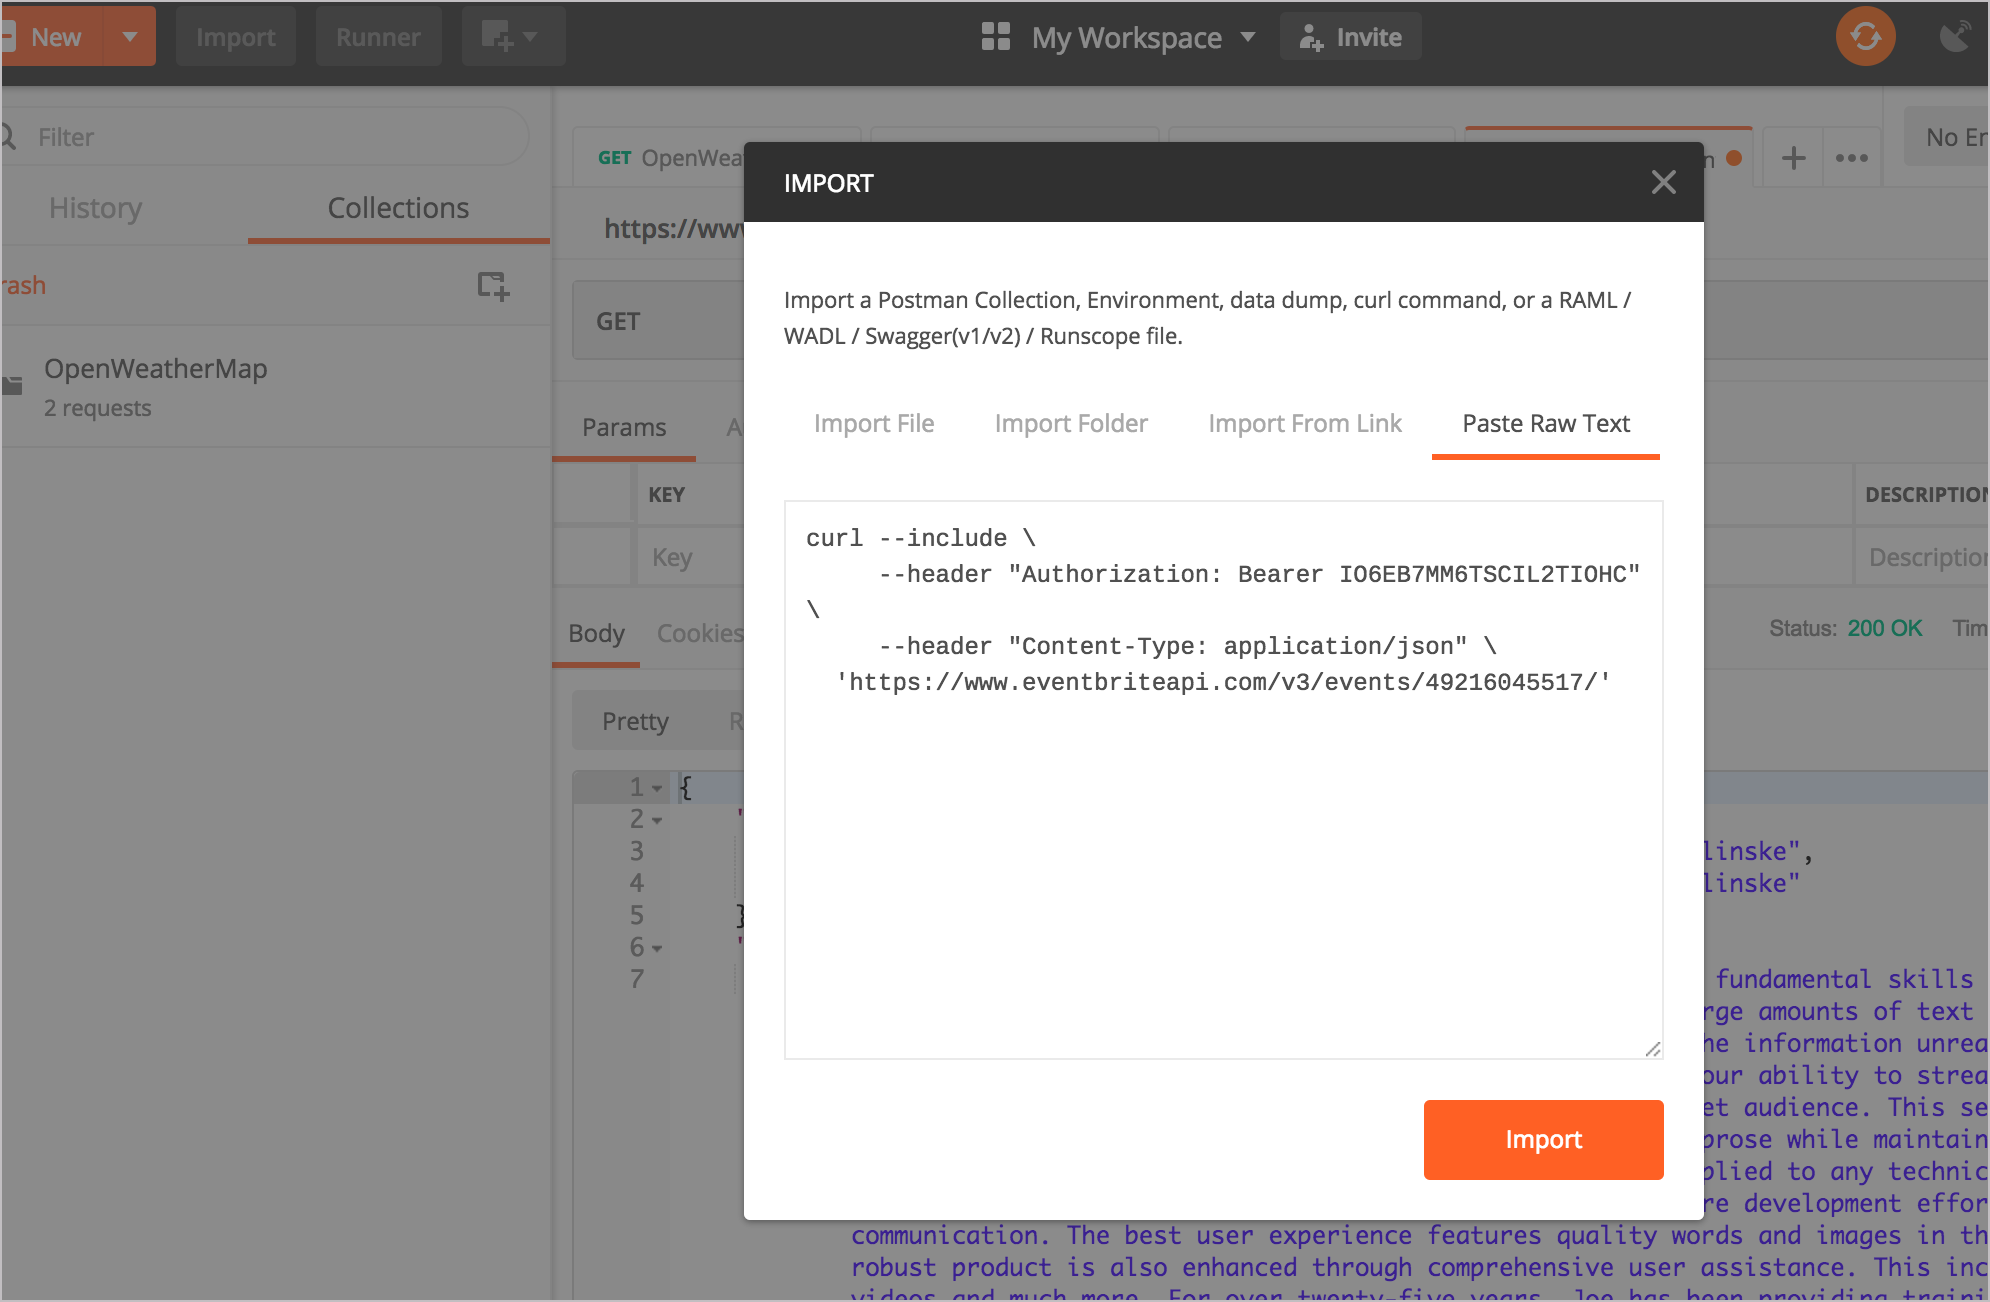
Then click Import. The information will populate in a new Postman tab. In Postman, if you expand the Headers tab, you will see the OAuth information. The GET box includes the Eventbrite retrieve endpoint with the event ID added as a path parameter.
In Postman, below the Send button, click Code. In the Generate Code Snippets dialog box, select JavaScript > Jquery AJAX. Copy the value shown:
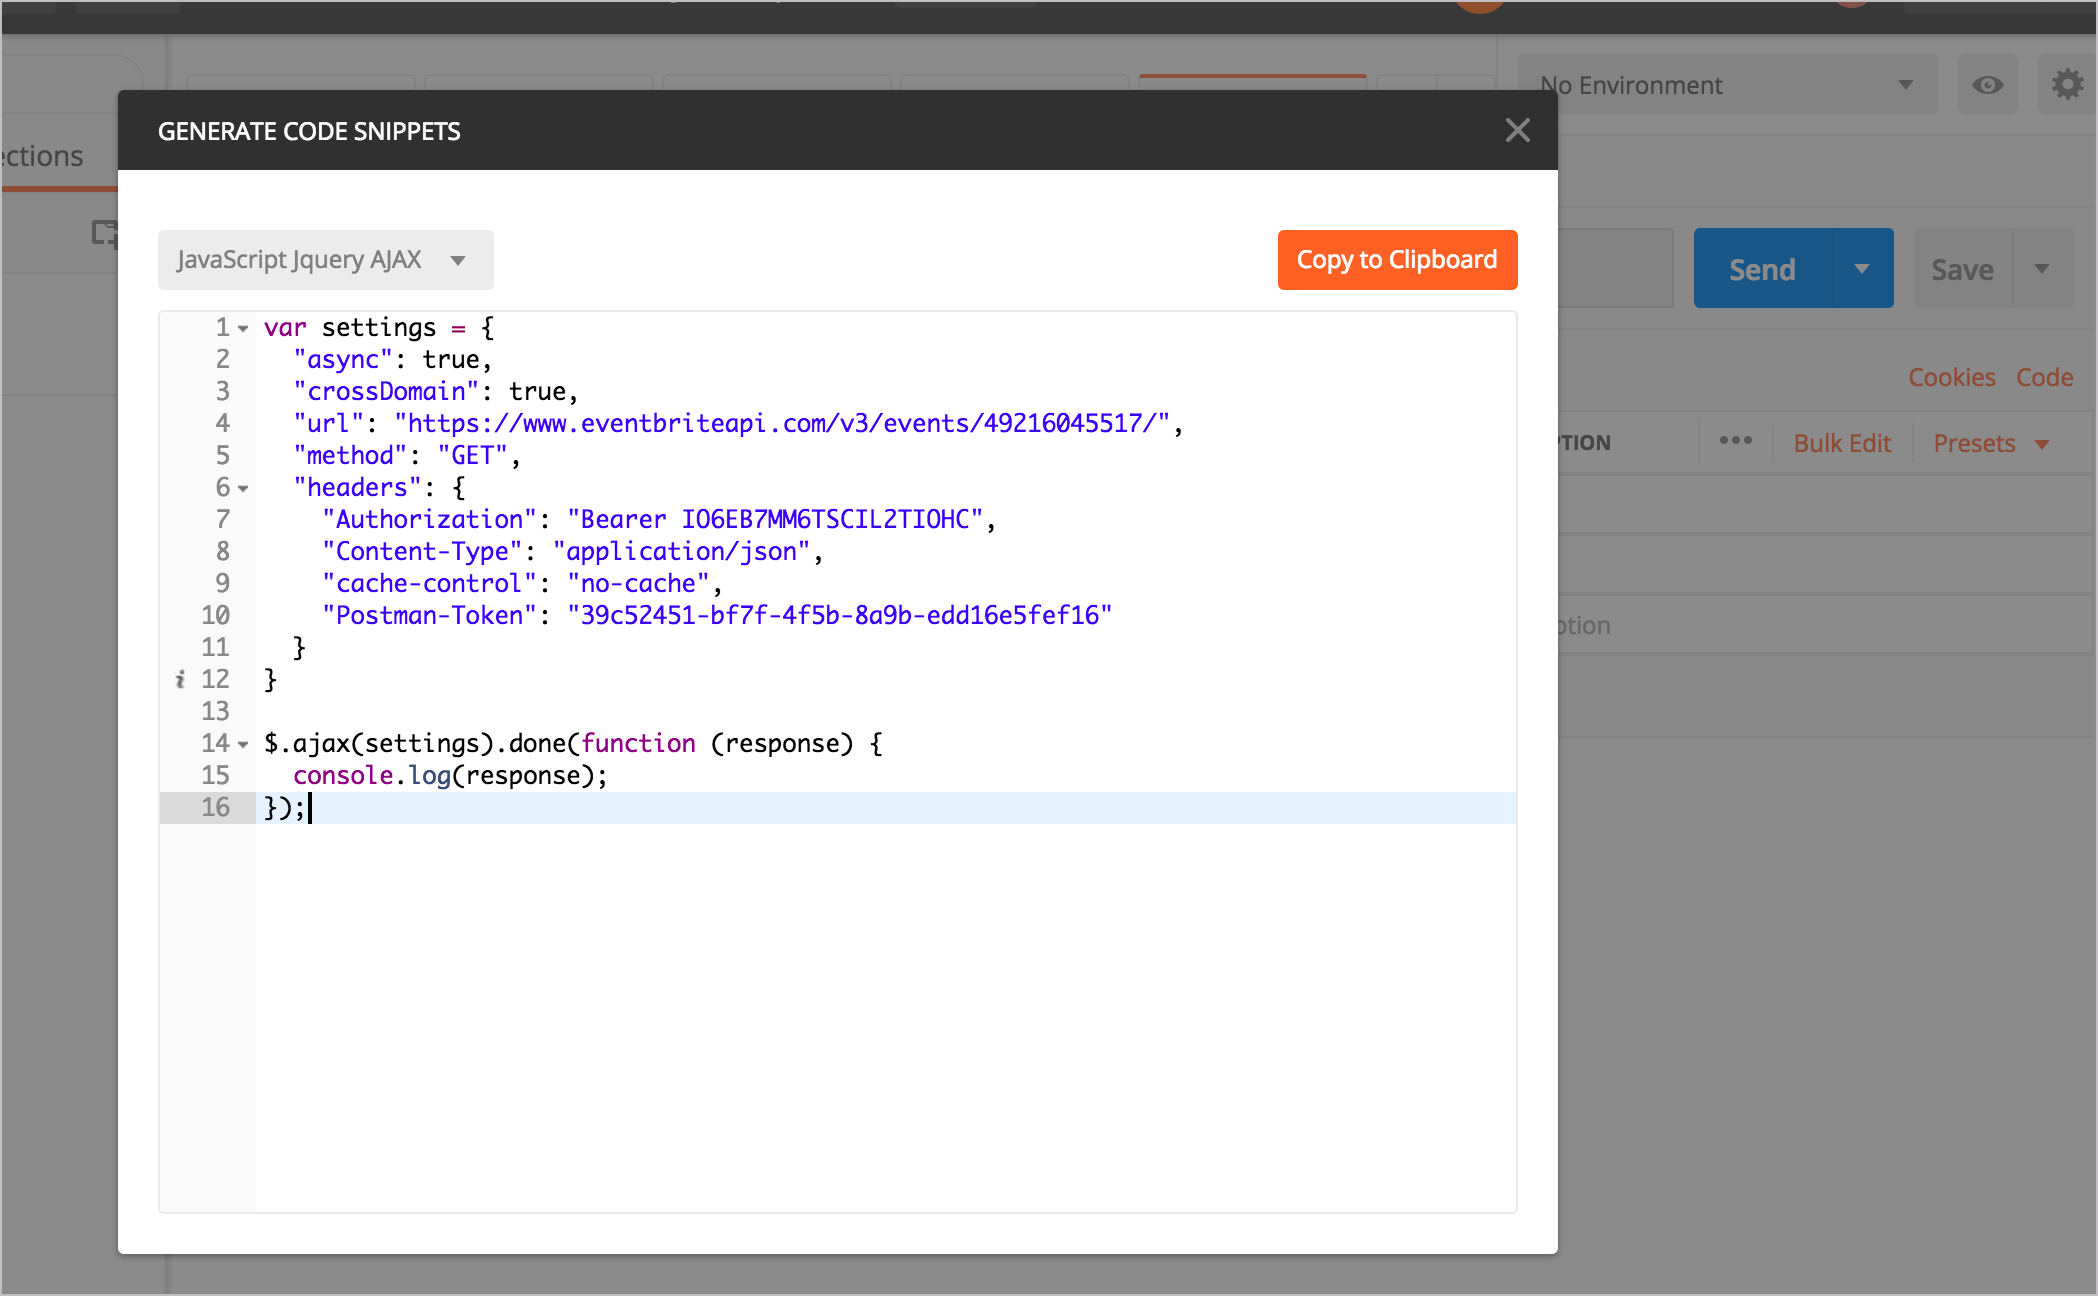
In the value, remove the cache-control and Postman-Token key-value pairs, so that your code sample looks like this:
var settings = {
  "async": true,
  "crossDomain": true,
  "url": "https://www.eventbriteapi.com/v3/events/49216045517/",
  "method": "GET",
  "headers": {
    "Authorization": "Bearer IO6EB7MM6TSCIL2TIOHC",
    "Content-Type": "application/json"
  }
}

$.ajax(settings).done(function (response) {
  console.log(response);
});
5. Customize the response on the page
The information returned from the event object has a lot more detail than we need. We just want to display the event’s title and description on our site. We’ll use the jQuery AJAX code copied from the earlier step to do this. Note that I won’t go into full detail about this code. I covered this AJAX call in more detail in some earlier tutorials:
- Inspect the JSON from the response payload
- Access and print a specific JSON value
- Dive into dot notation
To integrate the jQuery AJAX Postman code into your website and print the title and description fields in the response, use the following code:
<!DOCTYPE html>
<html>
<meta charset="UTF-8">

<script src="https://ajax.googleapis.com/ajax/libs/jquery/1.11.1/jquery.min.js"></script>

<script>
  var settings = {
    "async": true,
    "crossDomain": true,
    "url": "https://www.eventbriteapi.com/v3/events/49216045517/",
    "method": "GET",
    "headers": {
      "Authorization": "Bearer IO6EB7MM6TSCIL2TIOHC",
      "Content-Type": "application/json"
    }
  }

  $.ajax(settings).done(function (data) {
    console.log(data);
    var content = "<h2>" + data.name.text + "</h2>" + data.description.html;
    $("#eventbrite").append(content);
  });
</script>

<div id="eventbrite"></div>

</body>
</html>
Here’s the result:
Code explanation
The sample implementation is as plain as it can be concerning style. But with API documentation code examples, you want to keep code examples simple. In fact, you most likely don’t need a demo at all. Simply showing the payload returned in the browser is sufficient for a UI developer. However, for testing it’s fun to make content actually appear on the page.
In a nutshell, here’s what’s going on. The ajax method from jQuery gets a payload for an endpoint URL and then assigns it to the data argument. We optionally log data to the console to more easily inspect its payload. To pull out the various properties of the object, we use dot notation. data.name.text gets the text property from the name object, and data.description.html gets the body.
We then rename the content we want with a variable (var content) and use jQuery’s append method to assign the variable’s contents to a specific tag (eventbrite) on the page.
About Tom Johnson

I'm an API technical writer based in the Seattle area. On this blog, I write about topics related to technical writing and communication — such as software documentation, API documentation, AI, information architecture, content strategy, writing processes, plain language, tech comm careers, and more. Check out my API documentation course if you're looking for more info about documenting APIs. Or see my posts on AI and AI course section for more on the latest in AI and tech comm.
If you're a technical writer and want to keep on top of the latest trends in the tech comm, be sure to subscribe to email updates below. You can also learn more about me or contact me. Finally, note that the opinions I express on my blog are my own points of view, not that of my employer.
160/168 pages complete. Only 8 more pages to go.