

Activity: Manage content in a GitHub wiki
In this tutorial, we’ll walk through a publishing workflow with one of the most common developer platforms: GitHub. When you create a repository on GitHub, the repository comes with a wiki that you can add pages to. This wiki can be convenient if your source code is stored on GitHub. Although GitHub might not be a platform where you publish your docs, understanding how to interact with it can be important for understanding version control.
Learning GitHub will allow you to become familiar with the version control workflows that are common with many docs-as-code tools. For this reason, I have a detailed tutorial for using GitHub in this course. Regardless of whether you use GitHub as a publishing tool, this tutorial will introduce you to Git workflows with content.
- About GitHub Wikis
- Limitations with GitHub wikis
- Install Git
- Set up automatic GitHub authentication
- Activity: Create a GitHub wiki and publish content on a sample page
- Activity: Clone your GitHub repo locally
- Activity: Push local changes to the remote
- Avoiding merge conflicts when editing online and locally
About GitHub Wikis
You could actually use the default GitHub wiki as your doc site. Here’s an example of the Basecamp API, which is housed on GitHub.
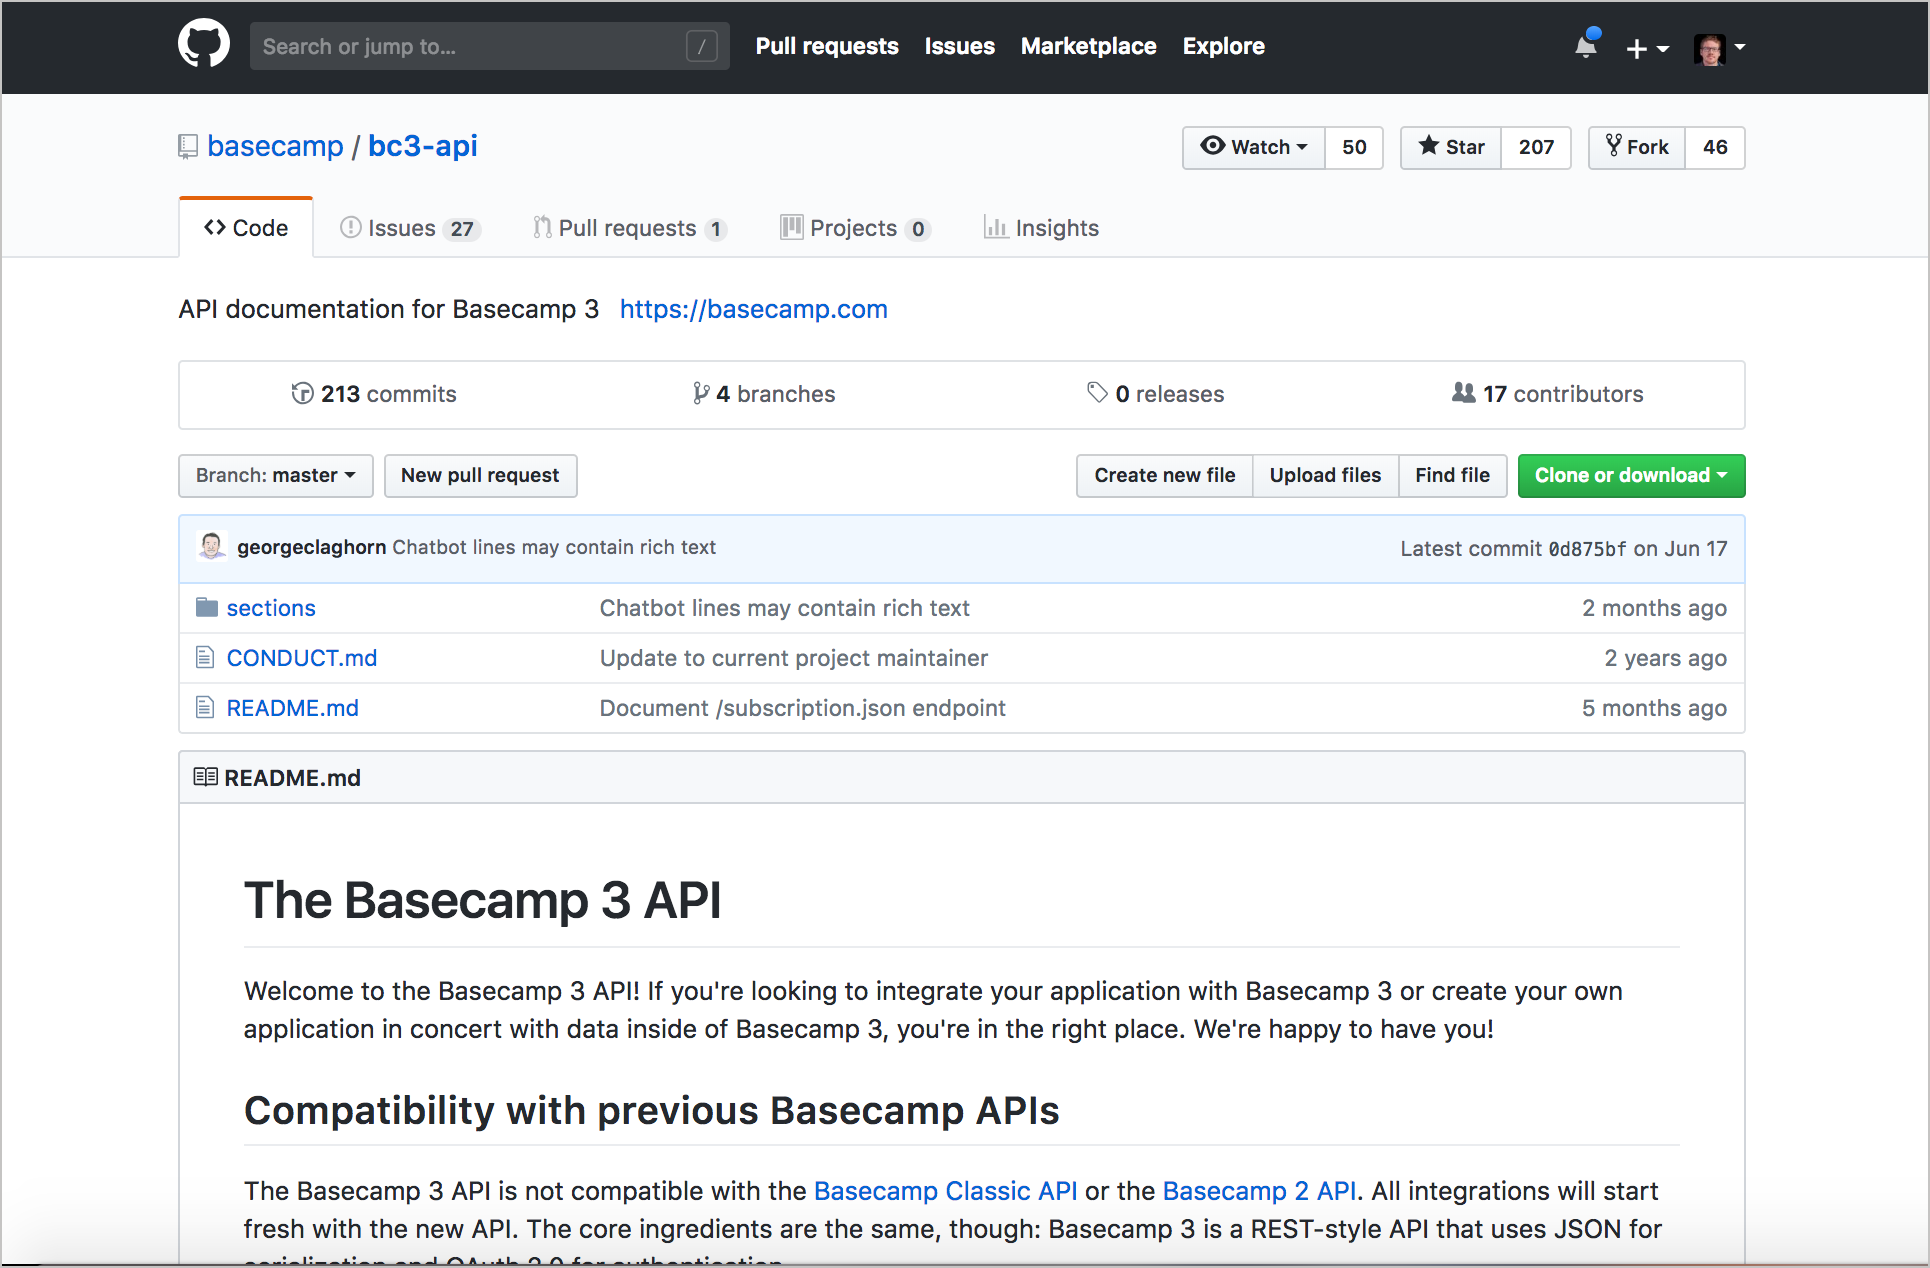
Unlike other wikis, the GitHub wiki you create is its own repository that you can clone and work on locally. (If you look at the “Clone this wiki locally” link, you’ll see that it’s a separate repo from your main code repository.) You can work on files locally and then commit them to the wiki repository when you’re ready to publish. You can also arrange the wiki pages into a sidebar.
With GitHub, you write wiki pages in Markdown syntax. There’s a special flavor of Markdown syntax for GitHub wikis called Github-flavored Markdown, or GFM. The GitHub Flavored Markdown allows you to create tables, add classes to code blocks (for proper syntax highlighting), and more.
Because you can work with the wiki files locally, you can leverage other tools (such as static site generators, or even DITA) to generate the Markdown files if desired. Working locally, you can handle all the re-use, conditional filtering, and other logic outside of the GitHub wiki. You can then output your content as Markdown files and commit them to your GitHub repository.
Use Git only to track text files. Don’t start tracking large binary files, such as audio files, video files, Microsoft Word files, or Adobe PDF files. Version control systems really can’t handle that kind of format well, and your repo size will increase exponentially. If you use Git to manage your documentation, exclude these files through your .gitignore file. You might also consider excluding images, as they bloat your repo size as well.
Limitations with GitHub wikis
GitHub wikis have some limitations:
- Limited branding. All GitHub wikis pretty much look the same.
- Open access on the web. If your docs need to be private, GitHub probably isn’t the place to store them (private repos, however, are an option).
- No structure. The GitHub wiki pages give you a blank page and allow you to add sections. You won’t be able to do any advanced styling or more attractive-looking interactive features.
I’m specifically talking about the built-in wiki feature with GitHub, not GitHub Pages. You can use tools such as Jekyll to brand and auto-build your content with whatever look and feel you want. I explore GitHub Pages with more depth in the tutorial on Jekyll.
Install Git
Before you start working with GitHub, you need to set up Git and install any necessary tools and credentials to work with GitHub (especially if you’re on Windows).
Mac:
To install Git on a Mac, see Installing on Mac. Once installed, you can use Git in several ways:
- Open the default Terminal application by doing to Applications > Utilities > Terminal.
- Install iTerm, a separate terminal app.
- Use PlatformIO IDE Terminal in Atom (this is my preferred method when working with projects).
Windows:
On Windows, install Git using the installer here: Git for Windows.
This installer includes a Git BASH terminal emulator that will allow you to use Git and Unix commands from the terminal.
You can check to see if you have Git already installed by opening a terminal and typing the following:
git --version
Set up automatic GitHub authentication
You can configure Git so that when you push changes to GitHub, you won’t need to type your username and password each time. See the following topics to set this up:
- Set up Git.
- Generating a new SSH key and adding it to the ssh-agent
- Adding a new SSH key to your GitHub account
- Associating text editors with Git
After you make these configurations, close and re-open your terminal.
GitHub and Git are not the same. Git provides distributed version control. GitHub is a platform that helps you manage Git projects. GitHub also provides a GUI interface that allows you to execute a lot of Git commands, such as pull requests.
Activity: Create a GitHub wiki and publish content on a sample page
In this section, you will create a new GitHub repo and publish a sample file there.
- Create a GitHub account at GitHub.com.
-
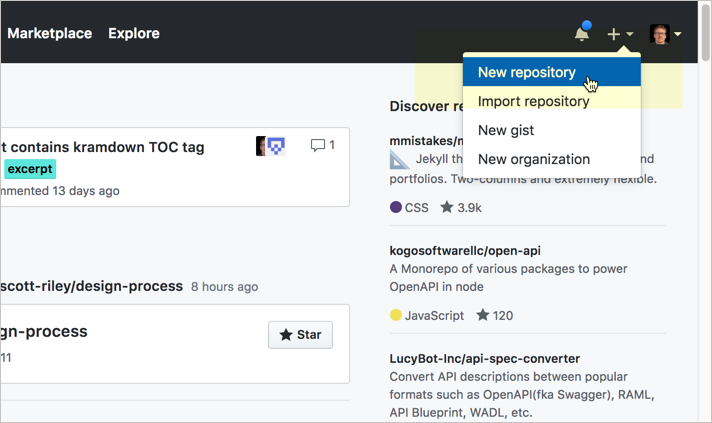
Go to GitHub and sign in. After you’re signed in, click the + button in the upper-right corner and select New repository.
Creating a new GitHub repository - Give the repo a Repository name, a short Description, select Public, select Initialize the repo with a README, and then click Create repository. (Don’t worry about selecting the license or gitignore settings for this activity.)
- Click the Wiki tab on the top navigation bar of your new repository.
- Click Create the first page.
- In the default page (“Home”), insert your own sample documentation content, preferably using Markdown syntax. Or grab the sample Markdown page of a fake endpoint called surfreport here and insert it into the page.
- In the Edit message box, type a description of what you updated (your commit message).
- Click Save Page.
Notice how GitHub automatically converts the Markdown syntax into HTML and styles it in a readable way. You could work with this GitHub wiki entirely in the browser as a way for multiple people to collaborate and edit content. However, unlike other wikis, with GitHub you can also take all the content offline and edit locally, and then commit your changes and push the changes back online.
Activity: Clone your GitHub repo locally
So far you’ve been working with GitHub in the browser. Now we’ll take the same content and work with it locally. This is what makes the GitHub wiki unique from other wikis — it’s a Git repo, so you can manipulate the content the same way as any other Git repo (working locally, pushing, pulling, merging, branching, etc.).
To clone the GitHub repo locally:
- If you don’t already have Git installed, set it up on your computer. (You can check whether Git is installed by typing
git --versionin your terminal or command prompt. See Install Git for more information on installation.) -
While viewing your the GitHub wiki in your browser, look for the section that says Clone this wiki locally (highlighted below). Click the clipboard button. (This copies the clone URL to your clipboard.)
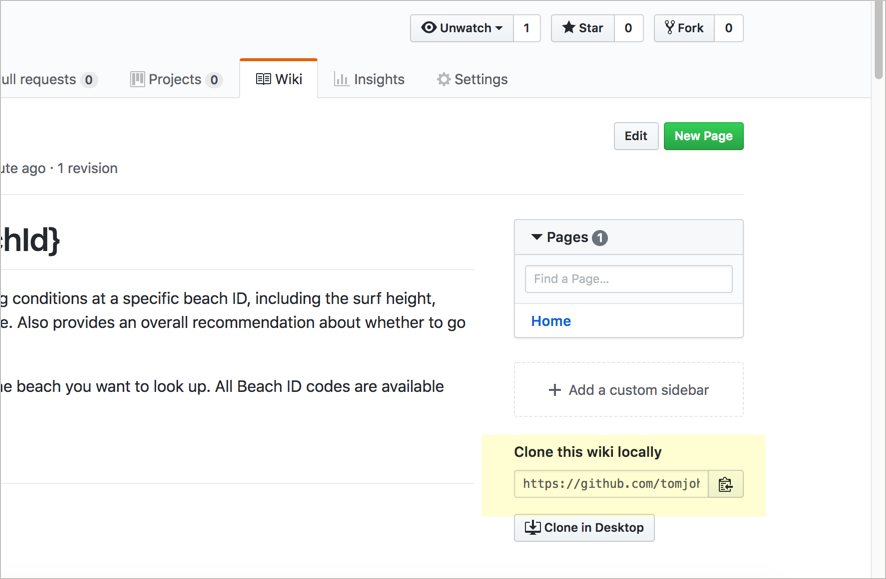
Clone this wiki locally The wiki is a separate clone URL than the project’s repository. Make sure you’re viewing your wiki and not your project. The clone URL will include
.wiki.In contrast to the “Clone this wiki locally” section, the “Clone in Desktop” button launches the GitHub Desktop client and allows you to manage the repository and your modified files, commits, pushes, and pull through the GitHub Desktop client. If you’re interested in using the GitHub Client of the command line, see this other activity: Activity: Use the GitHub Desktop client.
-
Open your terminal emulator:
- If you’re a Windows user, open the Git BASH terminal emulator, which was installed when you installed Git.
- If you’re a Mac user, go to Applications > Utilities > Terminal (or launch iTerm, if you installed it instead).
- In your terminal, either use the default directory or browse (
cd) to a directory where you want to download your repository. -
Type the following, but replace the git URL with your own git URL that you copied earlier (it should be on your clipboard). The command should look something like this:
git clone https://github.com/tomjoht/weatherapi.wiki.gitWhen you clone a repo, Git will show something like the following:
Cloning into 'weatherapi.wiki'...
remote: Enumerating objects: 3, done.
remote: Counting objects: 100% (3/3), done.
remote: Compressing objects: 100% (2/2), done.
remote: Total 9 (delta 0), reused 0 (delta 0), pack-reused 6
Unpacking objects: 100% (9/9), done.
The folder Git creates in the above example is called
weatherapi.wiki.Cloning the wiki gives you a copy of the content on your local machine. Git is distributed version control software, so everyone has their own copy. When you clone the repo, you create a copy on your local machine; the version in the cloud on GitHub is referred to as “origin.” Thus, you have two instances of the content.
More than just copying the files, though, when you clone a repo, you initialize Git in the folder where you clone the repo. Initializing Git means Git will create an invisible Git folder in that directory, and Git can start tracking your edits to the files, providing version control. With Git initialized, you can run
pullcommands to get updates from the online repository (origin) pulled down to your local copy. You can alsocommityour changes and thenpushyour changes back up to origin. -
Navigate to the directory where you cloned the repo (either using standard ways of browsing for files on your computer or via the terminal with
cd) to see the files you downloaded. For example, typecd weatherapi.wikiand thenls(Mac) ordir(Windows) to see the files.You don’t need to type the full directory name. Just start typing the first few letters and then press your Tab key to autocomplete the rest.
You might also want to browse to this folder via Finder (Mac) or Explorer (Windows). The folder also continas an invisible folder called
.git. For instructions on making hidden files visible, see one of the following: Windows or Mac).
Activity: Push local changes to the remote
- In a text editor, open the Markdown file you downloaded in the GitHub repository.
- Make a small change to the content and save it. For example, type your name below the page title.
-
In your terminal, make sure you’re in the directory where you downloaded the GitHub project.
To look at the directories under your current path, type
ls(Mac) ordir(Windows). Then usecd {directory name}to drill into the folder, orcd ../to move up a level. -
See what files have changed:
git statusGit shows the files it’s tracking but which haven’t been added to the commit’s staging area:
Changes not staged for commit: (use "git add <file>..." to update what will be committed) (use "git checkout -- <file>..." to discard changes in working directory) modified: Home.md -
Type
git add .to add all the files to your staging area. The staging area contains all files that you want added to your next commit:git add .Git doesn’t automatically track all files in the same folder where Git has been initialized. Git tracks modifications only for the files that have been “added” to Git. By typing
git add .orgit add --all, you’re telling Git to start tracking modifications to all files in this directory. You could also type a specific file name here instead, such asgit add Home.md, to just add a specific file (rather than all files changed) to Git’s tracking.After you run the
git addcommand, Git adds the files into what’s called the staging area. These files will be committed when you rungit commit. -
See the changes set in your staging area:
git statusGit responds with a message indicating which files are on-deck to be committed.
Changes to be committed:
(use "git reset HEAD <file>..." to unstage)

    modified:   Home.md
The staging area lists all the files that have been added to Git that you have modified in some way. It’s a good practice to always type
git statusbefore committing files because you might realize that you accidentally added some files you didn’t intend to track (such as large binary files). If you want to remove this file from the staging area, you can typegit reset HEAD Home.mdto unstage it. -
Commit the changes:
git commit -m "updated some content"When you commit the changes, you’re creating a snapshot of the files at a specific point in time for versioning.
The
git commit -mcommand is a shortcut for committing and typing a commit message in the same step. It’s much easier to commit updates this way.If you type
git commitonly, you’ll be prompted with another window to describe the change. On Windows, this new window will probably be a Notepad window. Describe the change on the top line, and then save and close the Windows file.On a Mac, a new window doesn’t open. Instead, the Vim editor mode opens up within the terminal. (“vi” stands for visual and “m” for mode, but it’s not a very visual editor.) I don’t recommend using Vim. If you get stuck in this mode and need to escape, press your Escape key. Then type q to quit. (See Vim commands here.) Normally, you want an external editor such as Sublime Text to open from your terminal. See Associating text editors with Git for details.
-
Push the changes to your repository:
git pushUnless you set up automatic GitHub authentication, you will be prompted for your GitHub username and password. (Note that your username is your GitHub login ID, such as “jdoe,” not your friendly name, such as “John Doe.”)
When you type
git pushorgit pulland don’t specify the branch, GitHub uses the default branch from origin. The default branch on GitHub is calledmain. Thus the command actually passed isgit push origin main(which means “push these changes to the remote origin[al] repository, in themainbranch”). Some developers prefer to specify the repository and branch to ensure they are interacting with the right repositories and branches.Your terminal window probably looks something like this:
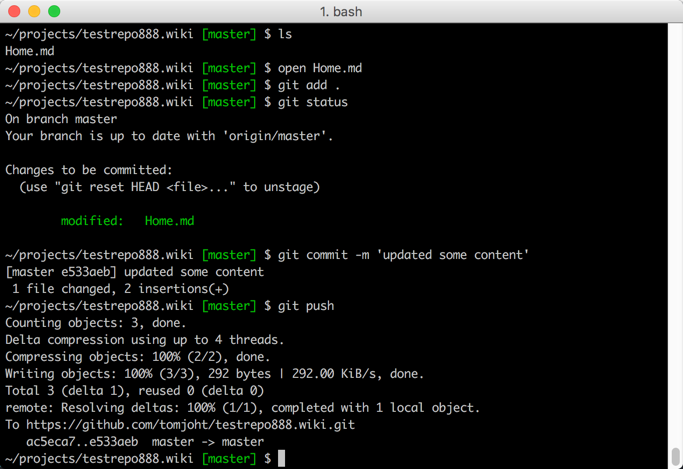
Terminal window with git commands - Now verify that your changes took effect. Browse to your GitHub wiki repository, refresh the page, and look to see the changes.
Although there are many options for authoring and publishing tools with developer docs (see staticgen.com for common docs-as-code tools), at the core of these tools is usually a Git workflow. The Git workflow can be more powerful and complex than any authoring tool. Interacting with Git might also be key for interacting with engineering repos to make edits to documentation that appears inside code.
Avoiding merge conflicts when editing online and locally
The visual editor on GitHub.com might be an easy way for subject matter experts to contribute, whereas tech writers will probably want to clone the repo and work locally. If some people make edits in the browser while others edit locally, you might encounter merge conflicts. To avoid merge conflicts, always run git pull before running git push. If two people edit the same content simultaneously between commits, you will likely need to resolve merge conflicts.
About Tom Johnson

I'm an API technical writer based in the Seattle area. On this blog, I write about topics related to technical writing and communication — such as software documentation, API documentation, AI, information architecture, content strategy, writing processes, plain language, tech comm careers, and more. Check out my API documentation course if you're looking for more info about documenting APIs. Or see my posts on AI and AI course section for more on the latest in AI and tech comm.
If you're a technical writer and want to keep on top of the latest trends in the tech comm, be sure to subscribe to email updates below. You can also learn more about me or contact me. Finally, note that the opinions I express on my blog are my own points of view, not that of my employer.
109/168 pages complete. Only 59 more pages to go.