

Inspect the JSON from the response payload
Seeing the response from curl or Postman is cool, but how do you make use of the JSON data? With most API documentation, you don’t need to show how to make use of JSON data. You assume that developers will use their front-end development skills to parse through the data and display it appropriately in their apps. However, to better understand how developers will access the data, we’ll go through a brief tutorial to display the REST response on a web page.
- Activity: Make an API request on a web page
- The AJAX method from jQuery
- Logging responses to the console
- Inspect the payload
Activity: Make an API request on a web page
For this activity, you’ll use JavaScript to display the API response on a web page. Specifically, you’ll use some auto-generated jQuery code from Postman to create the AJAX request. You’ll get the wind speed from the response and print it to the page.
-
In an editor such as Sublime Text, create a new HTML file called
weather.htmland insert the following boilerplate code:<html> <meta charset="UTF-8"> <head> <title>Sample page</title> <script src="https://ajax.googleapis.com/ajax/libs/jquery/1.11.1/jquery.min.js"></script> <script> POSTMAN CODE GOES HERE </script> </head> <body> <h1>Sample Page</h1> </body> </html> - Assuming you completed the exercises in the Postman tutorial to configure a request, go back into Postman.
-
In Postman, click the Code link (below the Save button) and go to JavaScript - jQuery:
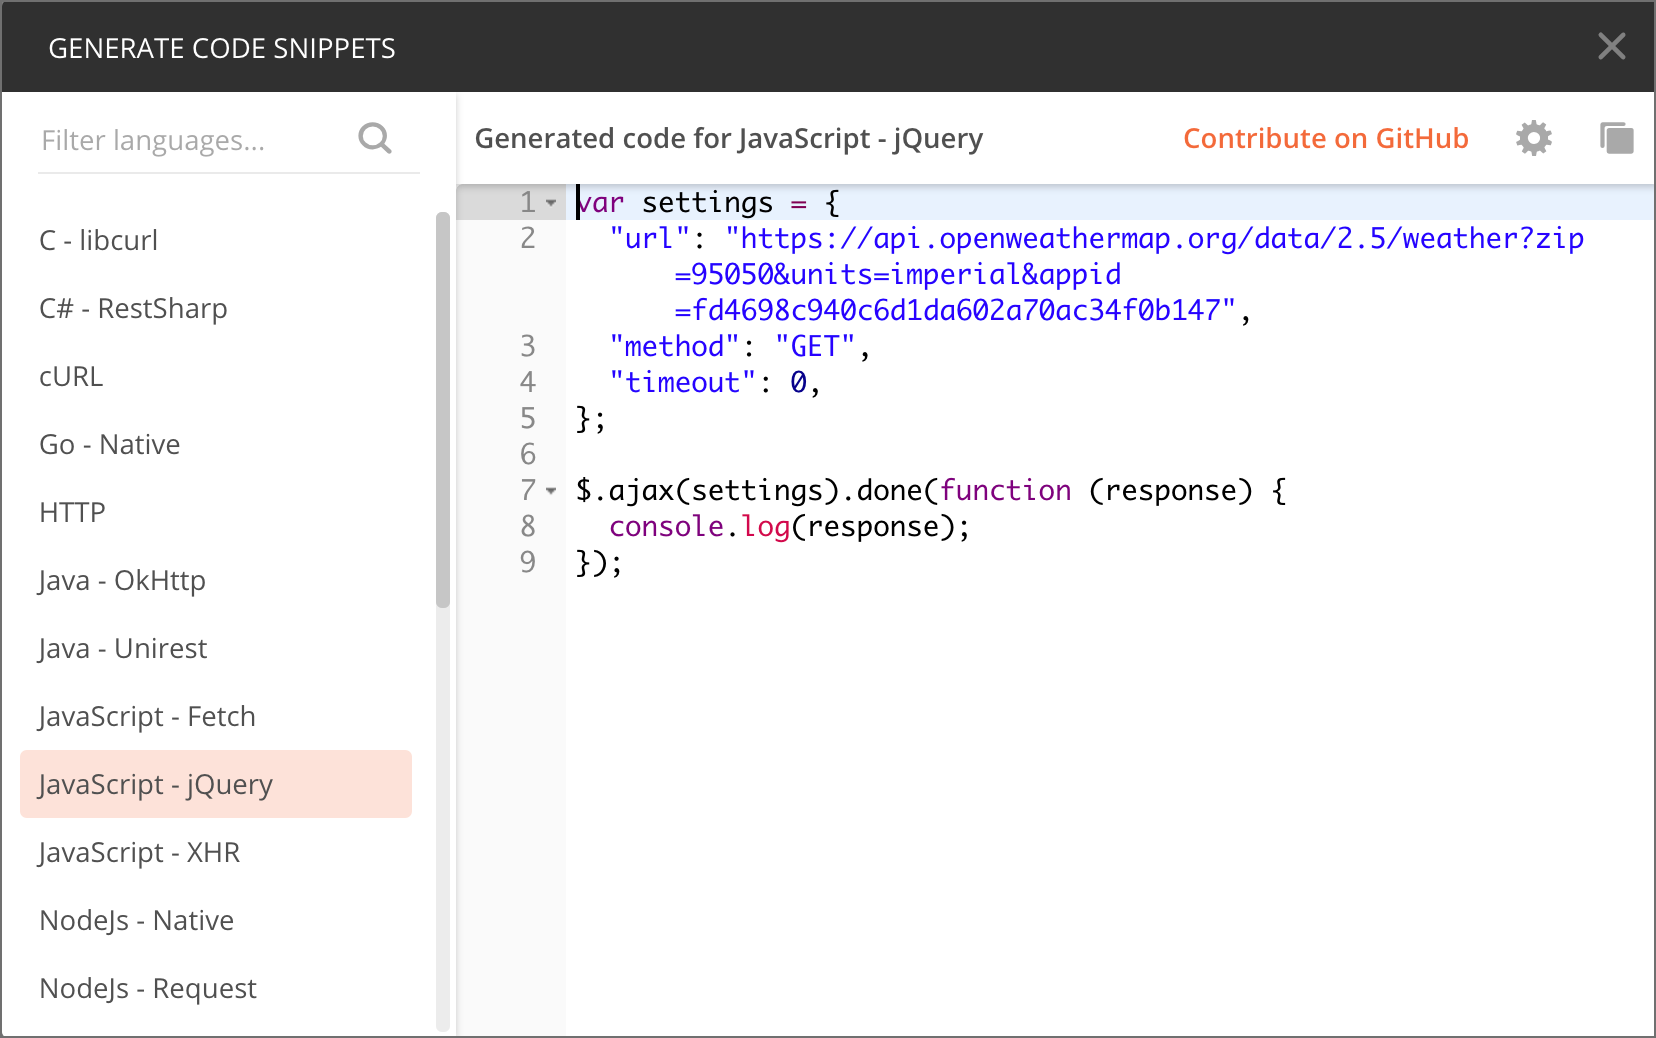
Copying JavaScript code from Postman - Copy the Postman code above and insert it into the
POSTMAN CODE GOES HEREplace in yourweather.htmlfile. -
Directly below
console.log(response);, add these two lines:var content = response.wind.speed; $("#windSpeed").append(content); -
Your final code should look as follows:
<html>
   <meta charset="UTF-8">
   <head>
      <title>Sample page</title>
      <script src="https://ajax.googleapis.com/ajax/libs/jquery/1.11.1/jquery.min.js"></script>
      <script>
      var settings = {
        "url": "https://api.openweathermap.org/data/2.5/weather?zip=95050&units=imperial&appid=APIKEY",
        "method": "GET",
        "timeout": 0,
      };

      $.ajax(settings).done(function (response) {
        console.log(response);
        var content = response.wind.speed;
        $("#windSpeed").append(content);
      });

      </script>
   </head>
  <body>
     <h1>Sample Page</h1>
     wind speed: <span id="windSpeed"></span>
  </body>
</html>
(In the above code, replace
APIKEYwith your actual API key.)What is this code doing? In a nutshell, when
ajax(a jQuery function) retrieves the response from the API, it assigns the response toresponse. A variable calledcontentis created and set it equal toresponse.wind.speed(dot notation is used to access this value). jQuery’sappendmethod insertscontentafter an element called#windSpeedon the page. (I realize this is an extremely abbreviated explanation, but explaining JavaScript is beyond the scope of this course. In general, you can learn more by reading about the jQuery.ajax() function.) -
Start Chrome and open the JavaScript Console.
To open the JavaScript Console, on Chrome on a Mac, go to View > Developer > Javascript Console; on Windows, click the menu button (vertical ellipses) and go to More tools > Developer tools. Then click the Console tab.
-
In Chrome, press Cmd+O (Mac) or Ctrl + O (Windows) and select your
weather.htmlfile.The weather response should be logged to the JavaScript Console (due to the
console.log(response)code in the request). If you expand the object returned to the console, it will look as follows: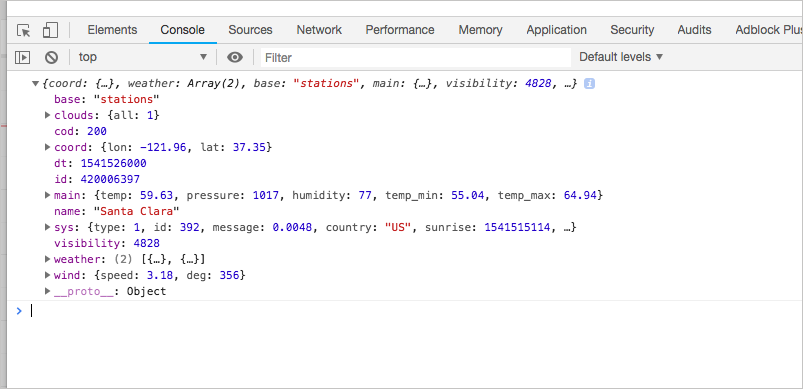
You can view the file here: weather-plain.html.
The AJAX method from jQuery
In this section, I’ll explain a bit more about the ajax function you used earlier. This information probably isn’t essential for documenting REST APIs, but it’s good to understand. In the code, here’s the ajax script:
<script>
   var settings = {
     "async": true,
     "crossDomain": true,
     "url": "https://api.openweathermap.org/data/2.5/weather?zip=95050&appid=APIKEY&units=imperial",
     "method": "GET"
   }

   $.ajax(settings).done(function (response) {
     console.log(response);
   });
</script>
(In the above code, replace APIKEY with your actual API key.)
If you’re working with JavaScript and APIs, the ajax method from jQuery can be helpful with code samples. This ajax method takes one argument: settings.
$.ajax(settings)
The settings argument is an object that contains a variety of key-value pairs.
var settings = {
}
Each of the allowed key-value pairs is defined in jQuery’s ajax documentation.
Some important values are the url, which is the URI or endpoint you are submitting the request to. Another value is headers, which allows you to include custom headers in the request.
Look at the code sample you created. The settings variable is passed in as the argument to the ajax method. jQuery makes the request to the HTTP URL asynchronously, which means it won’t hang up your computer while you wait for the response. You can continue using your application while the request executes.
You get the response by calling the method done.
$.ajax(settings).done(function (response) {
})
In the earlier code sample, done contains an anonymous function (a function without a name) that executes when done is called. The response object from the ajax call is assigned to the done method’s argument, which in this case is response. (You can name the argument whatever you want.)
You can then access the values from the response object using object notation. In this example, the response is just logged to the console.
If you’re new to JavaScript, this is likely a bit fuzzy right now. If so, don’t worry — code becomes clearer the more you use it.
Notice how difficult it is to explain code? This is one of the challenges of developer documentation. Fortunately, you wouldn’t need to explain much from standard programming languages like JavaScript. But you might need to explain how to work with your API in different languages. I cover this topic in more depth in Code samples and tutorials.
Logging responses to the console
The line of code that logged the response to the console was simply this:
console.log(response);
Logging responses to the console can be a useful way to test whether an API response is working (it’s also helpful for debugging or troubleshooting your code). The console collapses each object inside an expandable section. You can inspect the payload in the console to see if contains the values you expect (without printing values to the page).
Inspect the payload
Inspect the payload by expanding each of the sections returned in the JSON console object. Based on the information here, what’s the forecast for today?
I realize the page is blank and unexciting. In the next section, Access and print a specific JSON value, we’ll pull out some values and print them to the page.
About Tom Johnson

I'm an API technical writer based in the Seattle area. On this blog, I write about topics related to technical writing and communication — such as software documentation, API documentation, AI, information architecture, content strategy, writing processes, plain language, tech comm careers, and more. Check out my API documentation course if you're looking for more info about documenting APIs. Or see my posts on AI and AI course section for more on the latest in AI and tech comm.
If you're a technical writer and want to keep on top of the latest trends in the tech comm, be sure to subscribe to email updates below. You can also learn more about me or contact me. Finally, note that the opinions I express on my blog are my own points of view, not that of my employer.
23/168 pages complete. Only 145 more pages to go.