WordPress Tip: How to Transfer WordPress to a New Web Host
When you transfer WordPress from one web host to another, you have to go through quite a few steps, especially if your current web host owns the domain name. Transferring the domain name is the biggest hassle, because it requires a handful of special codes and verifications, but just understanding what's involved in a site transfer can be somewhat overwhelming. I just helped a person with Yahoo web hosting move to Bluehost, but there are also other dedicated managed hosting options available as well. I'll briefly outline the steps below in case you're thinking of moving to a new web host.
Set Up WordPress on Your New Host
- Identify the new host. Picking out a new host can be tough, but look for performance, support, and an easy interface, such as cPanel. To ensure good performance, make sure the web host doesn't overcrowd their servers (this slows down your site's loading time). For support, see if you can contact them at all hours of the day. That's why I like Bluehost so much -- at any time of the day or night I can get a hold of someone either by live chat or phone.Also look for a web host that offers an easy interface, such as cPanel, which gives you a standard interface for working with your content. If they don't offer cPanel, make sure you have access to a phpmyadmin and MySQL Databases tool. Finally, don't choose a Windows server or else you'll have index.php in almost every address of your blog (in addition to a file permissions issues). Most servers are Linux or Unix -- these work much better with WordPress.
- Make sure you have the web host login, the FTP username and password, and the temporary IP address of your new web host. This information should be in your welcome email when you sign up for a hosting plan. I think I spend half of my time with clients trying to figure this information out.
- Log into the cPanel of your new web host and install WordPress. You might use the easy Simple Scripts or Fantastico installers (available options in cPanel) to simplify the install. But even if you have to manually install WordPress, it only takes 5 minutes. You probably have to install WordPress in the primary domain for your account, e.g., ACME.com. But wait, you say, your ACME.com domain is pointing to your old web host (e.g., on Yahoo), so how will you access your new blog (e.g., on Blue Host) if the domain points to the wrong web host? Don't worry -- just install WordPress in the right domain (e.g., ACME.com). In the next step, you'll make an update to the blog's database settings to enable you to work with the blog at its temporary domain.
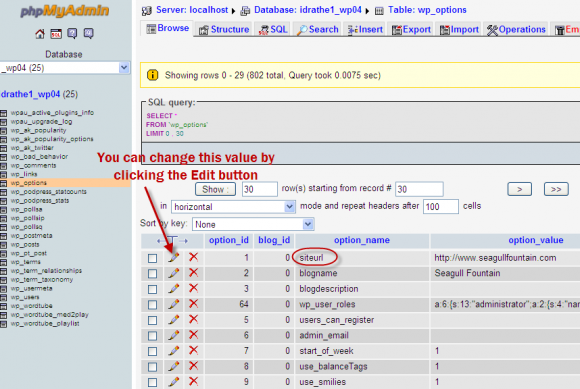
- After installing WordPress, go to cPanel on your new web host, log into phpmyadmin, select your database from the drop-down filter on the left, click wp_options in the list of tables in your database in the left column, click the Browse tab, and then change the siteurl and home values from http://ACME.com to http://yourIPaddress.com~directory -- where IPaddress~directory is your temporary URL of your new host (which they tell you when you sign up). To change the value, click the Edit button (pictured below), change the value, and then click the Go button at the bottom.

Change your domain in wp_options to your temporary domain so you can work with the site (By the way, you have to click the Next > arrow at the bottom of the screen to see the home value.) There are other ways to do this, but I think going into phpmyadmin is the easiest.

Export Your Content from the Old Blog
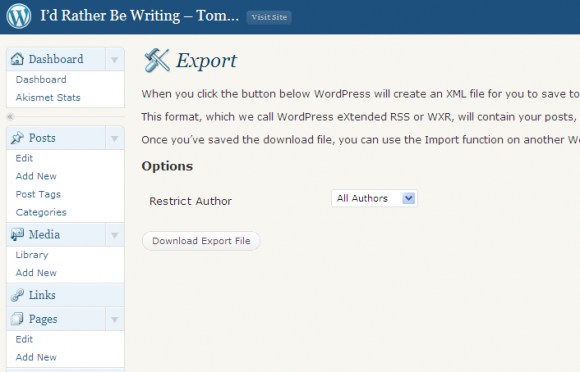
- Export your content from your old blog. You could export your entire MySQL database, but while you're starting fresh, why not start with a fresh database as well? Instead of exporting the entire database through phpmyadmin, go to Tools > Export within the WordPress Dashboard interface and export your content.
- FTP into your old web host and download your wp-content folder. This folder contains your theme, plugins, and all the image uploads for your posts. I recommend using Filezilla as an FTP client.

WordPress will generate an XML file containing all your pages, posts, and comments. This export purges you from any bad code that might be lingering in your database.
Note: You could also just export your MySQL database from phpmyadmin, but if you're transferring web hosts, you may have been experiencing issues with your old web host, either from attacks, slowness, quirks, or other issues. Those issues may have actually been inherent in your database rather than the web host. Additionally, your WordPress files may have certain file permissions set from that web host. I've found that it's just easier to start with a fresh database and install WordPress the way a particular web host wants it.
Import Your Content into Your New Blog
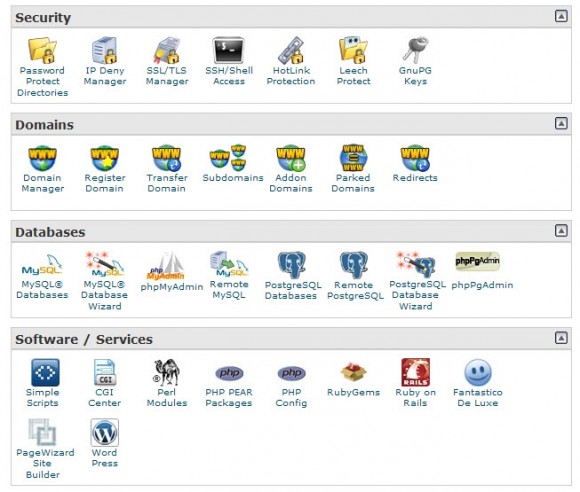
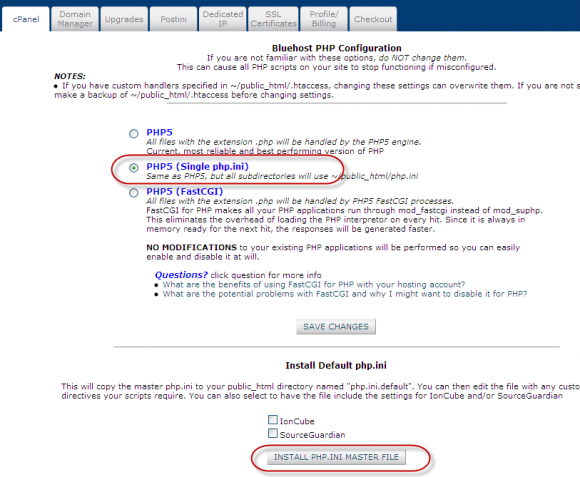
- Most likely your exported XML file is larger than 2 MB, so you have to adjust your PHP.ini file so that you can upload the XML file into your new blog. In cPanel, under the Software / Services section, click PHP Config and select PHP 5 (Single php.ini) file at the top. This will tell your server to use this same PHP for every directory on your host. Then click the INSTALL PHP.INI MASTER FILE button at the bottom.
- Go to your new blog using the temporary IP address/wp-admin. After you log in, go to Tools > Import and import the XML file containing your pages, posts, and comments.
- Upload the wp-content folder to your new host's web directory. (You can overwrite the new wp-content folder.)
- Reselect your theme from Appearance > Themes in your new blog.
- Go to Settings and reconfigure your basic blog settings, such as permalinks, comment approval, and other options.

This will create a php.ini.default file in your public_html folder. Using FTP, go into this /public_html directory, download the php.ini.default file, rename it to php.ini, and adjust upload values (search for the word "upload") to something greater than 2 MB. While you're in the php.ini file, increase the memory values as well.
Transfer Your Domain
- Life is sometimes easier if you manage your domain at your web host (rather than having a separate company manage the domain). If your domain was managed by your old web host, unlock your domain and disable privacy. If you just disabled privacy and made your contact information public, you may have to wait a few hours for the who-is database to update. (You can't transfer the domain while the contact information is private, because the winning registrar will need to send a verification to the administrative contact email, and if it's private, the email address is hidden.)
- Figure out what your authorization code is for the domain. Poke around the old web host's settings for this. If you can't find it, contact your old web host and ask them for it.
- In your new web host, in cPanel go to the Domain Manager and transfer the new domain to the web host. To transfer the domain, you'll need to the authorization code. The new registrar must also send an email to the contact admin address listed on the domain at your old web host. You'll grab this verification code at the contact admin email and use it to verify the transfer.
- There's one more step if you're trying to get out of Yahoo. Yahoo requires you to wait 5-9 days for the release of the domain name to the new registrar. You can try calling them to speed up the process, but they won't do anything.
- After the domain is released, wait 12 to 72 hours for the Internet servers around the world to receive information about the updated domain.
That's it. Seems like the process should be less painless, but it's not.
About Tom Johnson

I'm an API technical writer based in the Seattle area. On this blog, I write about topics related to technical writing and communication — such as software documentation, API documentation, AI, information architecture, content strategy, writing processes, plain language, tech comm careers, and more. Check out my API documentation course if you're looking for more info about documenting APIs. Or see my posts on AI and AI course section for more on the latest in AI and tech comm.
If you're a technical writer and want to keep on top of the latest trends in the tech comm, be sure to subscribe to email updates below. You can also learn more about me or contact me. Finally, note that the opinions I express on my blog are my own points of view, not that of my employer.

